To put products on sale in Shopify, copy each variant’s current price into Compare-at price, then lower its Price. Your theme can then show the original price crossed out beside the sale price.
You can update both fields in bulk with Shopify’s bulk editor or a CSV import. For a percentage discount, spreadsheet formulas can calculate the new prices. Shopify admin won’t schedule the change or put the original prices back when the sale ends, so keep a backup of the original values. A bulk pricing app can automate these changes and schedule the start and end.
This guide covers Shopify’s built-in methods first, then shows how to run a scheduled sale with Platmart Bulk Price Editor, the app I build.
A compare-at price is the “was” price of a product variant. Your theme can show it crossed out beside the selling price. Some themes also add a Sale badge or show the percentage saved. Your theme controls where these appear on your storefront; other sales channels control their own display. Customers pay the selling price without entering a discount code.
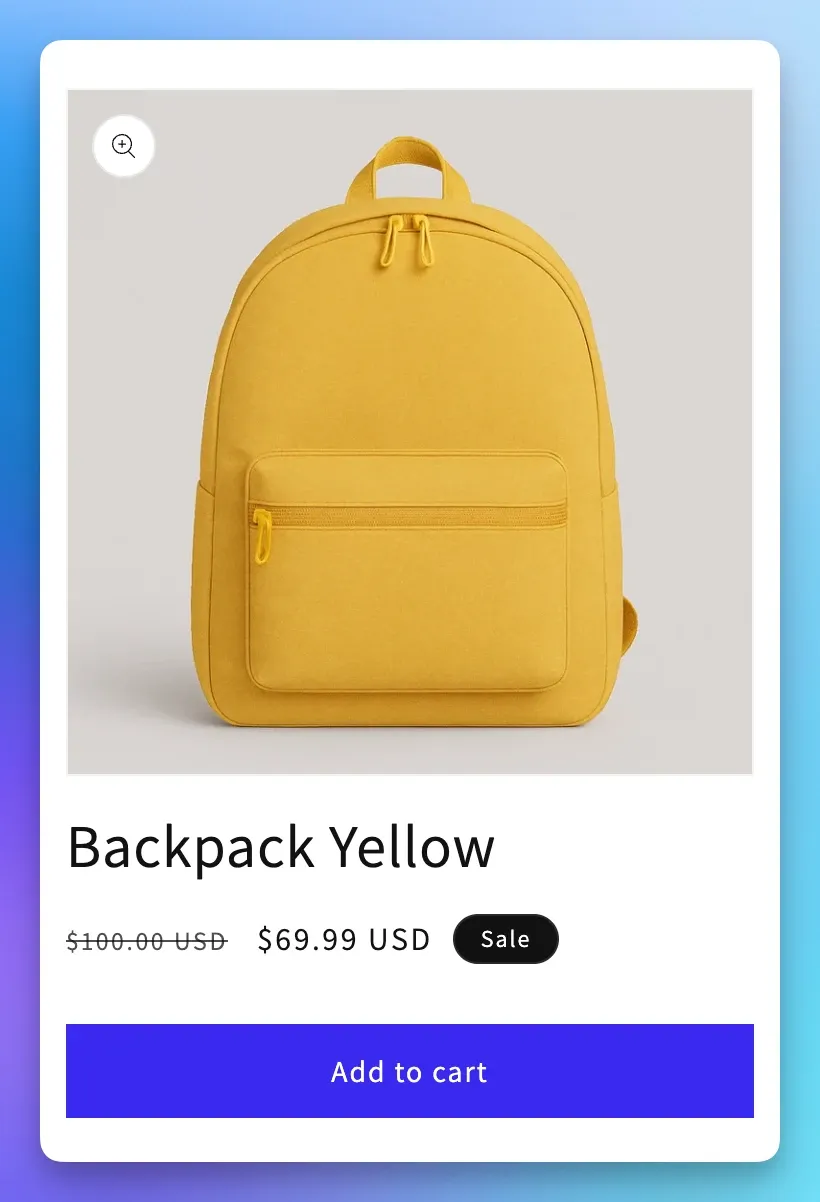
The compare-at price must be higher than the selling price to show a markdown. If it’s lower, equal, or empty, shoppers see only the selling price.
To set one on a single product, open it in Products and enter the sale price in Price. Expand Additional display prices, enter the original price in Compare-at price, and click Save.
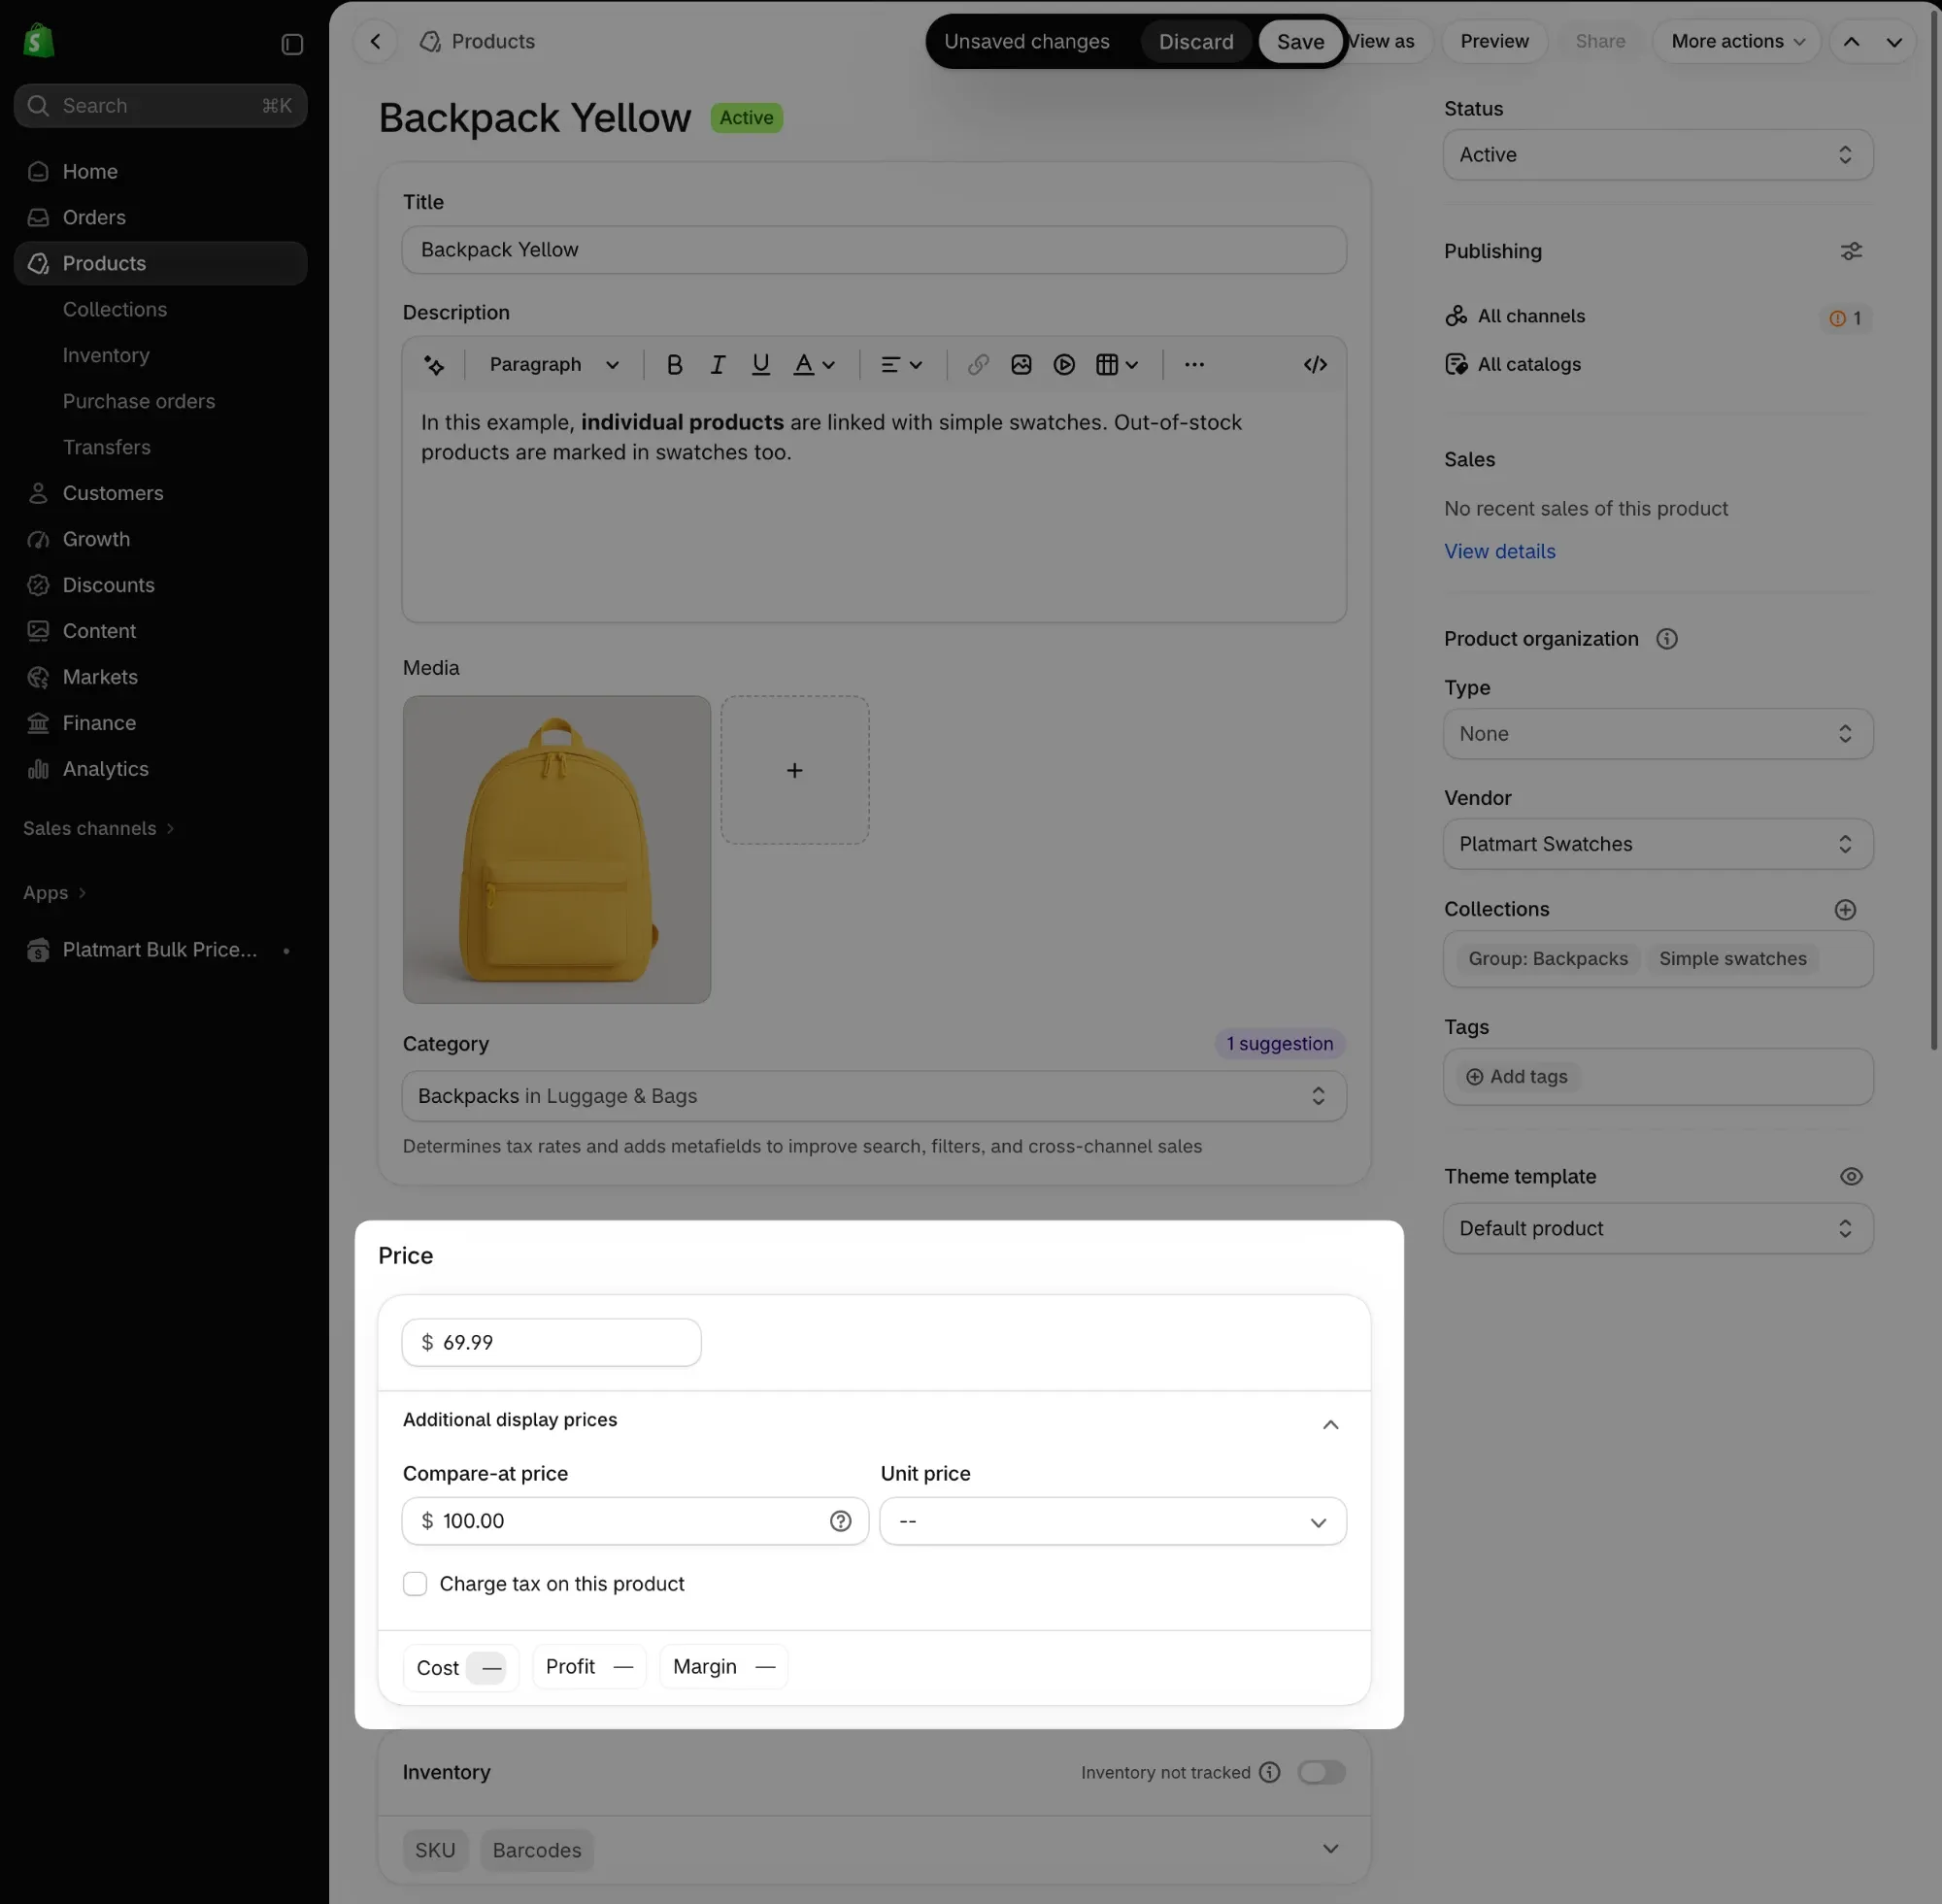
If the product has variants, repeat this process for each one.
Shopify has three ways to discount products: lower the price and show the old one as a compare-at price, create an automatic discount, or create a discount code. A sale price changes the product’s actual price, so most themes show the old price crossed out on product and collection pages. Discounts leave the price as it is and apply in the cart and at checkout, unless an app or custom theme code shows them earlier.
| Sale price + compare-at price | Automatic discount | Discount code | |
|---|---|---|---|
| Changes the product price | Yes | No | No |
| Where shoppers see the savings | Product and collection pages, in most themes | Cart and checkout, earlier with an app | Cart and checkout |
| What the customer does | Nothing | Nothing | Enters the code |
| Start and end dates | Only with an app | Yes | Yes |
| When the sale ends | Prices stay until you change them back | Stops on its own | Stops on its own |
| Buy X get Y, order minimums, free shipping | No | Yes | Yes |
My rule: if you want shoppers to notice the sale while they browse, use a sale price with a compare-at price. Use discounts for cart offers like “buy 2, get 1 free” or a code for your email list.
Shopify gives you three tools: the bulk editor for a few dozen variants, a CSV import for any number of products, and Shopify Launchpad if you’re on Shopify Plus.
Go to Products, select the products you want to change, and click Bulk edit. Add the Base price and Compare-at price columns, type a new value into each cell for every variant, and save.
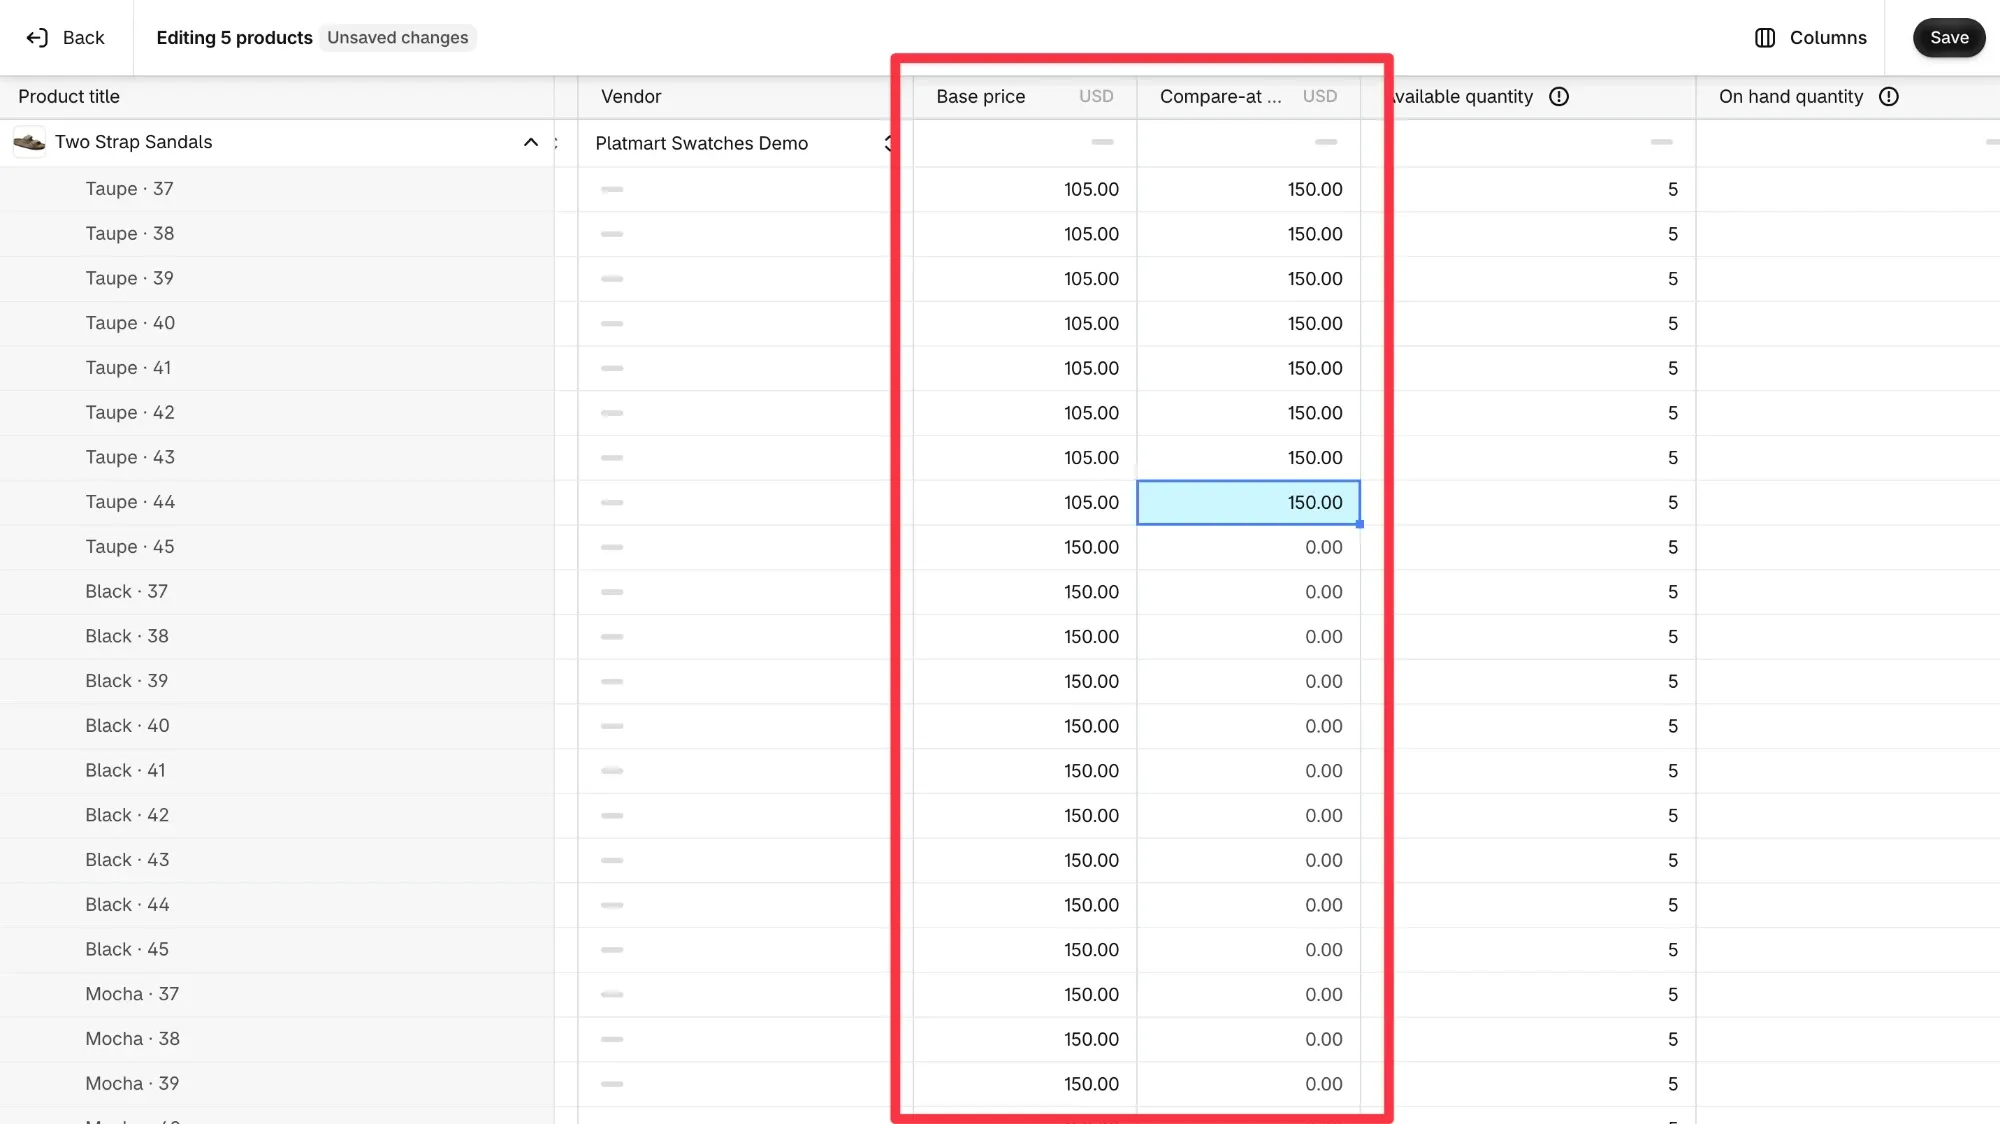
It has no formulas, so 30% off means calculating every price yourself. That’s fine for a few dozen variants. For bigger catalogs, you’re better off using a spreadsheet.
Nothing records the old prices, so export the products to CSV before making any changes. With that file, you can see what the prices were before the sale and restore them later.
This is the free way to take a percentage off hundreds of products:
In Products, filter by the collection, click Export, and export the products matching your search.
Save an untouched copy of the file. You’ll import it again to end the sale.
Check the Variant Compare At Price column first. Rows that already have one higher than Variant Price are on sale; remove them or decide what their new prices should be.
In the working copy, copy the Variant Price column into Variant Compare At Price.
In the first data row of Variant Price, enter this formula, then fill it down the column. This example assumes Variant Price is column X and Variant Compare At Price is column Y:
=IF(Y2="", "", ROUND(Y2*0.7, 2))This takes 30% off and rounds to two decimal places: $150.00 becomes $105.00, and $24.00 becomes $16.80. The IF leaves rows with no price blank, including image-only rows. Copy the calculated column and paste it back as values before you save.
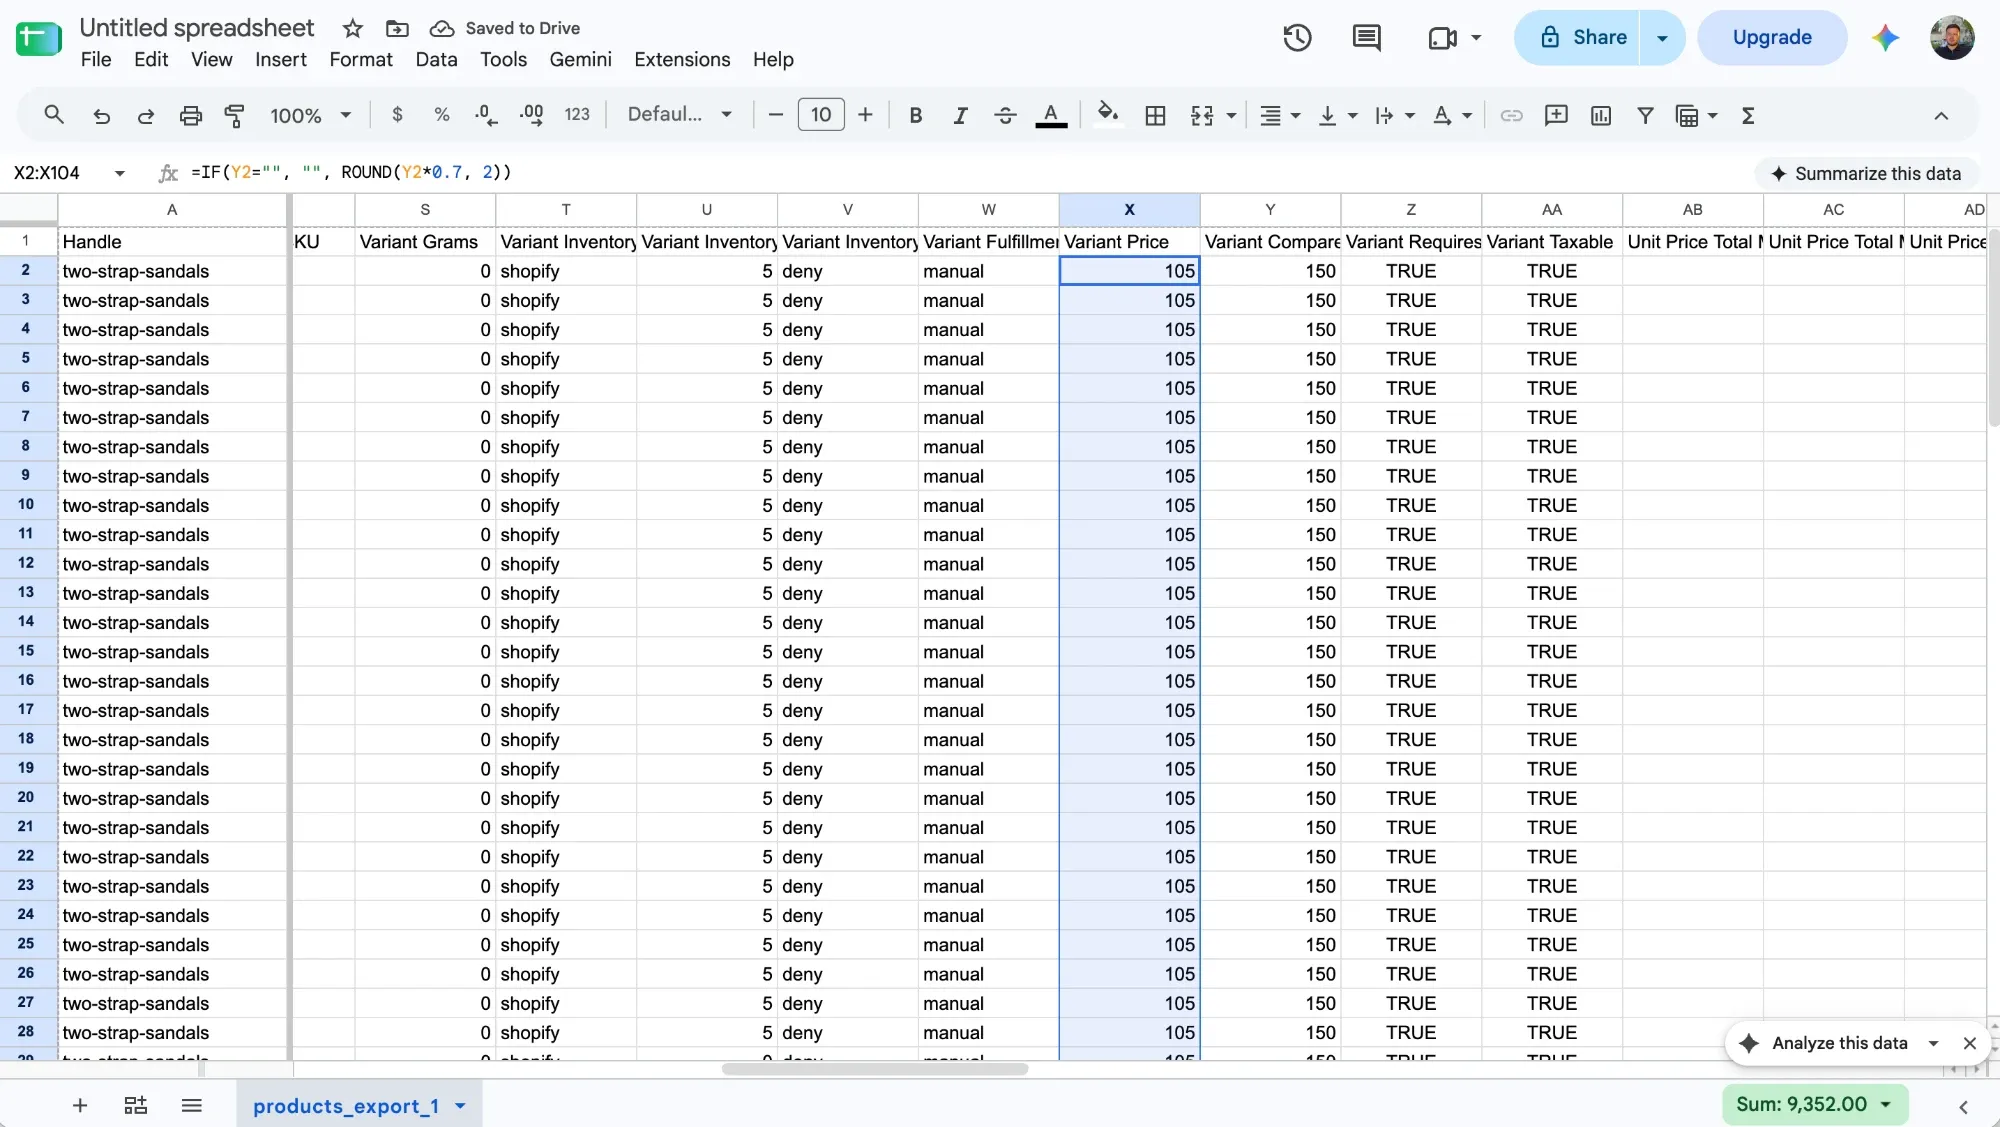
Delete every column except Handle, Title, the option name and value columns, Variant Price, and Variant Compare At Price. Shopify leaves columns that aren’t in the file alone, but it overwrites columns that are, blank cells included. Keep the option columns: without them, Shopify can delete your variants.
Click Import, choose the file, select Overwrite products with matching handles, and click Upload file.
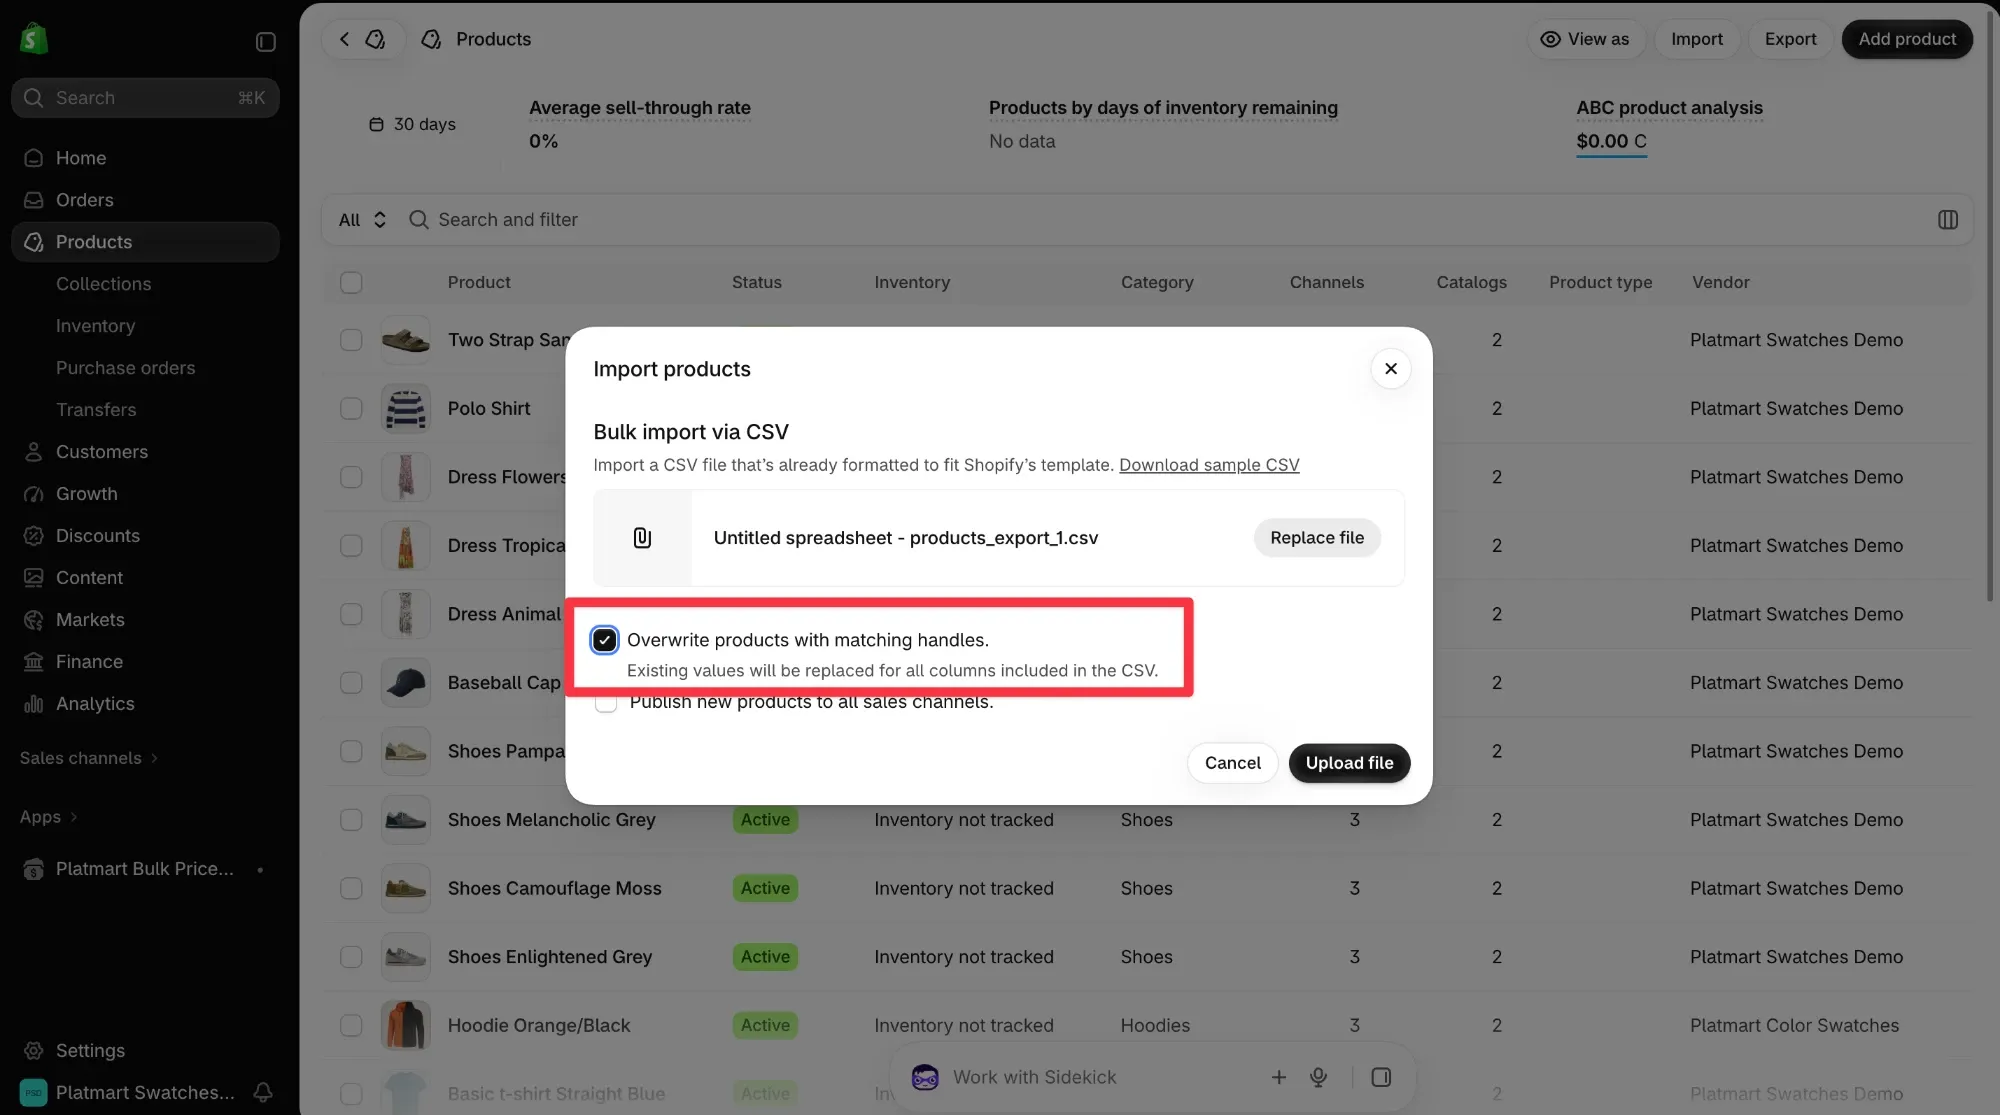
To end the sale, trim the untouched copy the same way and import it. Variants that had no compare-at price before get an empty one again. Any price you changed by hand during the sale is overwritten too.
Imports run when you click Import, so someone has to be there when the sale starts and when it ends.
Shopify Launchpad is Shopify’s own app for scheduling sales on Shopify Plus. It starts and ends a sale automatically and restores the original prices when the sale ends. It has a few limits:
If you’re on Plus and run one sale at a time on collections under 1,000 products, try Shopify Launchpad first. If you hit these limits, you’ll need a different tool.
Here’s how the four ways to put a collection on sale compare:
| Bulk editor | CSV import | Shopify Launchpad | Platmart Bulk Price Editor | |
|---|---|---|---|---|
| Who can use it | Every store | Every store | Shopify Plus only | Every store |
| Takes X% off | No, type each price | With formulas | Yes | Yes |
| Copies the old price into compare-at | No | With formulas | Yes | Yes |
| Schedules the start and end | No | No | Yes | Yes, on a paid plan |
| Puts original prices back | By hand | If you kept the old file | Yes | Yes |
| Several sales at once | By hand | By hand | No, one event at a time | Yes, on different products |
| Products added mid-sale | Not discounted | Not discounted | Not discounted | Auto-added with hourly tracking, on Premium |
| Market price lists | No | Yes, with a catalog CSV | No | Yes, on Advanced and up |
| Practical size | A few dozen variants | Large catalogs | 1,000 products per collection | 100 products free, up to 150,000 on a paid plan |
| Cost | Free | Free | Included with Plus | Free for 2 sales a month, paid from $14.99/month |
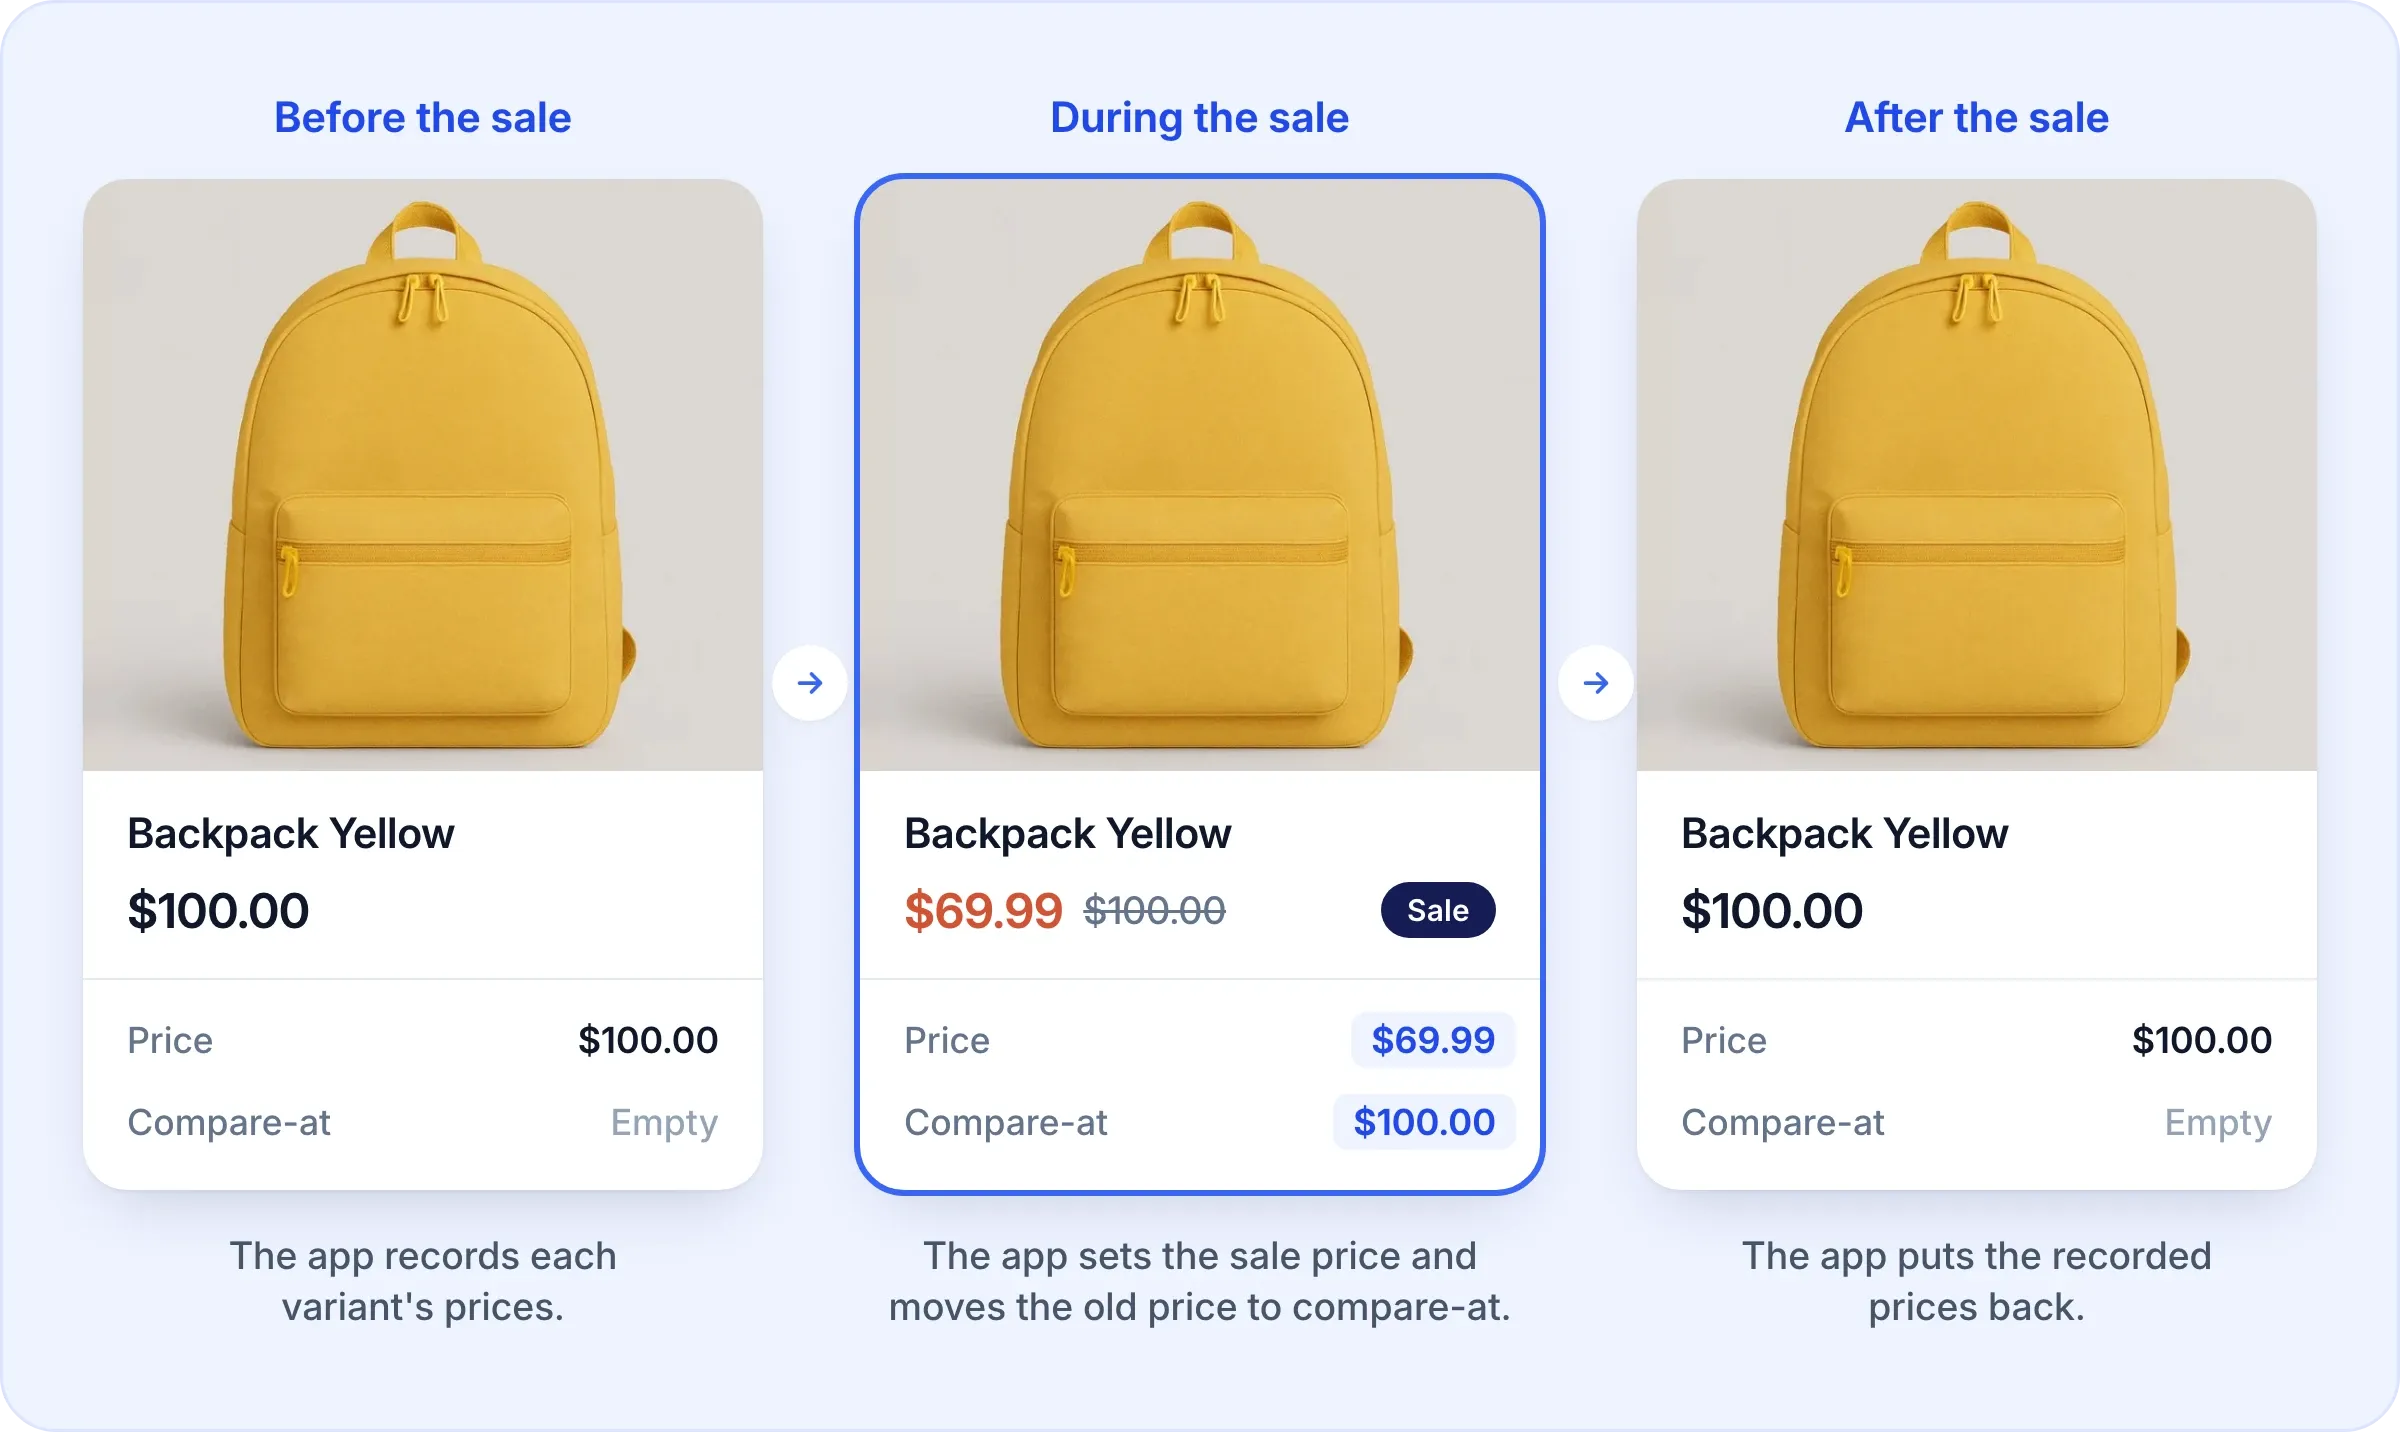
In Platmart Bulk Price Editor, a sale is a temporary price change. It records every variant’s price and compare-at price, sets the sale prices at the start time, and puts the recorded prices back when it ends. I built the app after a promotion app broke prices during a sale in my own store, so every change it makes has a backup.
Scheduling needs the Basic plan or higher. On the Free plan, a sale starts right away and runs until you disable it.
Here’s the full setup on video:
The steps below take 30% off a collection from Friday morning to Monday night, with prices ending in .99. A $100.00 product becomes $69.99, with $100.00 crossed out.
Open the app, go to Sales, and click Create sale. Give it a title only you will see, like Black Friday 2026 - 30% off.
Under Price, select Decrease price and enter 30 percent. To give every selected variant the same sale price instead, use Set new price.
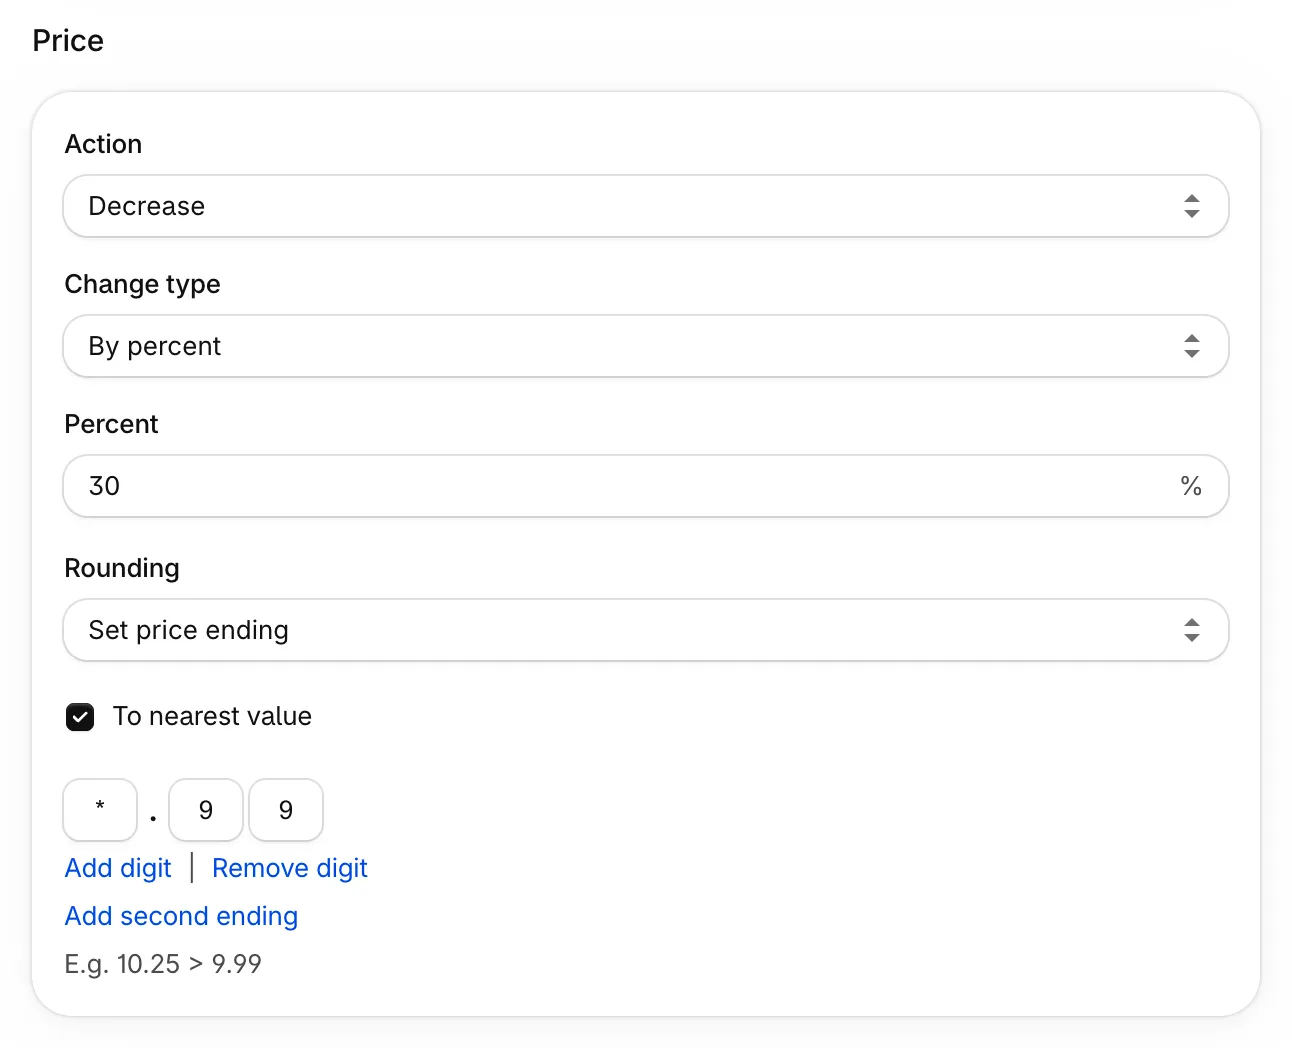
For $69.99 instead of $70.00, go to Rounding, select Set price ending, enter *.99, and turn on To nearest value. Without it, prices always round up, so $70.00 becomes $70.99.
Under Compare at price, select Set to old price (discount). Each variant’s compare-at price becomes its price before the sale, so the discount shows on your storefront.
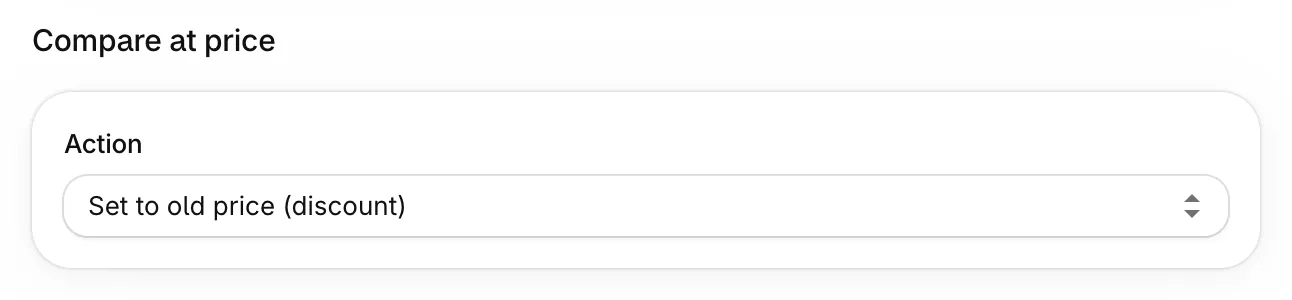
Skip this step and prices drop without a crossed-out price. Customers pay less, but nothing tells them it’s a sale.
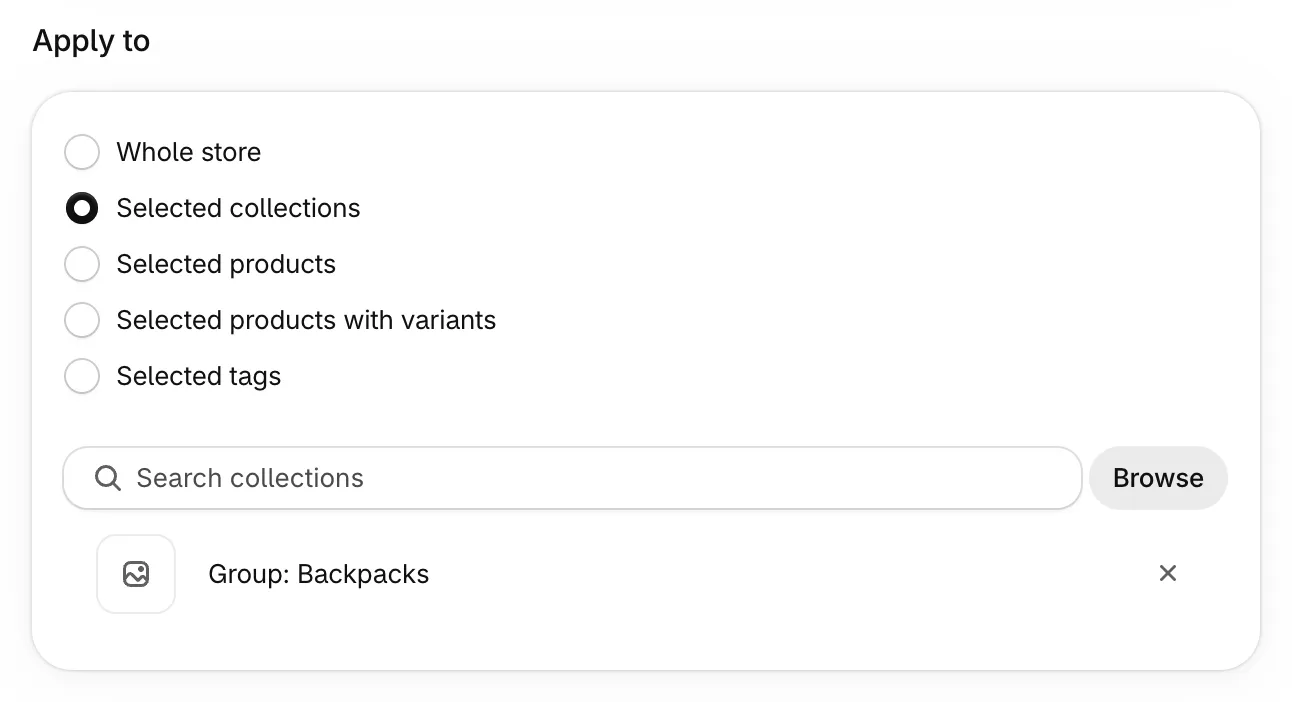
Under Apply to, select Selected collections and pick the collection. One sale can include up to 100 collections, or you can select products, variants, tags, or the whole store.
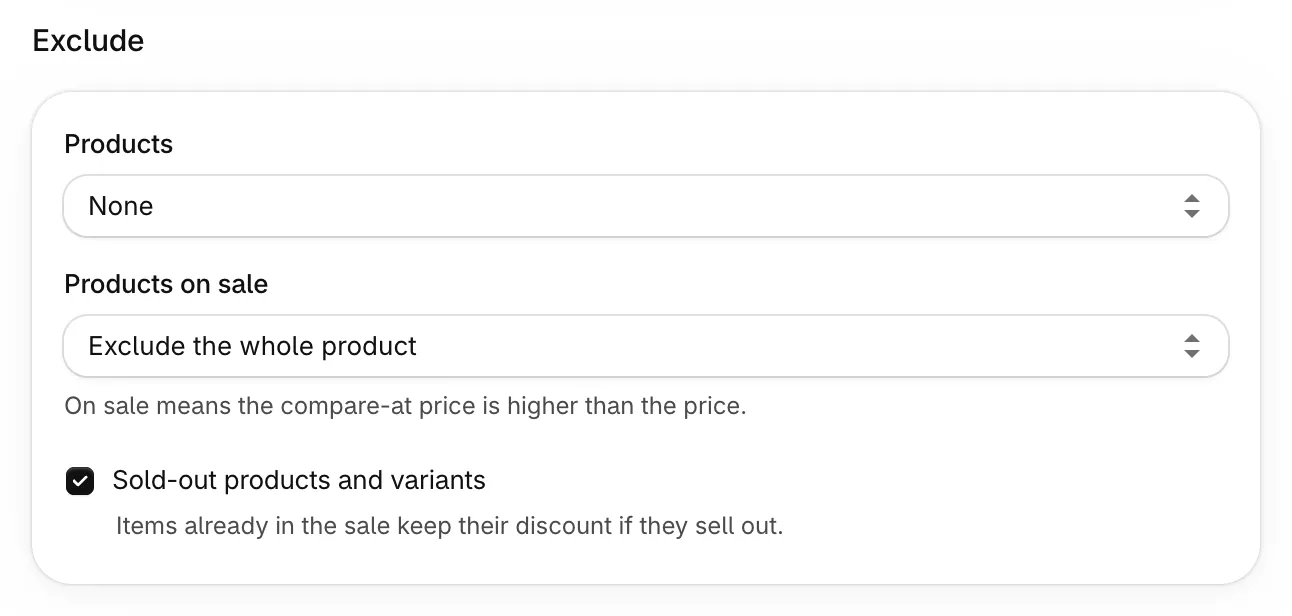
Under Exclude, you can leave out products, collections, or tags. To avoid stacking a new discount on products that are already marked down, set Products on sale to Exclude the whole product or Exclude only discounted variants. You can also skip sold-out products and variants. See exclude discounted products.
Under Schedule, set the start date and time, for example Friday at 8:00 AM. Leave it as is to start right away. Then turn on Set end date and set when the sale should stop, for example Monday at 11:59 PM.
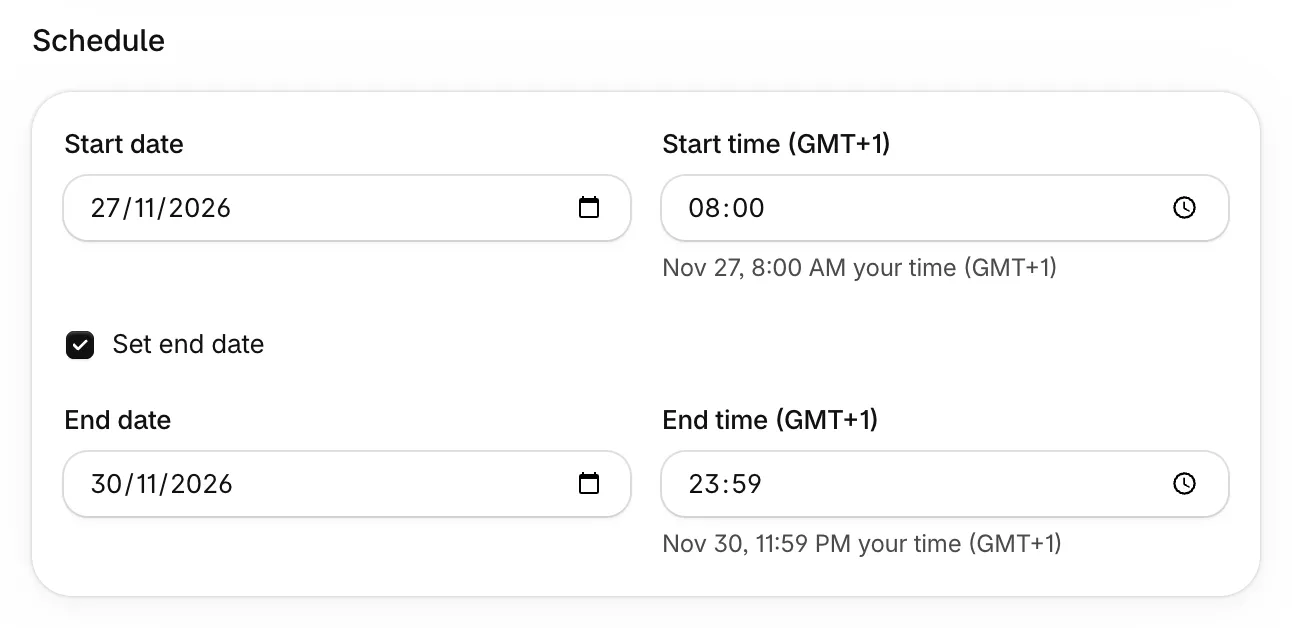
Start and end times use the timezone under Settings > General in Shopify, not your computer’s clock.
Set an end date unless the sale is meant to stay open. More than 60% of the stores that ran sales in Platmart Bulk Price Editor in the past year ran at least one without an end date. Some were clearances. Without an end date, the sale keeps running at the discount until you disable it.
Click Create at the bottom of the form. Before it changes anything, the app records the current price and compare-at price of every variant. That record is what it restores when the sale ends.
Prices don’t change all at once. Shopify limits how fast apps write prices: about 400 products a minute on Shopify’s Basic and Grow plans, 1,000 on Advanced, and 5,000 on Plus. 10,000 products take about 25 minutes on Basic, so schedule the start at least 30 minutes before you send the announcement.
Once the sale starts, open a discounted product and check the sale price, the crossed-out price, and your theme’s sale badge. If the crossed-out price is missing, see why your compare-at price isn’t showing.
The discount is locked once the sale starts. You can still change the end date and which products are in the sale. To change the discount itself, disable and duplicate the sale.
If you add products to the collection while the sale runs, click Check changes in the sale’s Details to discount them. On the Premium plan, turn on Track changes in condition automatically (every hour) under Advanced and the app adds them for you.
On a paid plan, the app can also tag discounted products (for example sale) while the sale runs, so you can build an automated Sale collection. See sale tags.
Run it on the market’s price list. A market’s fixed prices override your main prices there, so a sale on your main prices might not show at all. To bulk edit market prices in Shopify admin, use a catalog CSV import. Platmart Bulk Price Editor makes it easier: you can schedule market sales right within the app:
In Create sale, switch Change type to Market prices.
Select the markets.
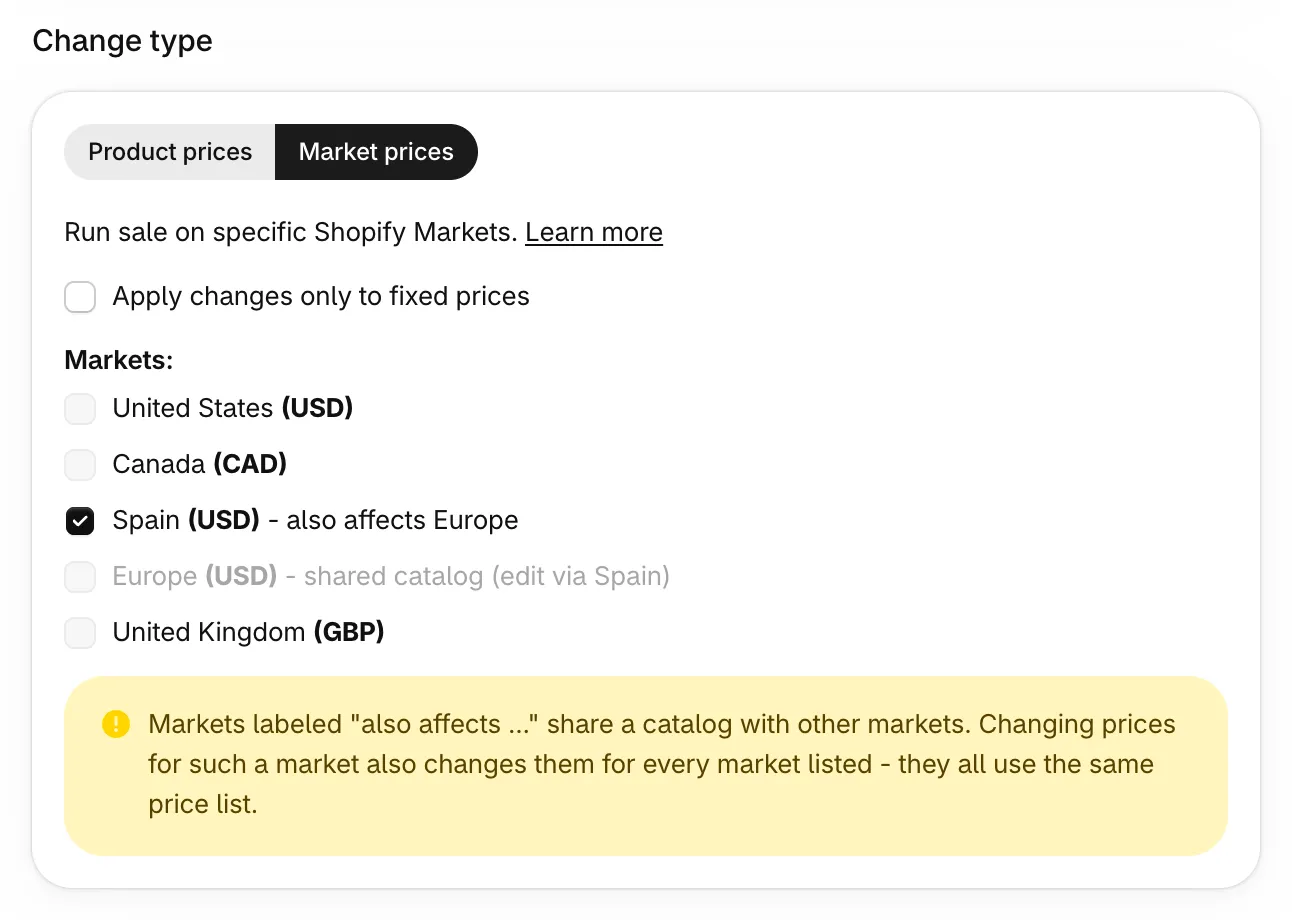
Set the discount and select Set to old price (discount) under Compare at price, same as above.
Choose the collection, set the schedule, and click Create sale.
The app changes the selected markets’ price lists at the start time and restores them at the end. Other markets keep their regular prices, so you can run 25% off in the EU and 20% off in the UK on different dates.
Very straightforward and easy to use - helped me create a sale across our website and across different markets.
Market sales have a few rules:
More in the docs: run a sale on specific markets.
Click Disable next to the running sale. The app restores the recorded prices and compare-at prices and removes any sale tags it added.
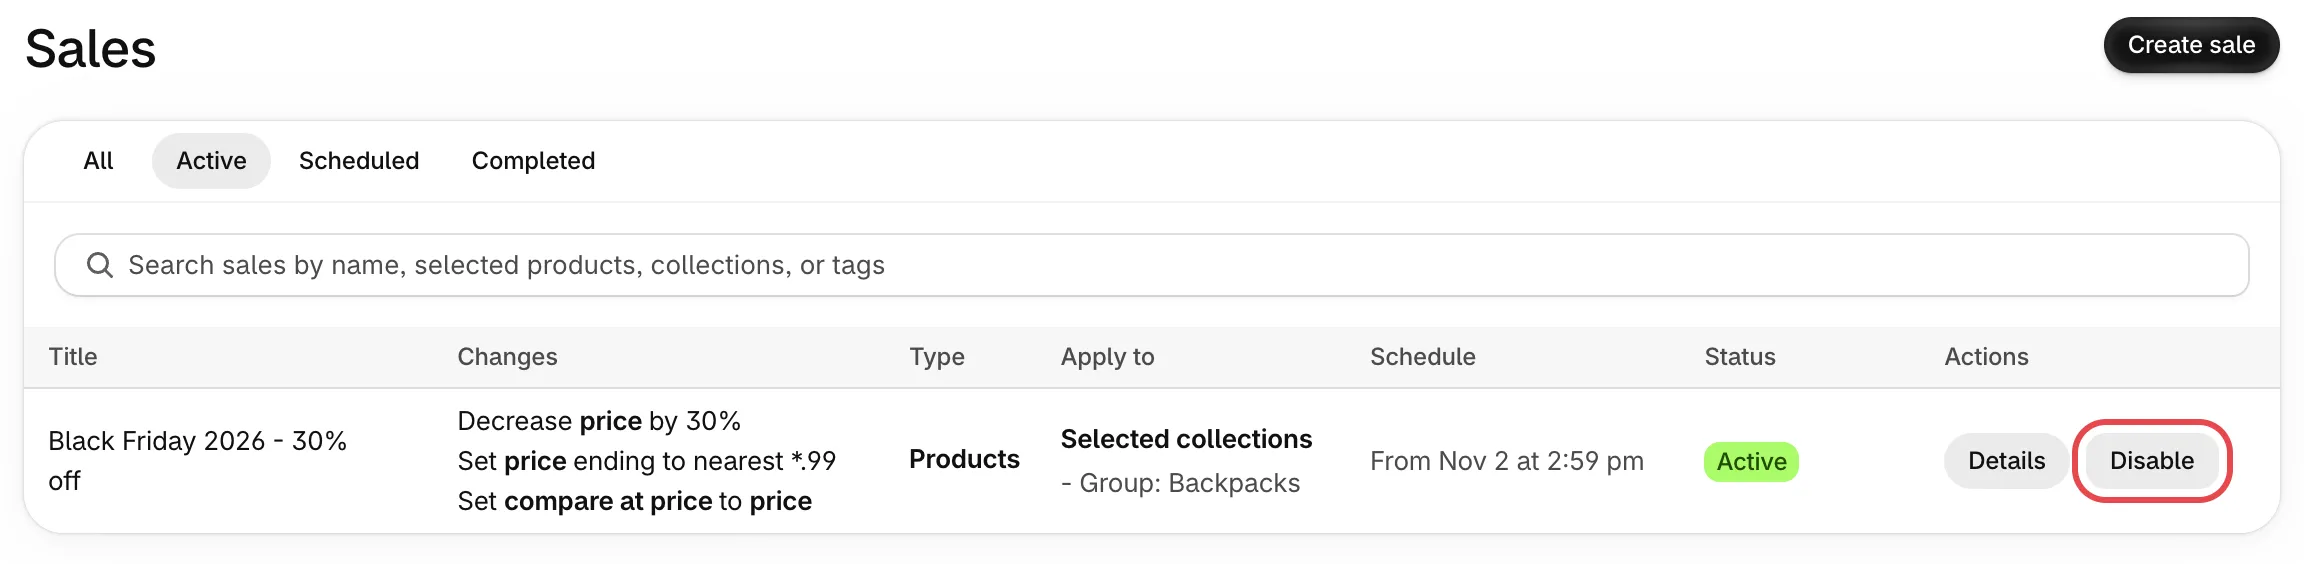
A sale that hasn’t started or is still applying can be canceled, and the app rolls back anything it already changed. To run it again next year, click Duplicate in the sale’s Details. See manage sales.
Before you create a big sale in Platmart Bulk Price Editor:
Not every compare-at change is a sale. These come up in support all the time:
Remove only the crossed-out price. If the price is already right, clear the compare-at cells in Shopify’s bulk editor, or import a file with an empty Variant Compare At Price column. In Platmart Bulk Price Editor, select Reset compare at price and leave the price alone.
Raise prices without shrinking the discount. If you raise prices 10% on products that are on sale and leave compare-at alone, the discount shrinks or disappears. In Platmart Bulk Price Editor, select Increase price and Increase compare at price by the same percent in one task. See increase or decrease prices.
Make a permanent markdown. A clearance that stays until you decide otherwise is a task, not a sale: Decrease price, with compare-at Set to price. Tasks don’t end on their own, but every task can be rolled back to the exact earlier prices, even months later. See set discount prices.
Usually one of these:
Select the products in Shopify admin, click Bulk edit, add the Compare-at price column, and type the values. For a percentage sale on many products, export them to CSV, copy the Variant Price column into Variant Compare At Price, calculate the new prices with a formula, and import the file with Overwrite products with matching handles. A bulk pricing app can do both fields in one step and put the old prices back when the sale ends.
Not out of the box. Shopify admin can't change product prices and compare-at prices at a set time or restore them afterwards. Discounts and discount codes have start and end dates, but they don't show a crossed-out price on product pages. The exception is Shopify Launchpad, an app for Shopify Plus stores only: it runs one sales event at a time, on collections of up to 1,000 products. On other plans, you change prices by hand or use an app. Platmart Bulk Price Editor schedules sales on a paid plan.
Yes. A market can have its own fixed prices and compare-at prices on its price list, and those override your main prices in that market. In bulk, market sale prices go through a CSV import of the market's catalog. Platmart Bulk Price Editor runs market sales on its Advanced plan and up, as long as the markets in one sale share a currency.
With Platmart Bulk Price Editor, the app restores the prices and compare-at prices it recorded before the sale started. Price edits made by hand during the sale are overwritten by that restore, so make permanent price changes after the sale ends.
Yes. A discount code applies to the already-reduced sale price, so a 20% code on a product that's 30% off takes 20% off the sale price. If you don't want codes to stack, limit them to collections that exclude the sale. See block discount codes during a sale.
Not at the same time. You can run as many sales at once as you like on different products, but two sales on one product fight over its price and can restore the wrong original price when they end. Platmart Bulk Price Editor blocks obvious overlaps, but keep each product in one active sale. See run multiple sales at once.
Yes, in many countries. In the EU, the crossed-out price generally has to be the lowest price you charged in the 30 days before the sale. Set to old price (discount) in Platmart Bulk Price Editor copies the price right before the sale starts, so it meets that rule only if you didn't charge less during those 30 days. Never show a made-up compare-at price, and check your local rules.
Platmart Bulk Price Editor runs the whole collection sale for you: it lowers the prices, sets the compare-at prices, starts and ends on schedule, and puts every original price back when the sale is over. It works with Shopify Markets, and there’s nothing to set up in your theme.
Being able to run sales and have prices update automatically versus manually changing things is a huge time saver.
Built for Shopify and rated 4.7 on the Shopify App Store. Start on the Free plan with up to 100 products per sale.
Get Platmart Bulk Price Editor →