
Automate product groups
Automations build and maintain your product groups for you. Instead of creating each group and adding products by hand, you point the app at your Shopify data - either collections or a product metafield - and it creates the matching groups, keeps them current as your catalog changes, and removes them when the source goes away.
Reach for automations once you have more than a handful of groups, or a catalog that changes often enough that manual upkeep gets tedious.
Collections or metafields: which to use
Section titled “Collections or metafields: which to use”There are two ways to drive an automation. Both create the same kind of groups; they differ only in where the grouping comes from.
| Use collections when… | Use metafields when… |
|---|---|
| You already organize products into Shopify collections, or don’t mind creating some | You’d rather group products without creating collections |
| You want each group to map to one collection | You want products to group by a value or a reference you set per product |
You’re fine naming collections with a prefix like Group: | You’re fine editing a product metafield in the Shopify admin |
You can run more than one automation. Pick one approach per set of products - the grouping source (collections or metafields) can’t be changed after an automation is created.
Group products by collections
Section titled “Group products by collections”The app watches for Shopify collections whose title starts with a prefix you choose. Each matching collection becomes a group, and the collection’s products become the group’s products.
The prefix is stripped to make the group name. With the prefix Group:, a collection titled Group: Backpacks creates a group named Backpacks.
Create your collections
Section titled “Create your collections”In your Shopify admin, create a collection for each group and start its title with your prefix. Manual and automated Shopify collections both work.
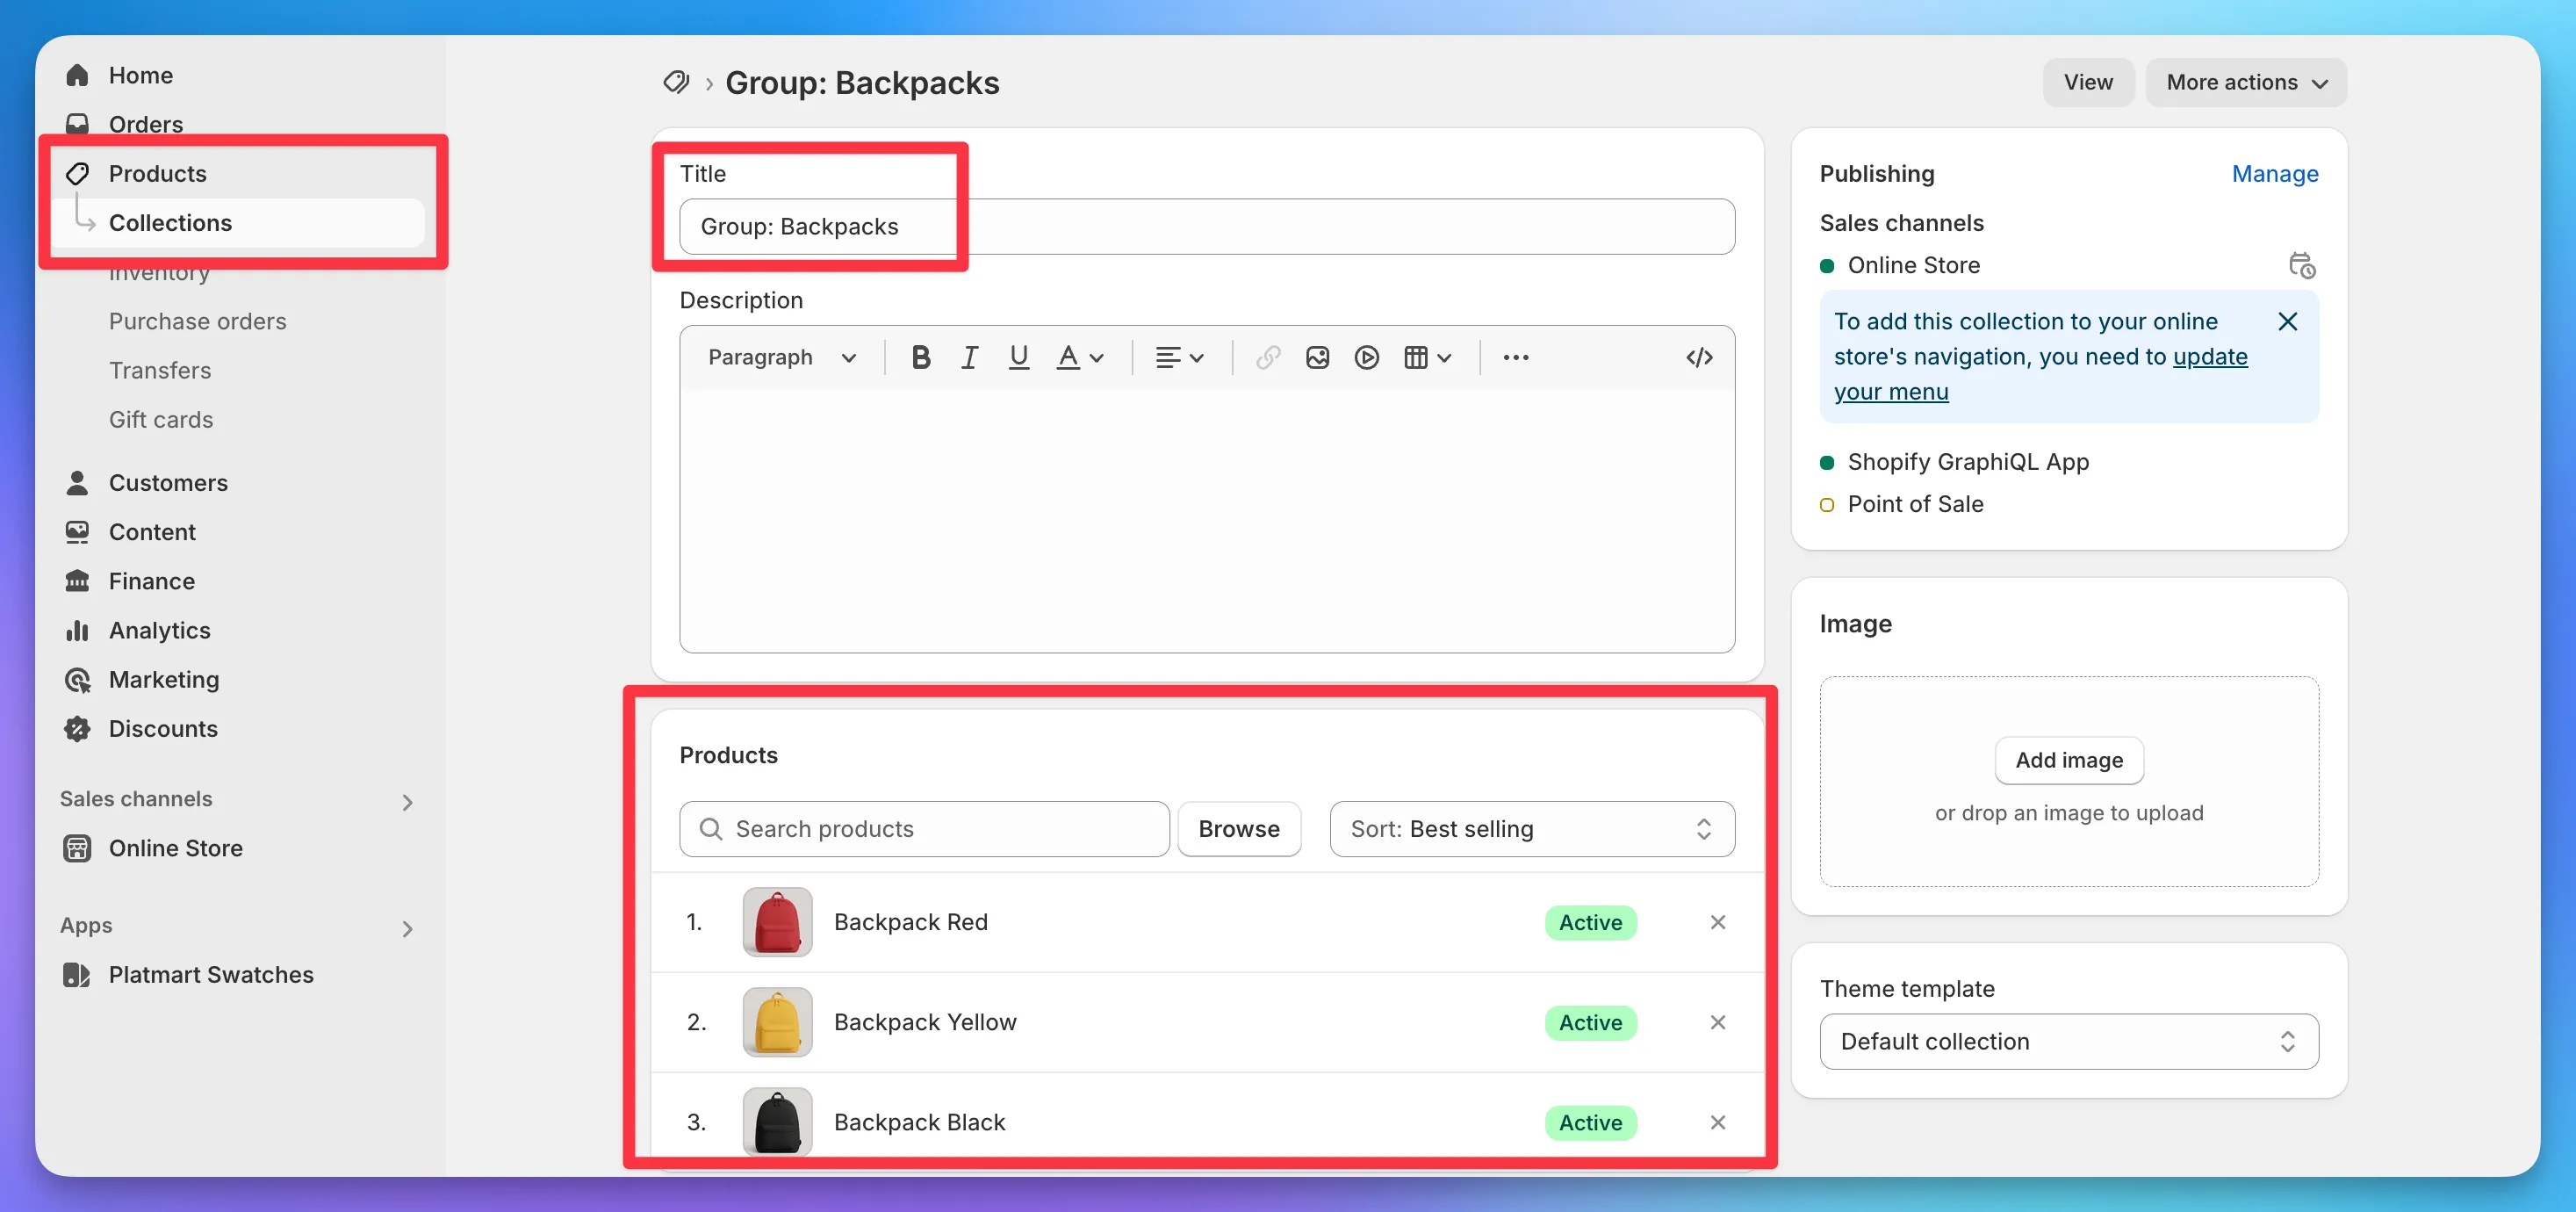
With the prefix Group::
- Group: Backpacks creates a group called “Backpacks”
- Group: Summer Shirts creates a group called “Summer Shirts”
- Sale Items is ignored - no prefix, no group
Choose a prefix that won’t match collections you use for other things. Group: or Swatch: work well.
With your collections ready, create the automation and set its source to Collections.
Group products by metafields
Section titled “Group products by metafields”A metafield automation groups products by a value you store on each product. Two kinds of metafield work, and they group in different ways.
Group by a shared text value
Section titled “Group by a shared text value”This is the common case. Products that share the same text value land in the same group, and the value becomes the group name.
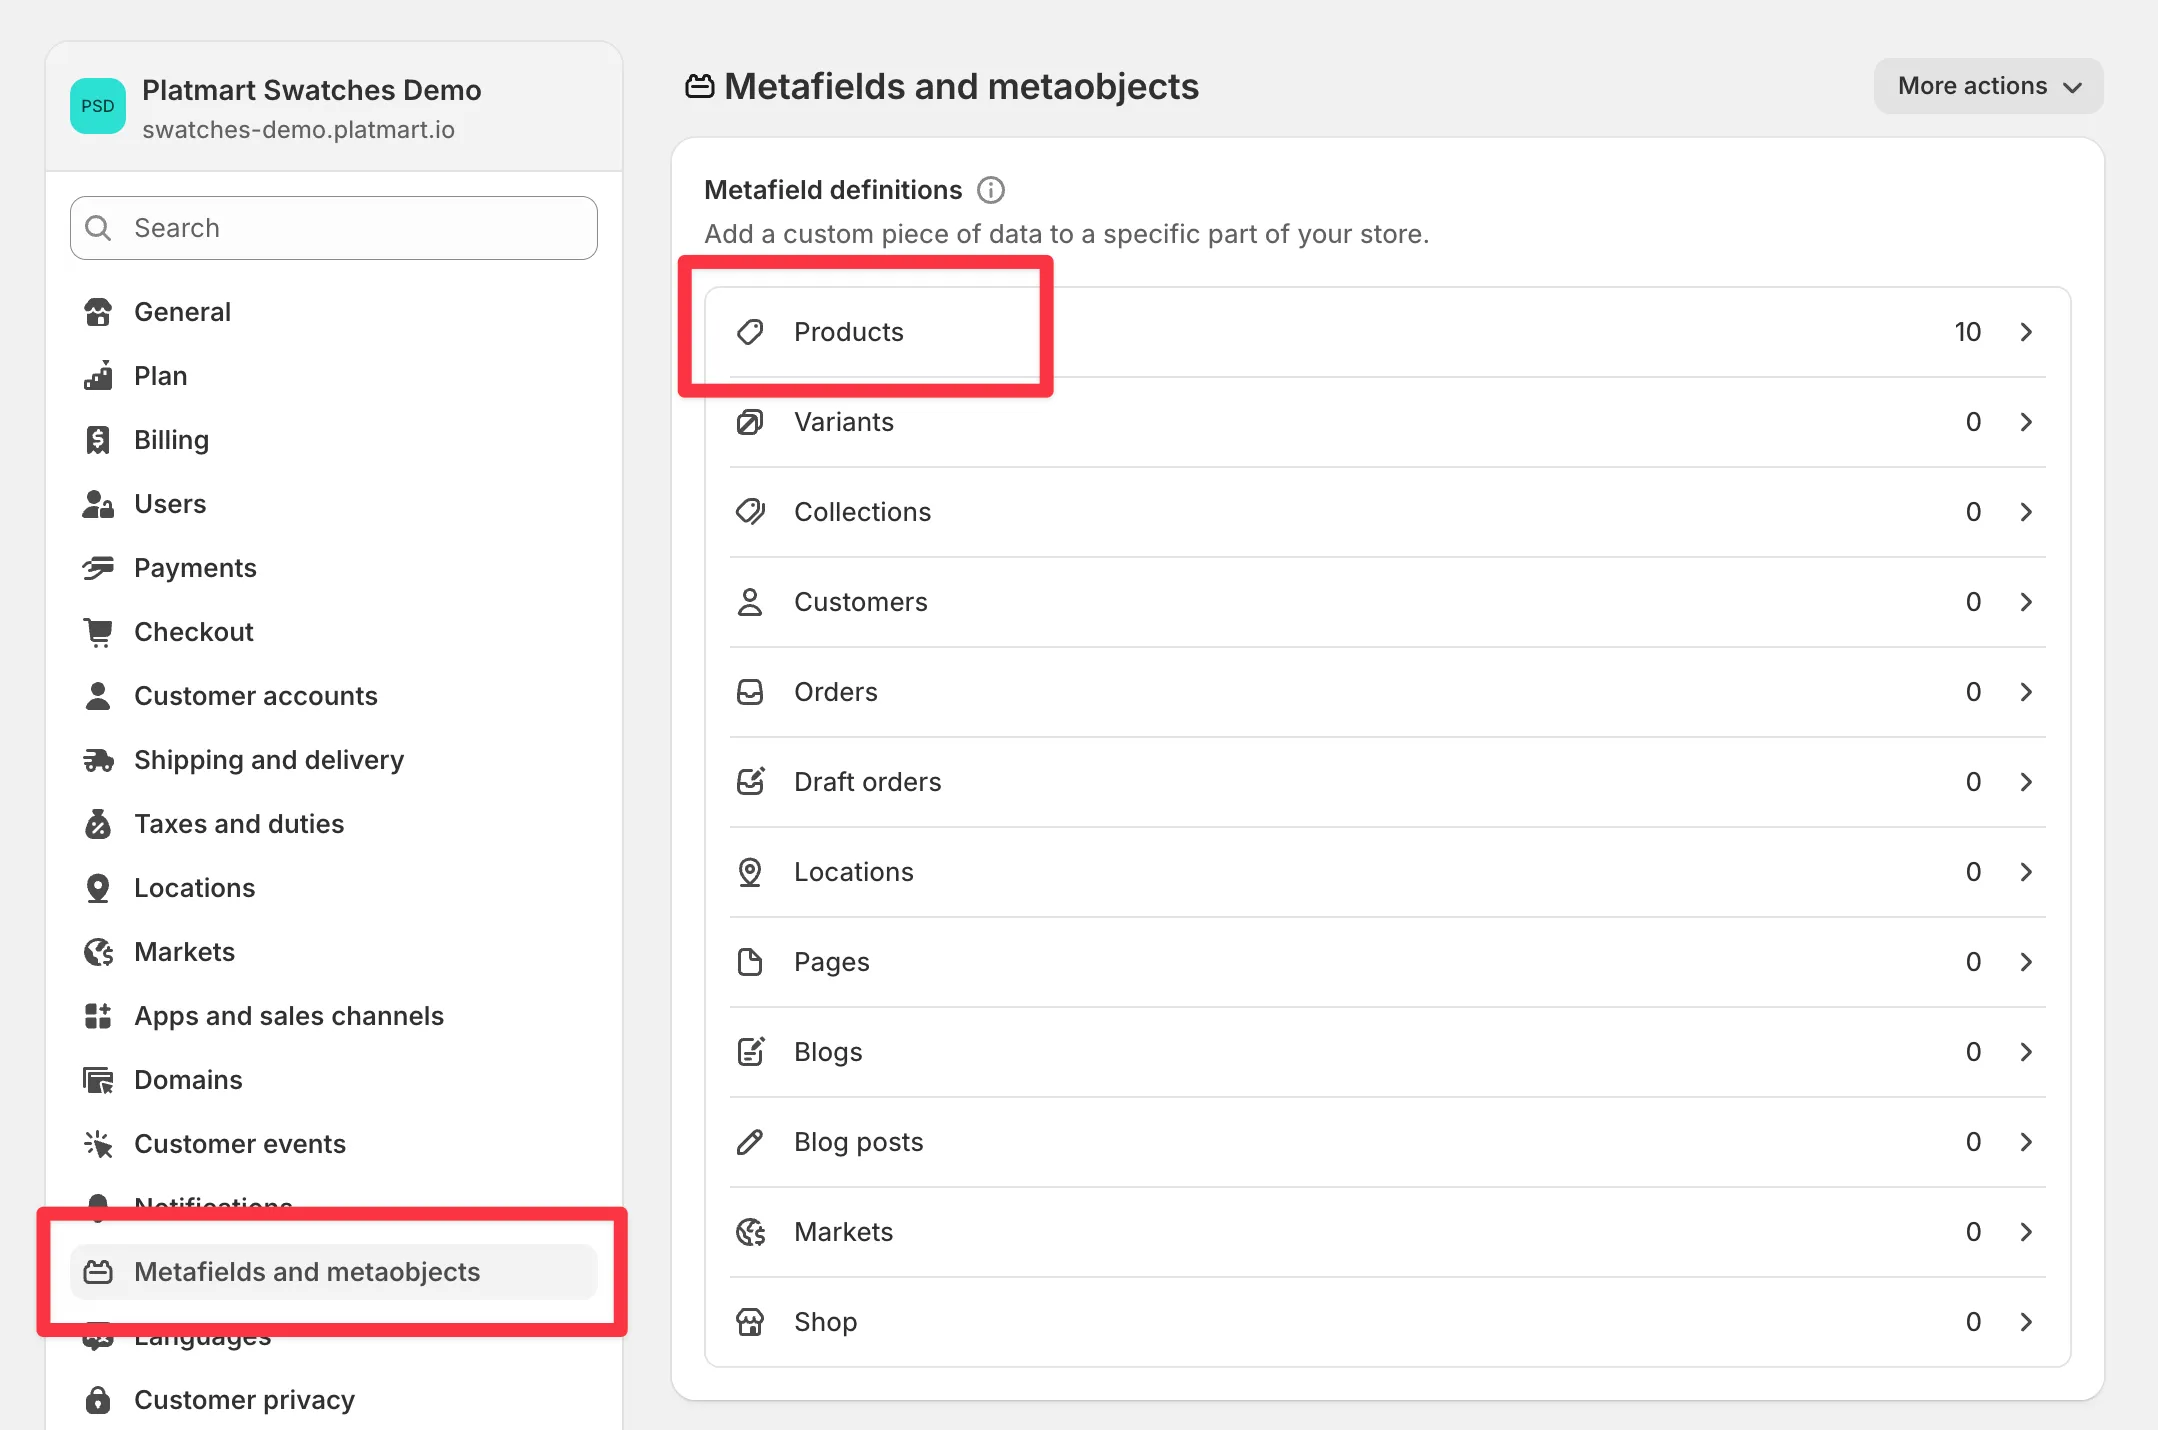
First, add the grouping metafield in your Shopify admin. Go to Settings > Metafields and metaobjects > Products.
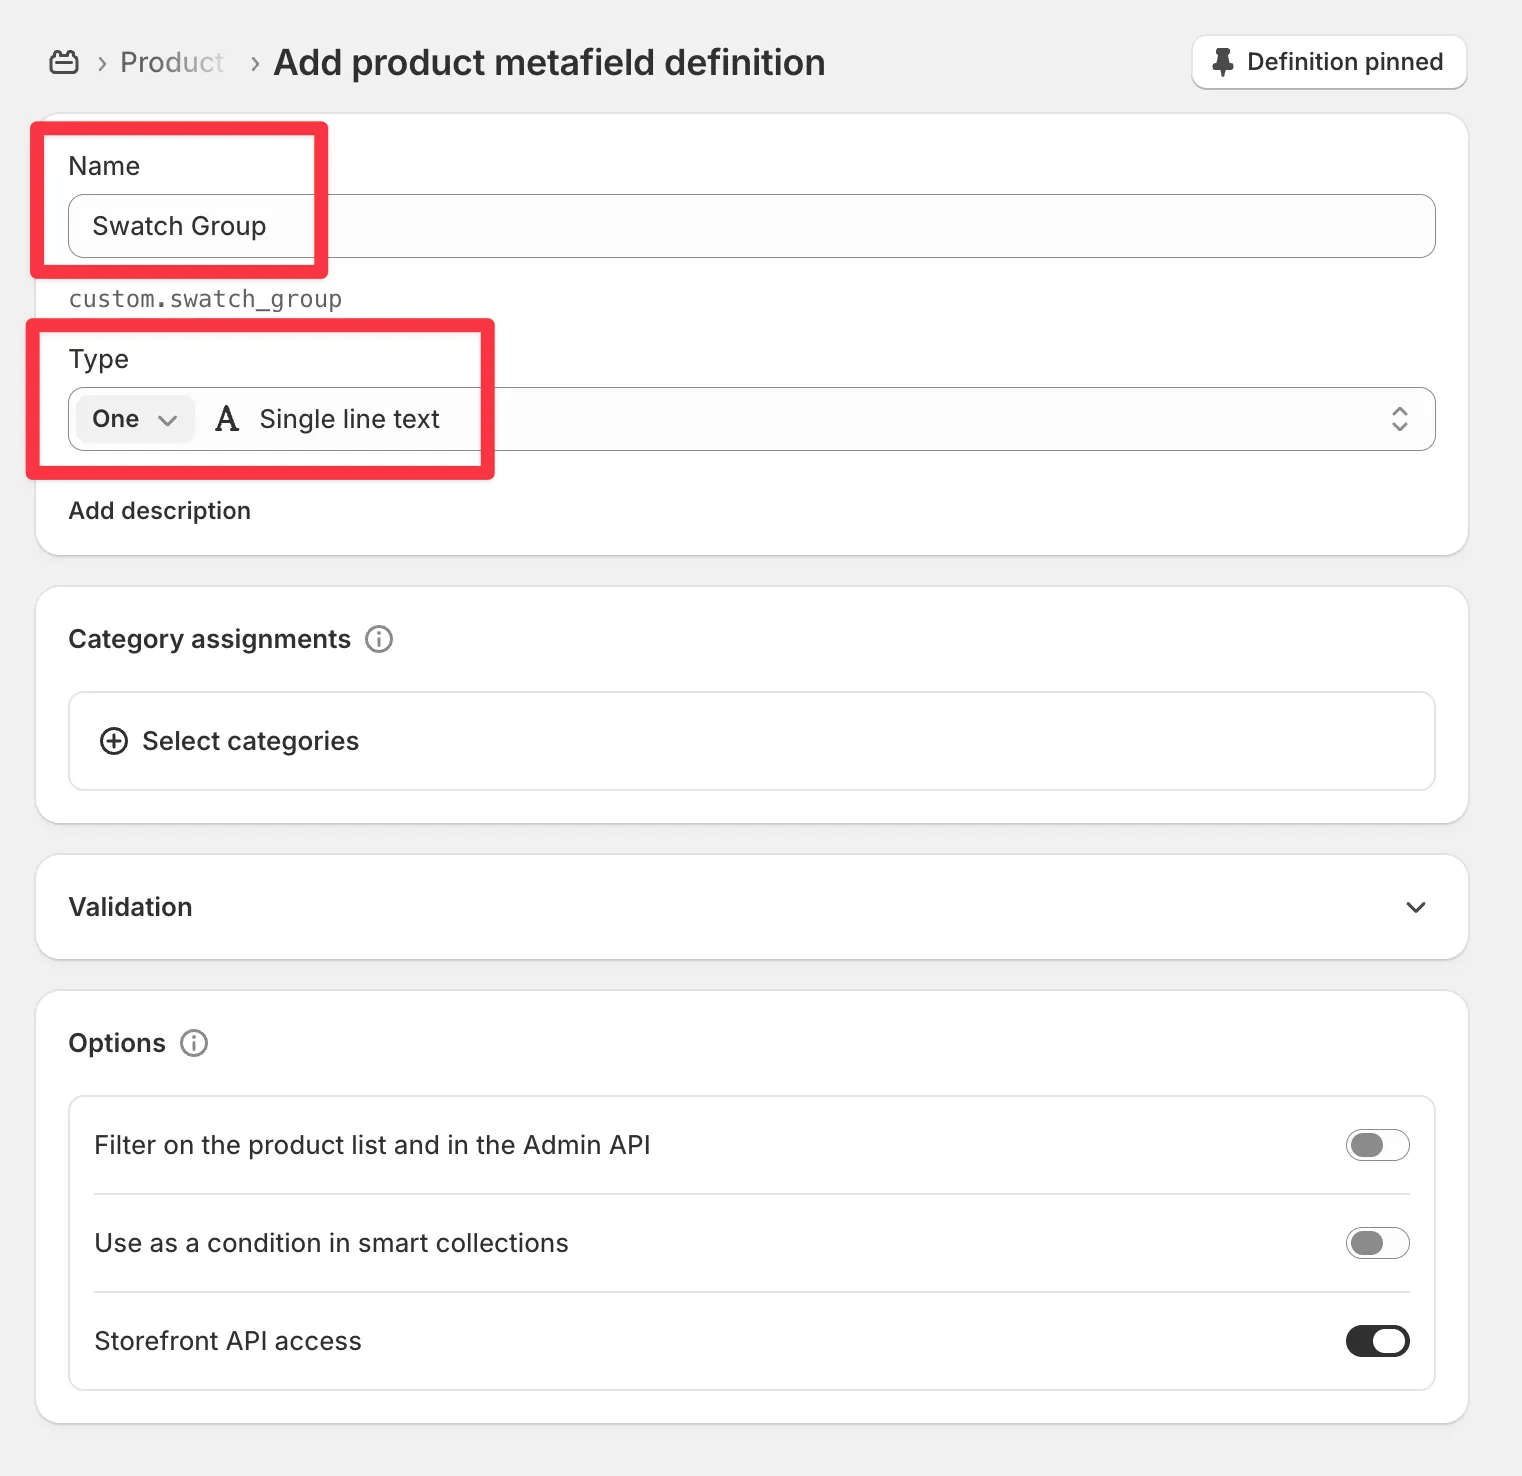
Add a definition, give it a name (for example Swatch Group), and set the type to Single line text. Shopify fills in the key automatically (here, custom.swatch_group).
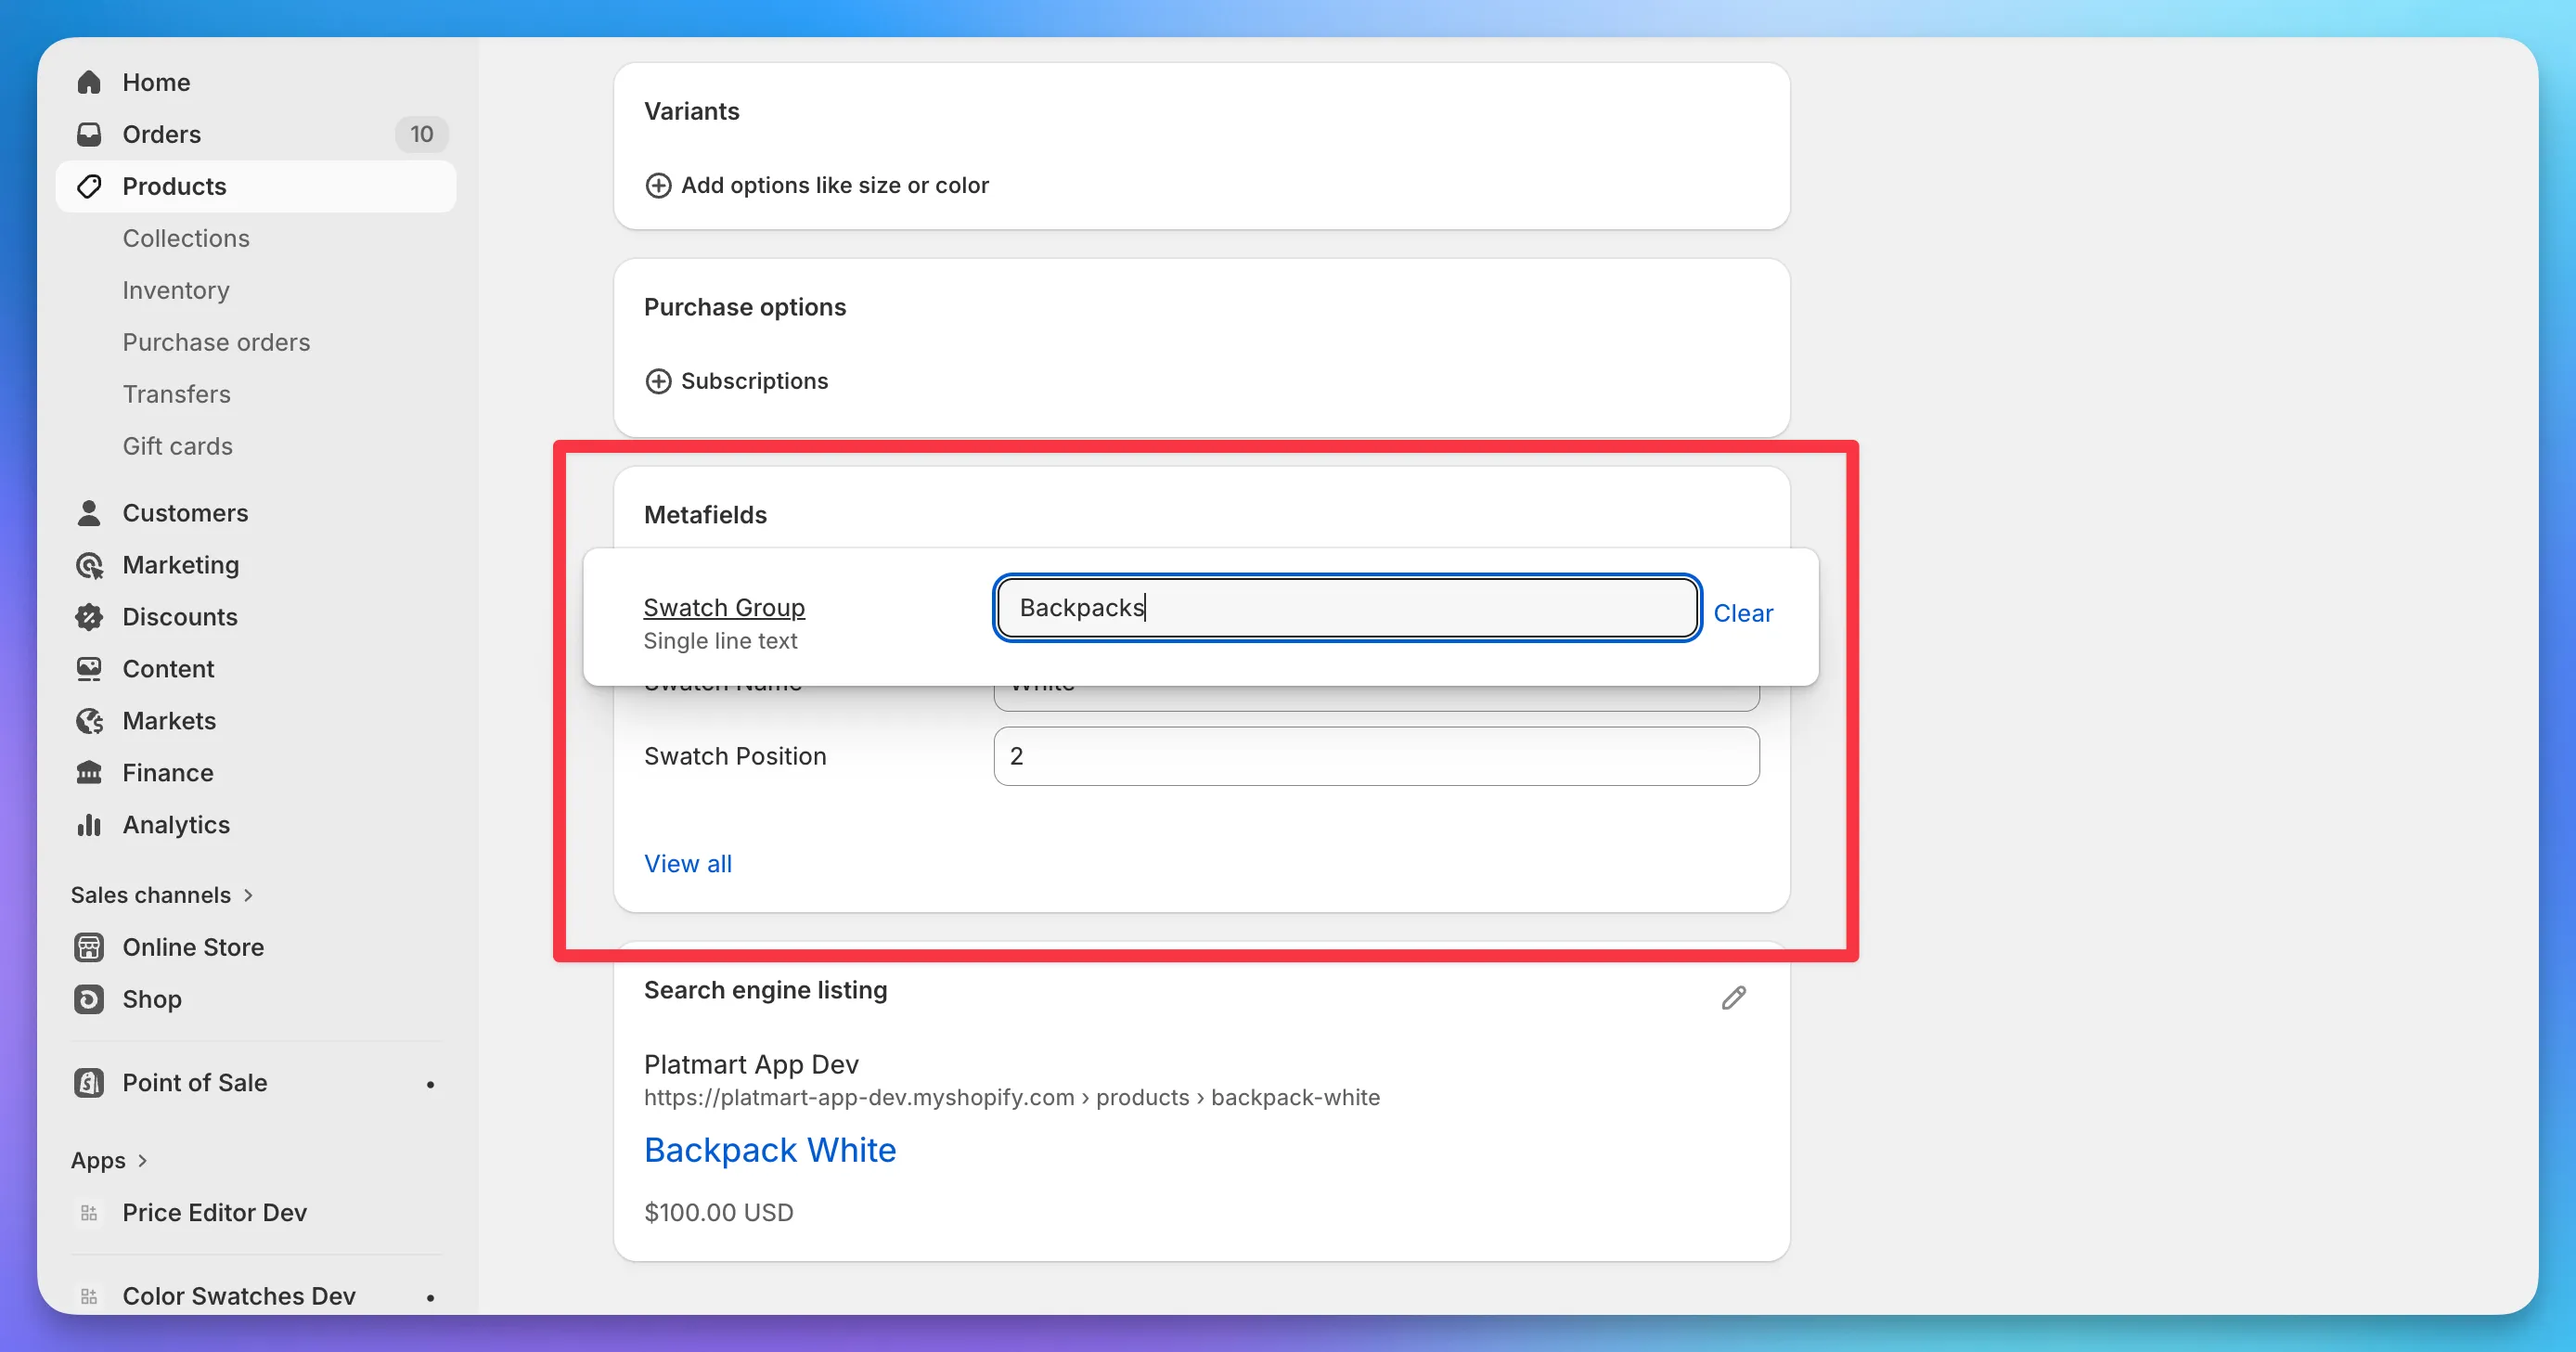
Then open each product and fill in the value. Products that belong together need the exact same value.
| Product | Metafield value | Group |
|---|---|---|
| Backpack Red | Backpacks | Backpacks |
| Backpack Black | Backpacks | Backpacks |
| White Sneakers | Sneakers | Sneakers |
| Winter Jacket | (empty) | (skipped) |
The value becomes the group name exactly as written, so keep it consistent. Backpacks and backpacks create two separate groups. Products with no value are skipped.
Group by product references
Section titled “Group by product references”If you pick a product list (product reference) metafield instead, the app groups by the links between products. Any products connected through those references end up together: if A references B and C, and C references D, all four land in one group. The group is named after the first product in it.
Use this when your relationships are already modeled as product references and you’d rather not maintain a separate text value.
Create the automation
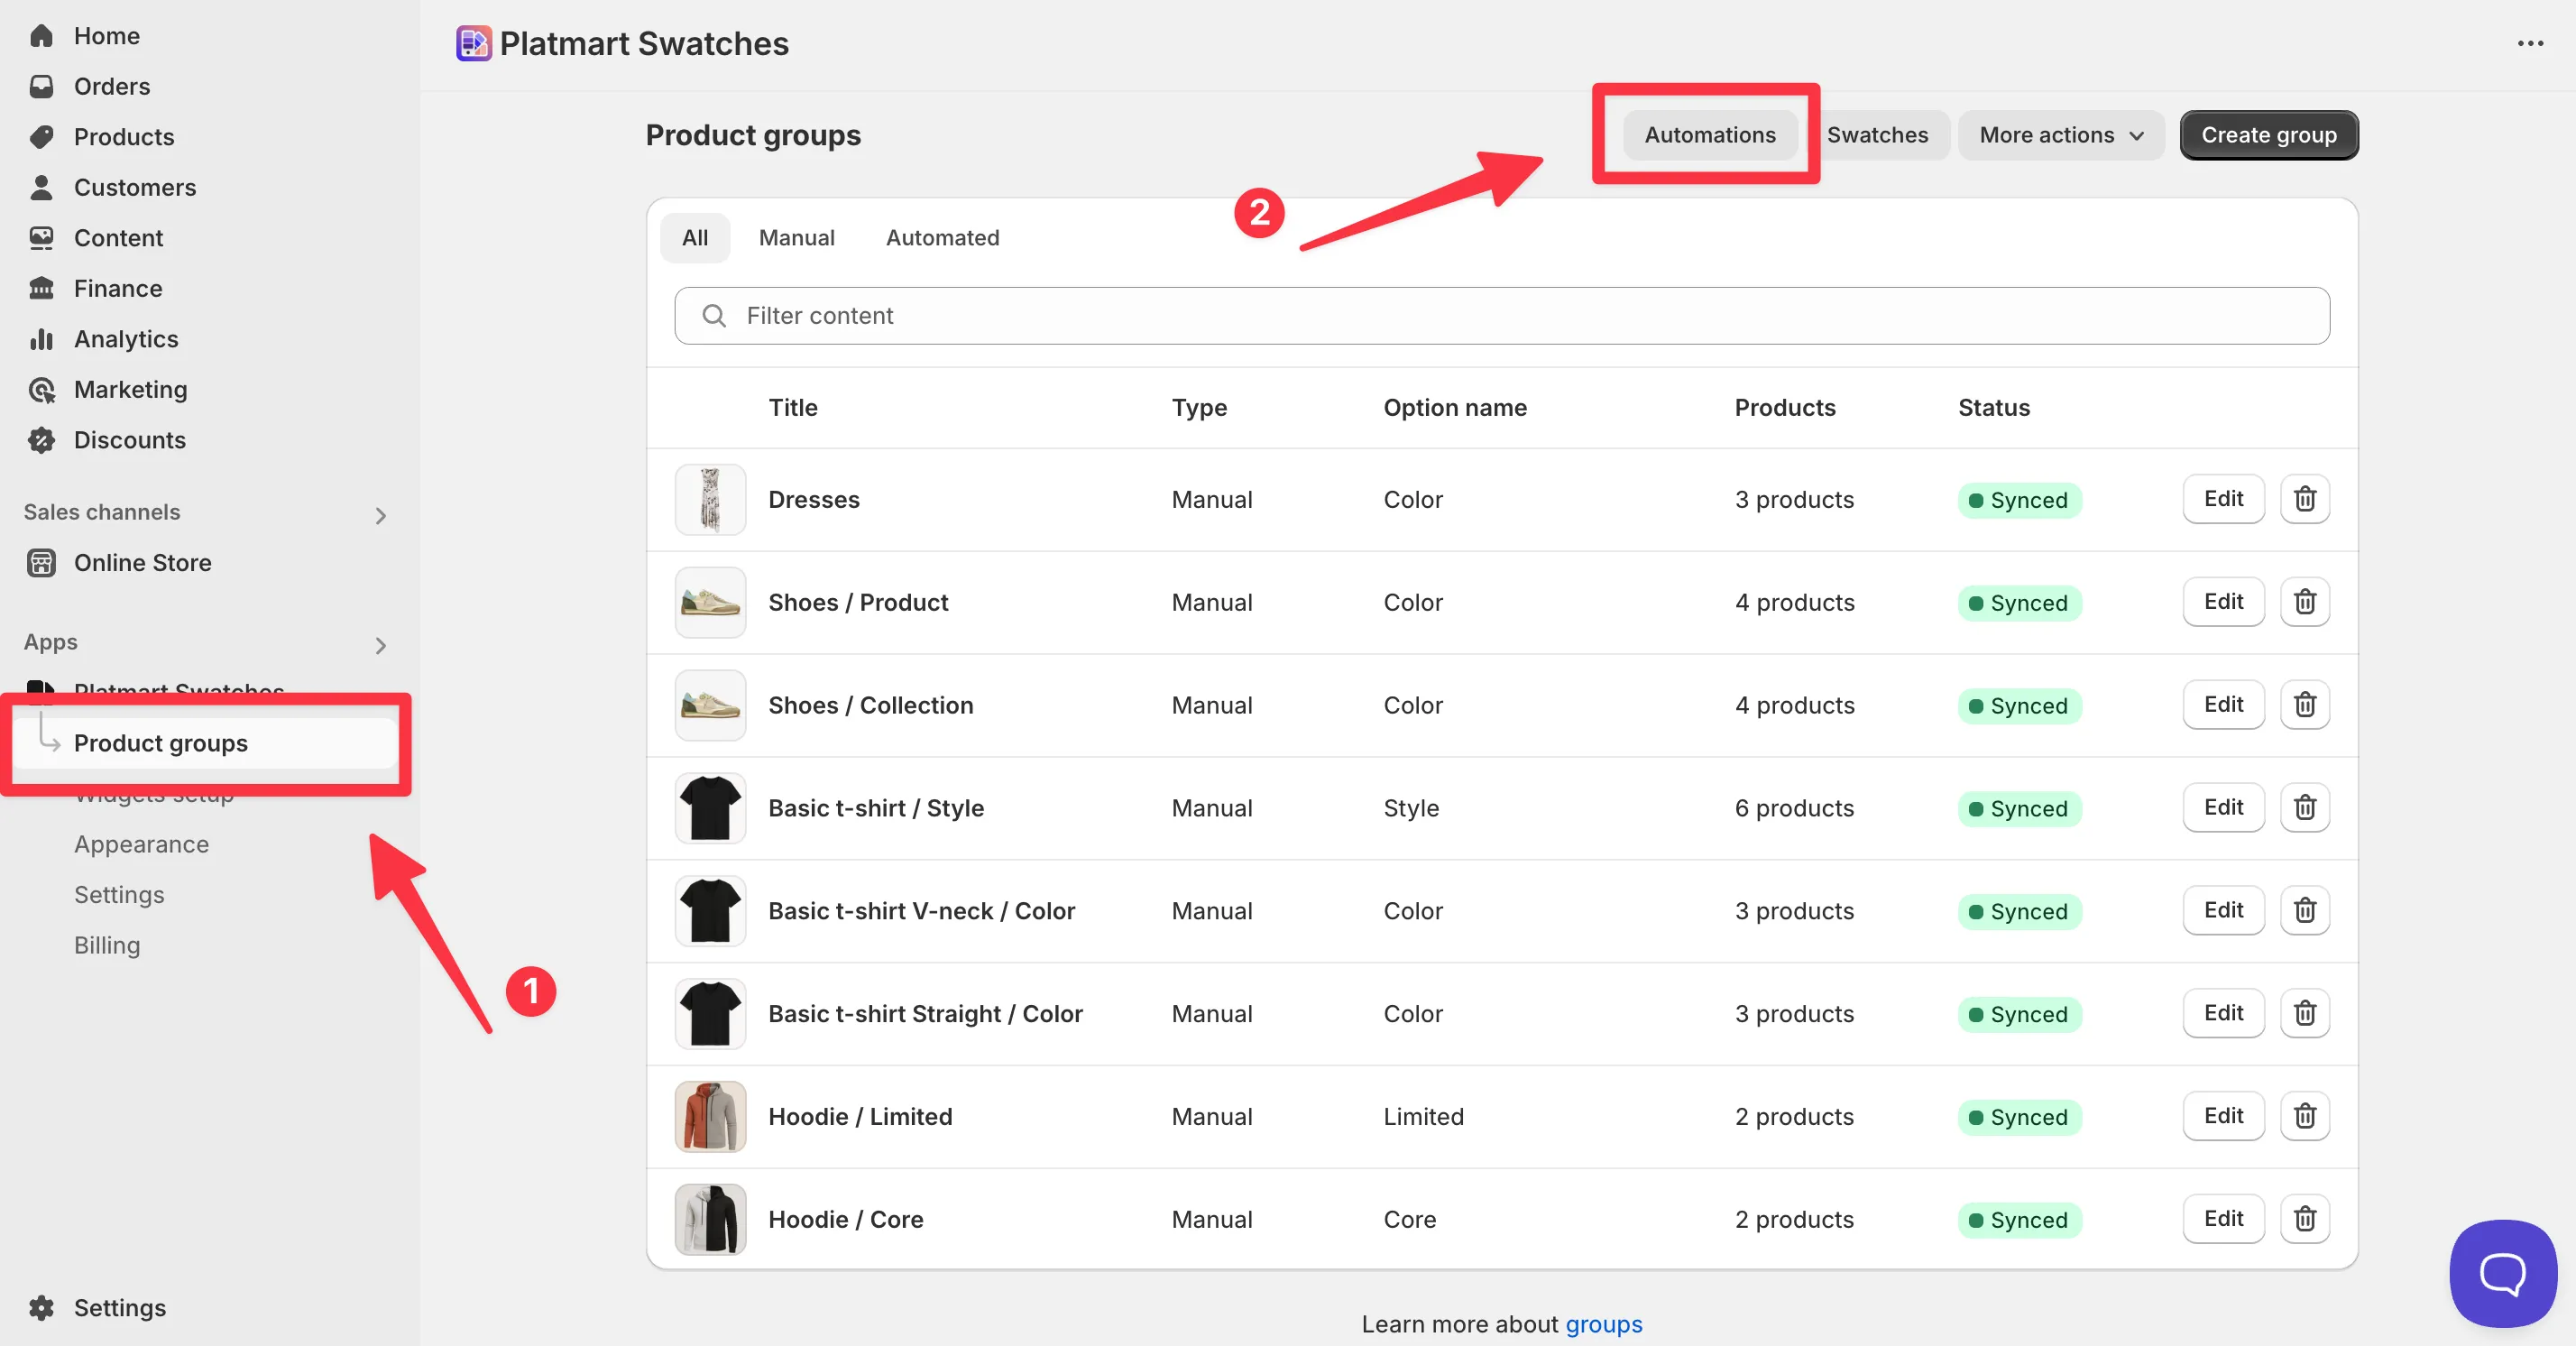
Section titled “Create the automation”With your collections or metafield ready, create the automation that uses them. In the app, open Product groups and click Automations.
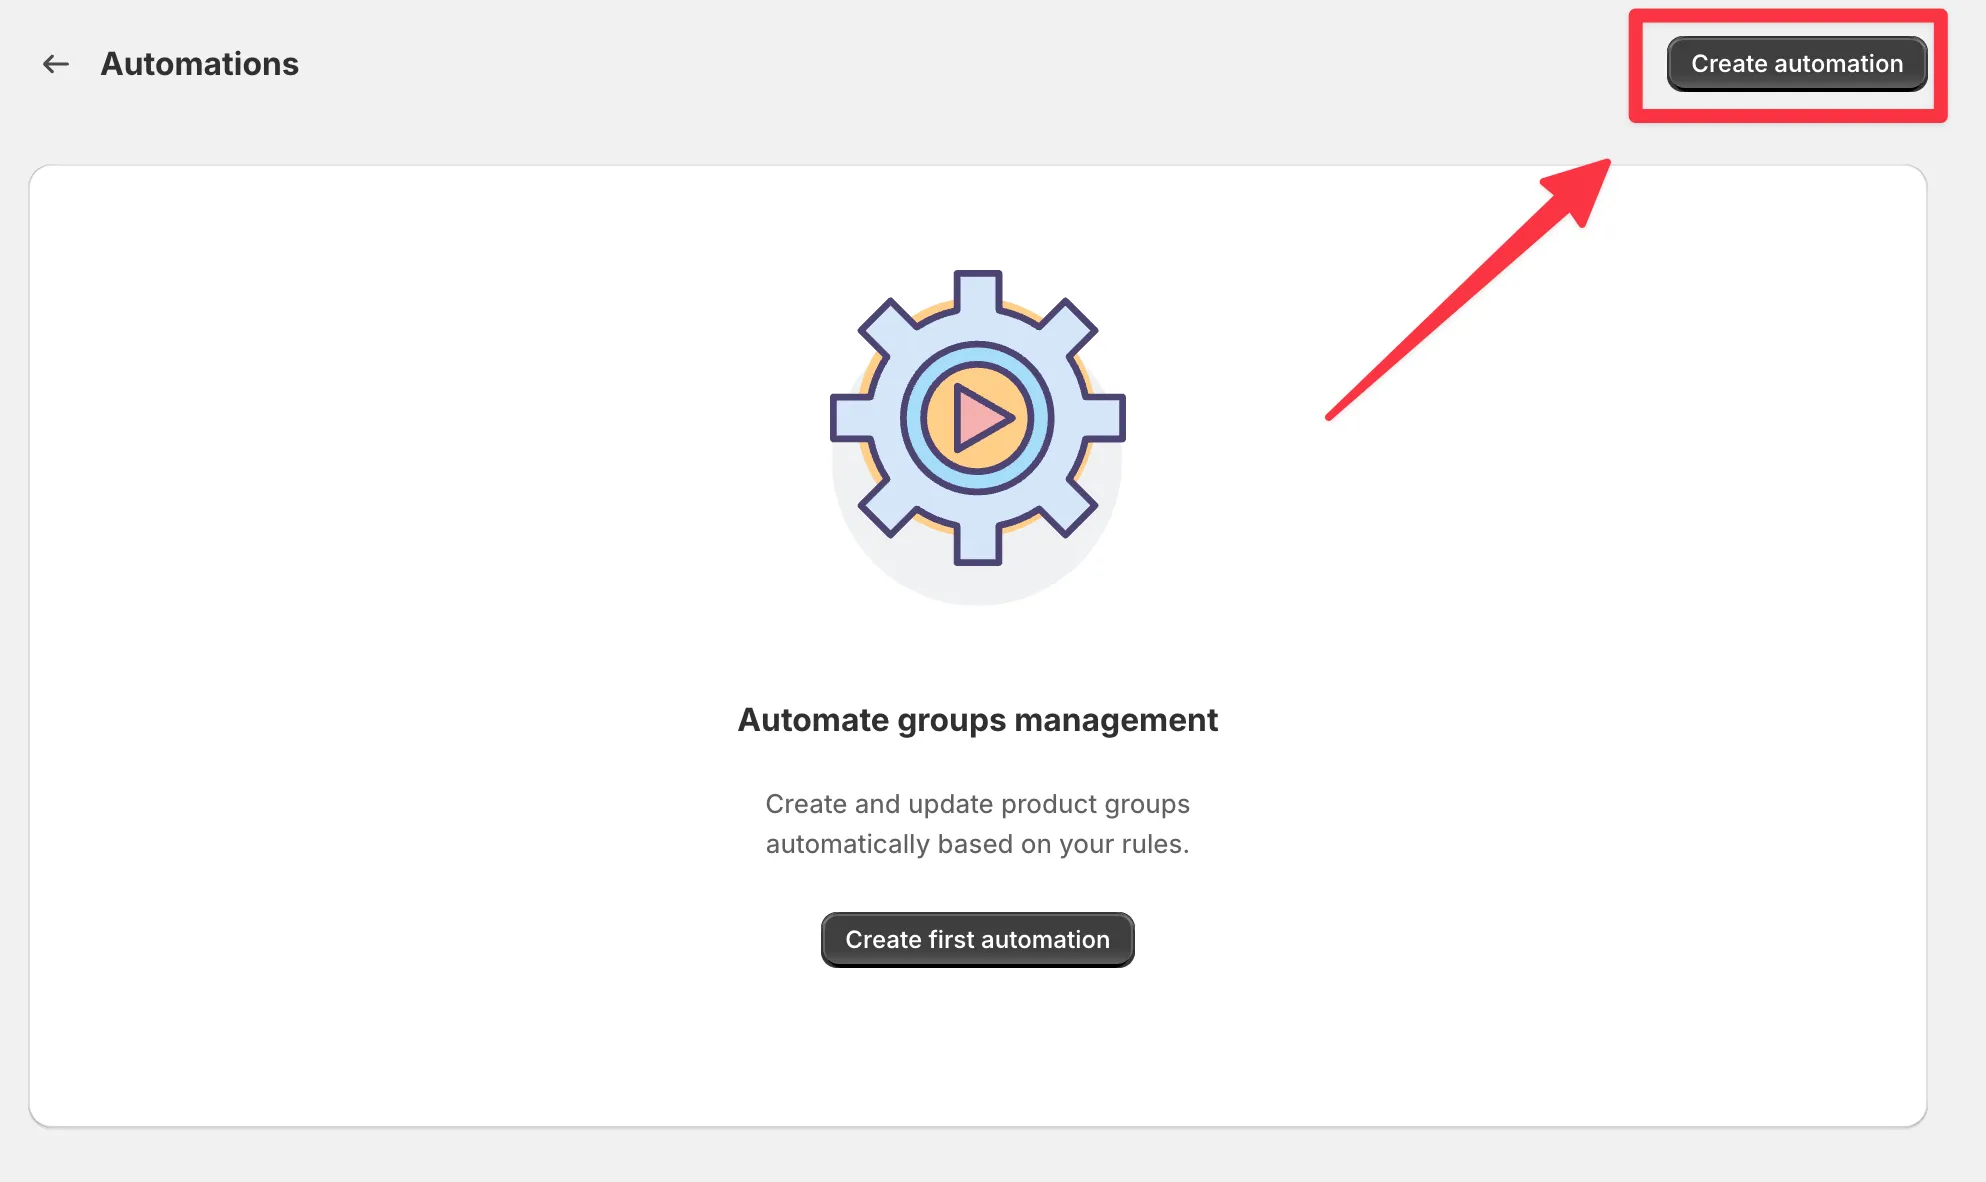
Then click Create automation.
Fill in the form:
- In Automatically group products using, choose Collections or Metafields. This can’t be changed later.
- Set the source:
- Collections - enter your prefix in Collection name prefix (e.g.
Group:). - Metafields - choose your definition in Grouping metafield. If it’s not listed, click the reload icon next to the dropdown to refetch your metafields from Shopify.
- Collections - enter your prefix in Collection name prefix (e.g.
- Set the group and swatch options - see Configure the groups below.
- Click Create. The automation is saved Inactive; activate it to start grouping.
Configure the groups your automation creates
Section titled “Configure the groups your automation creates”Both automation types share the rest of the form. These settings apply to every group the automation creates, and you change them by editing the automation - not the individual groups.
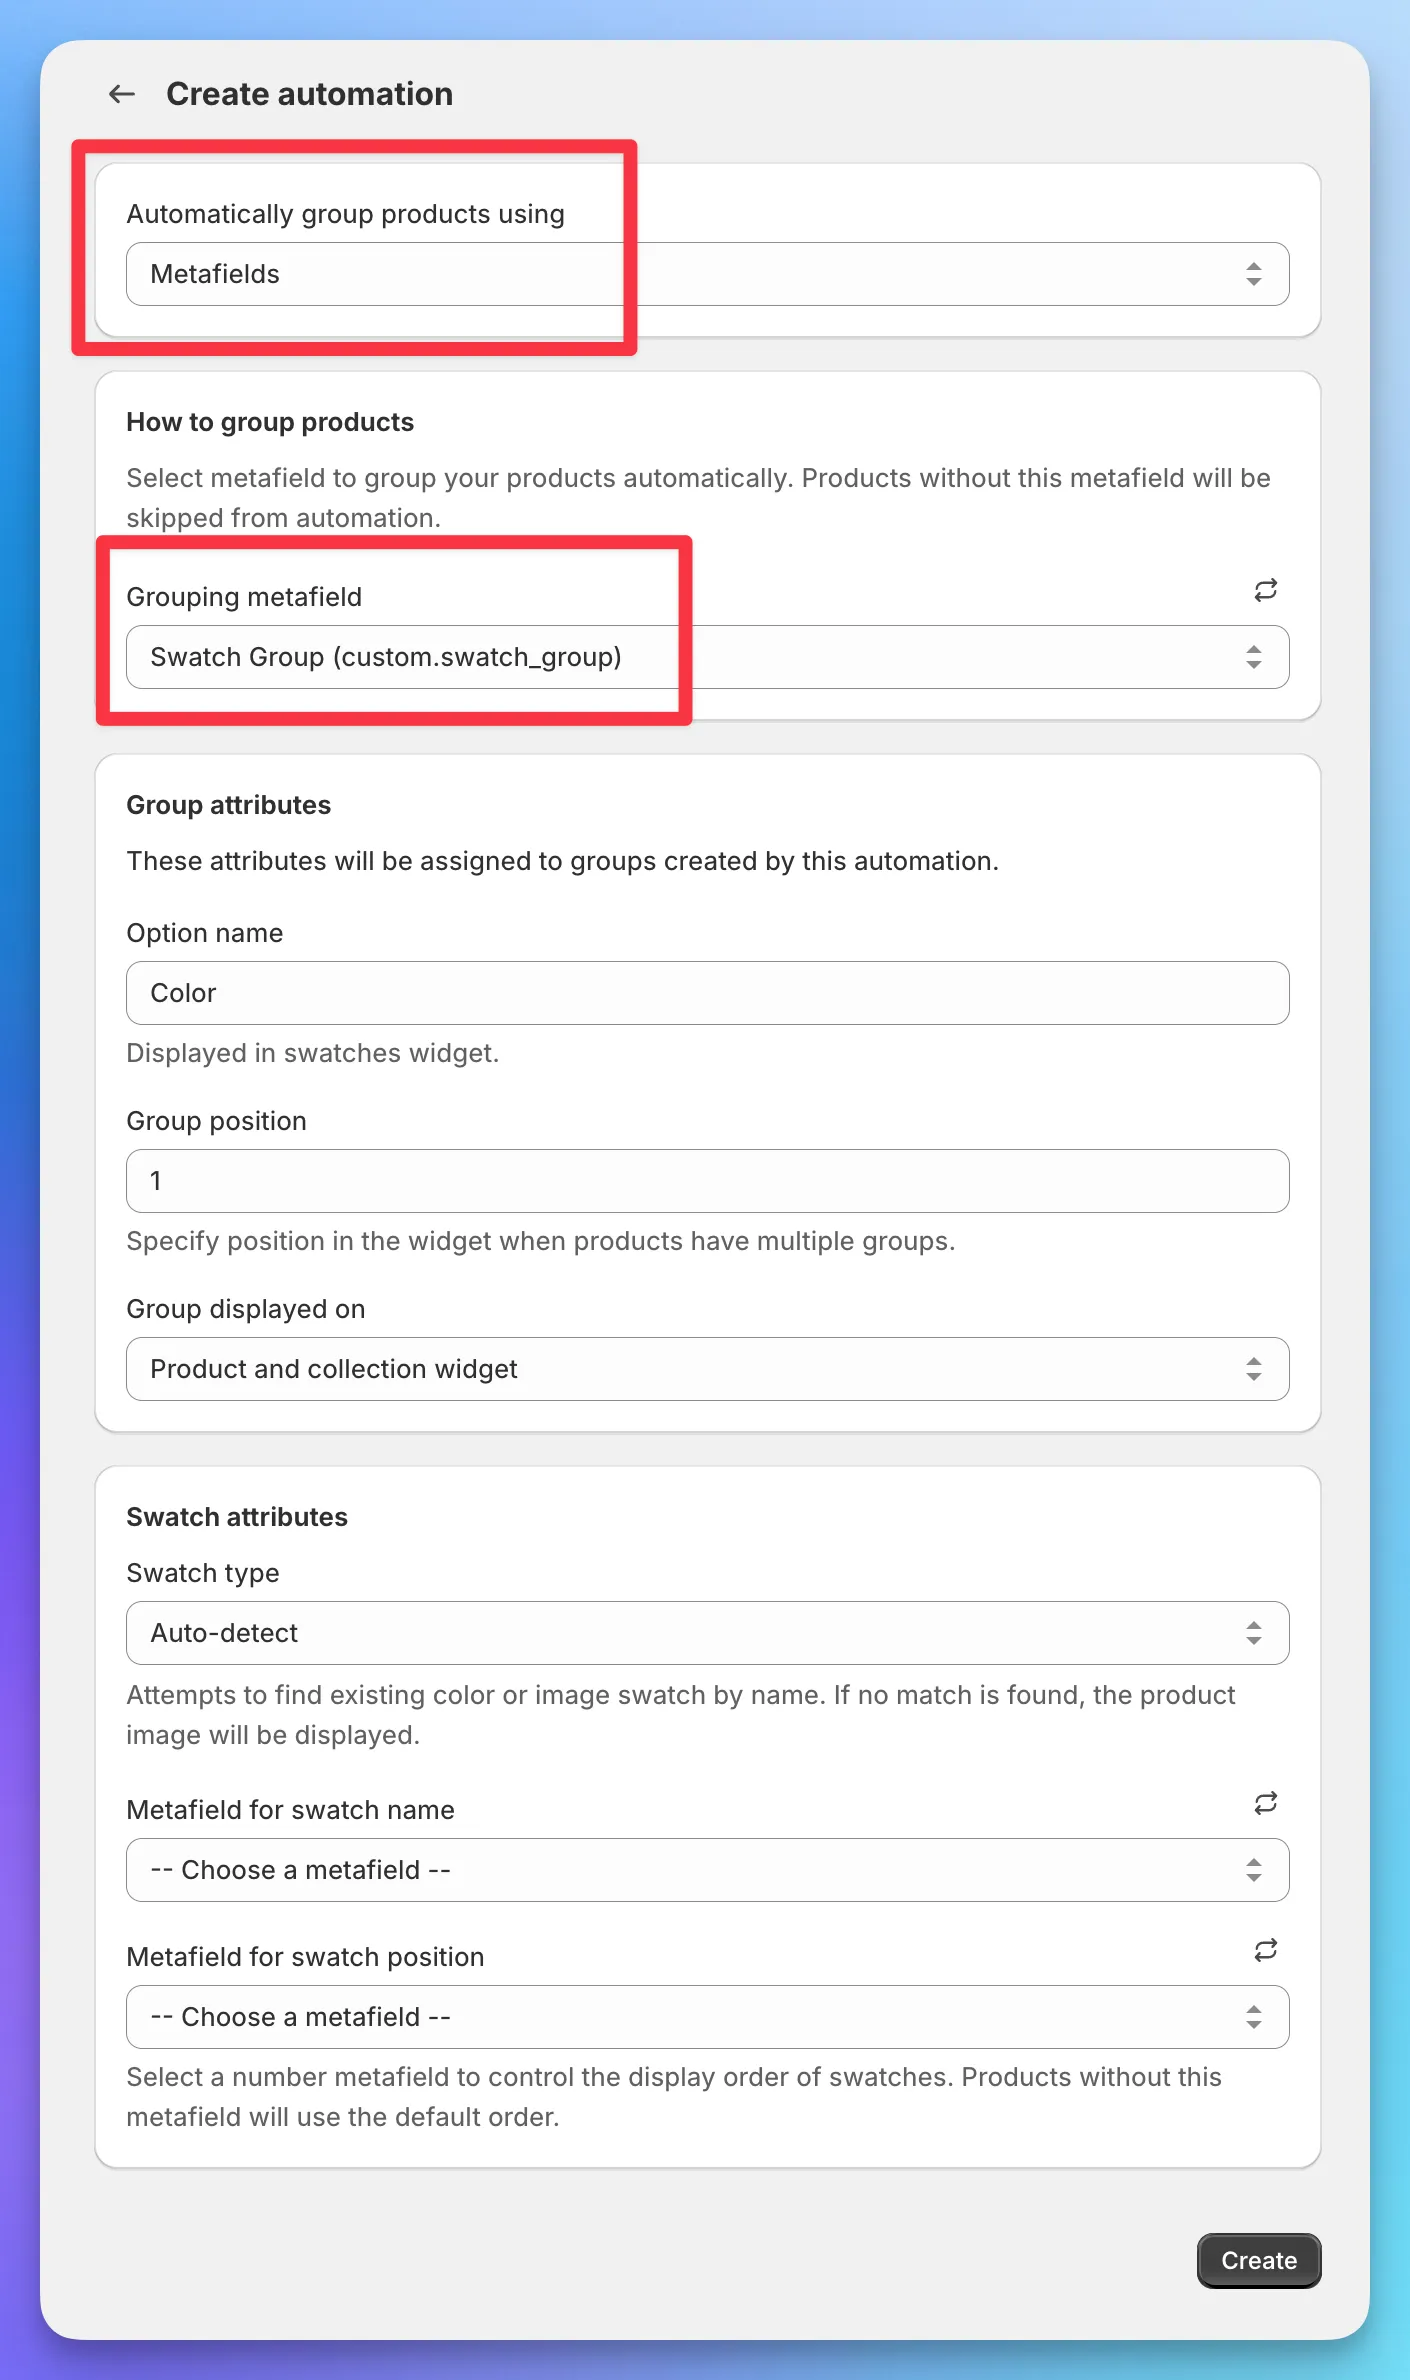
Group attributes
Section titled “Group attributes”- Option name - the label shown above the swatches on your storefront (e.g.
Color,Style,Design). - Group position - the order of this group in the widget when a product belongs to more than one group.
1shows first. - Group displayed on - where the swatches appear: product pages, collection pages, or both (the default).
Swatch type
Section titled “Swatch type”Swatch type controls how each product’s swatch is drawn:
- Auto-detect - matches an existing color or image swatch in the app by name. If nothing matches, the product’s image is used. This is the best default.
- Product image - always uses the product’s own photo: the featured image, or the image position you’ve set in Settings.
- Image with text - product image with a text label below it. Needs a swatch name (see below).
- Pill - a text-only button. Also needs a swatch name.
Swatch names from a metafield
Section titled “Swatch names from a metafield”By default the app names swatches by matching against your existing swatches. To set names explicitly - which you must for the Image with text and Pill types - point the automation at a metafield that holds each swatch’s name.
- Add a Single line text metafield in Shopify (for example
Swatch Name) and fill it in on your products with values likeRed,Ocean Blue,Charcoal. - In the automation, under Swatch attributes, choose it in Metafield for swatch name.
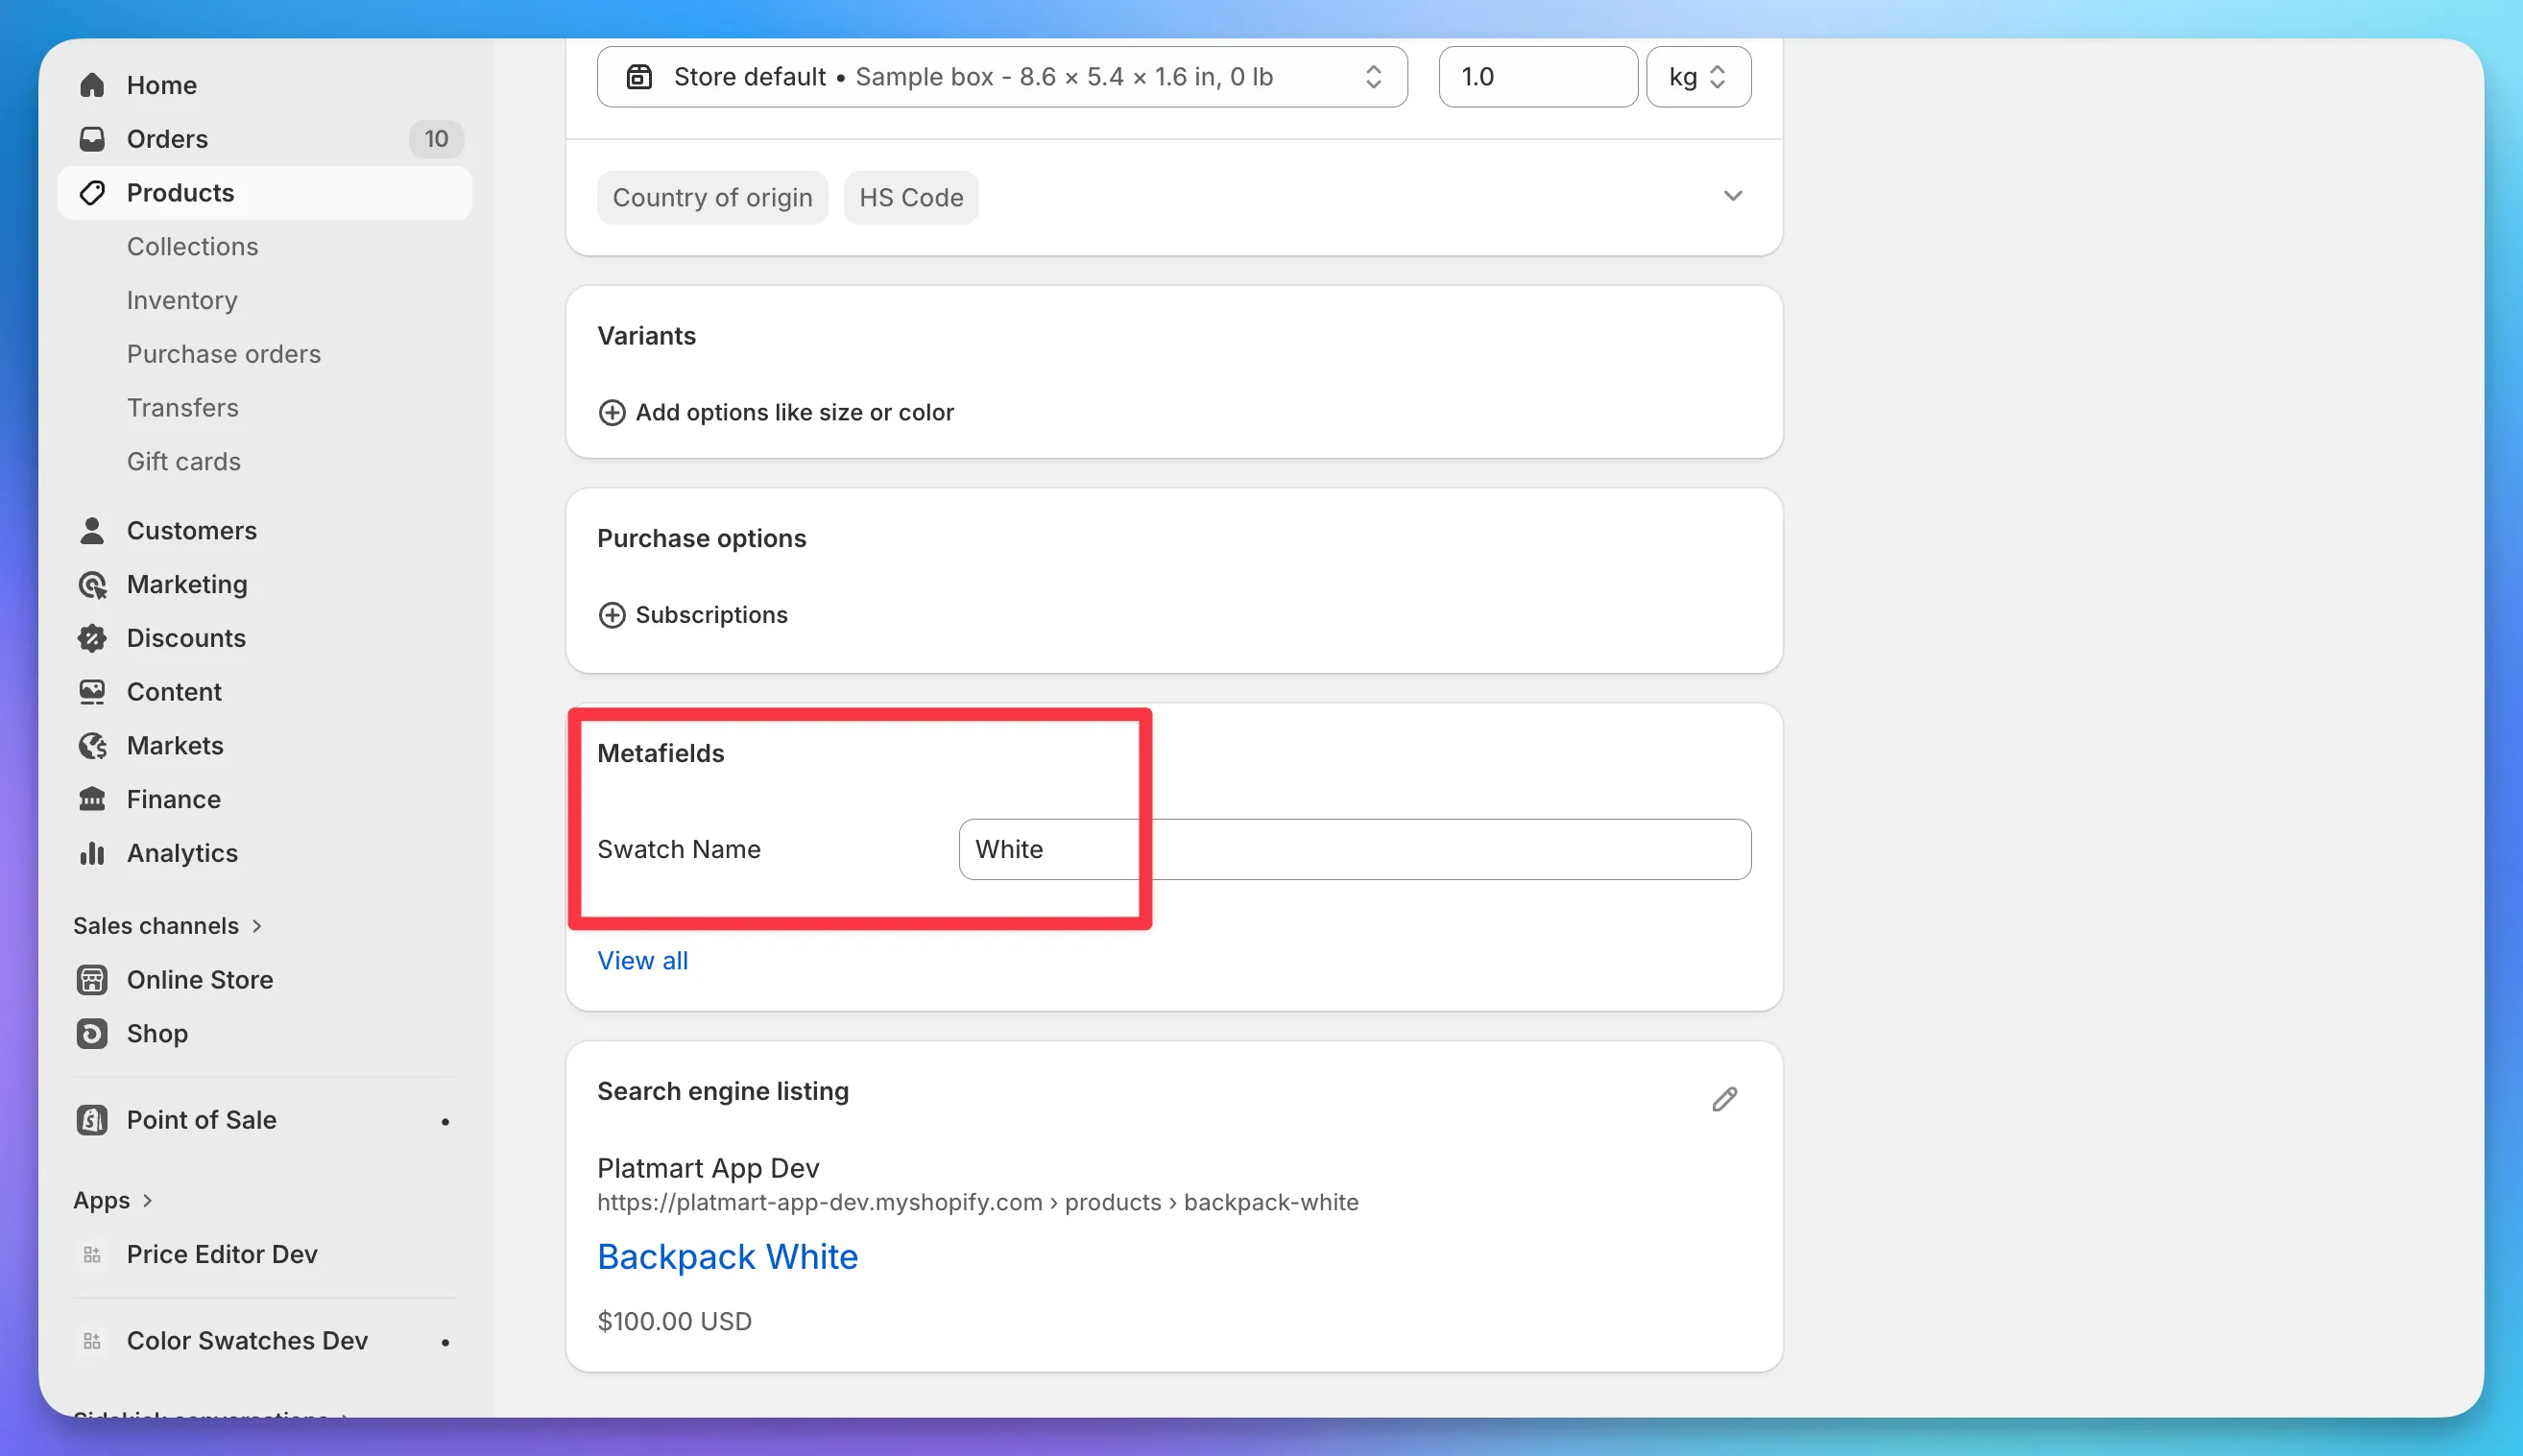
If a name matches a swatch you already use in the app, the automation reuses that swatch - same type, same color or image - so your storefront stays consistent.
Swatch order from a metafield
Section titled “Swatch order from a metafield”By default, swatches follow the order products appear in the collection (collections automation) or are sorted by product title (text-metafield automation). To control the order yourself, add an Integer metafield (for example Swatch Position), set a number on each product (lower shows first), and select it in Metafield for swatch position. Products with no number fall to the end.
Activate and check your groups
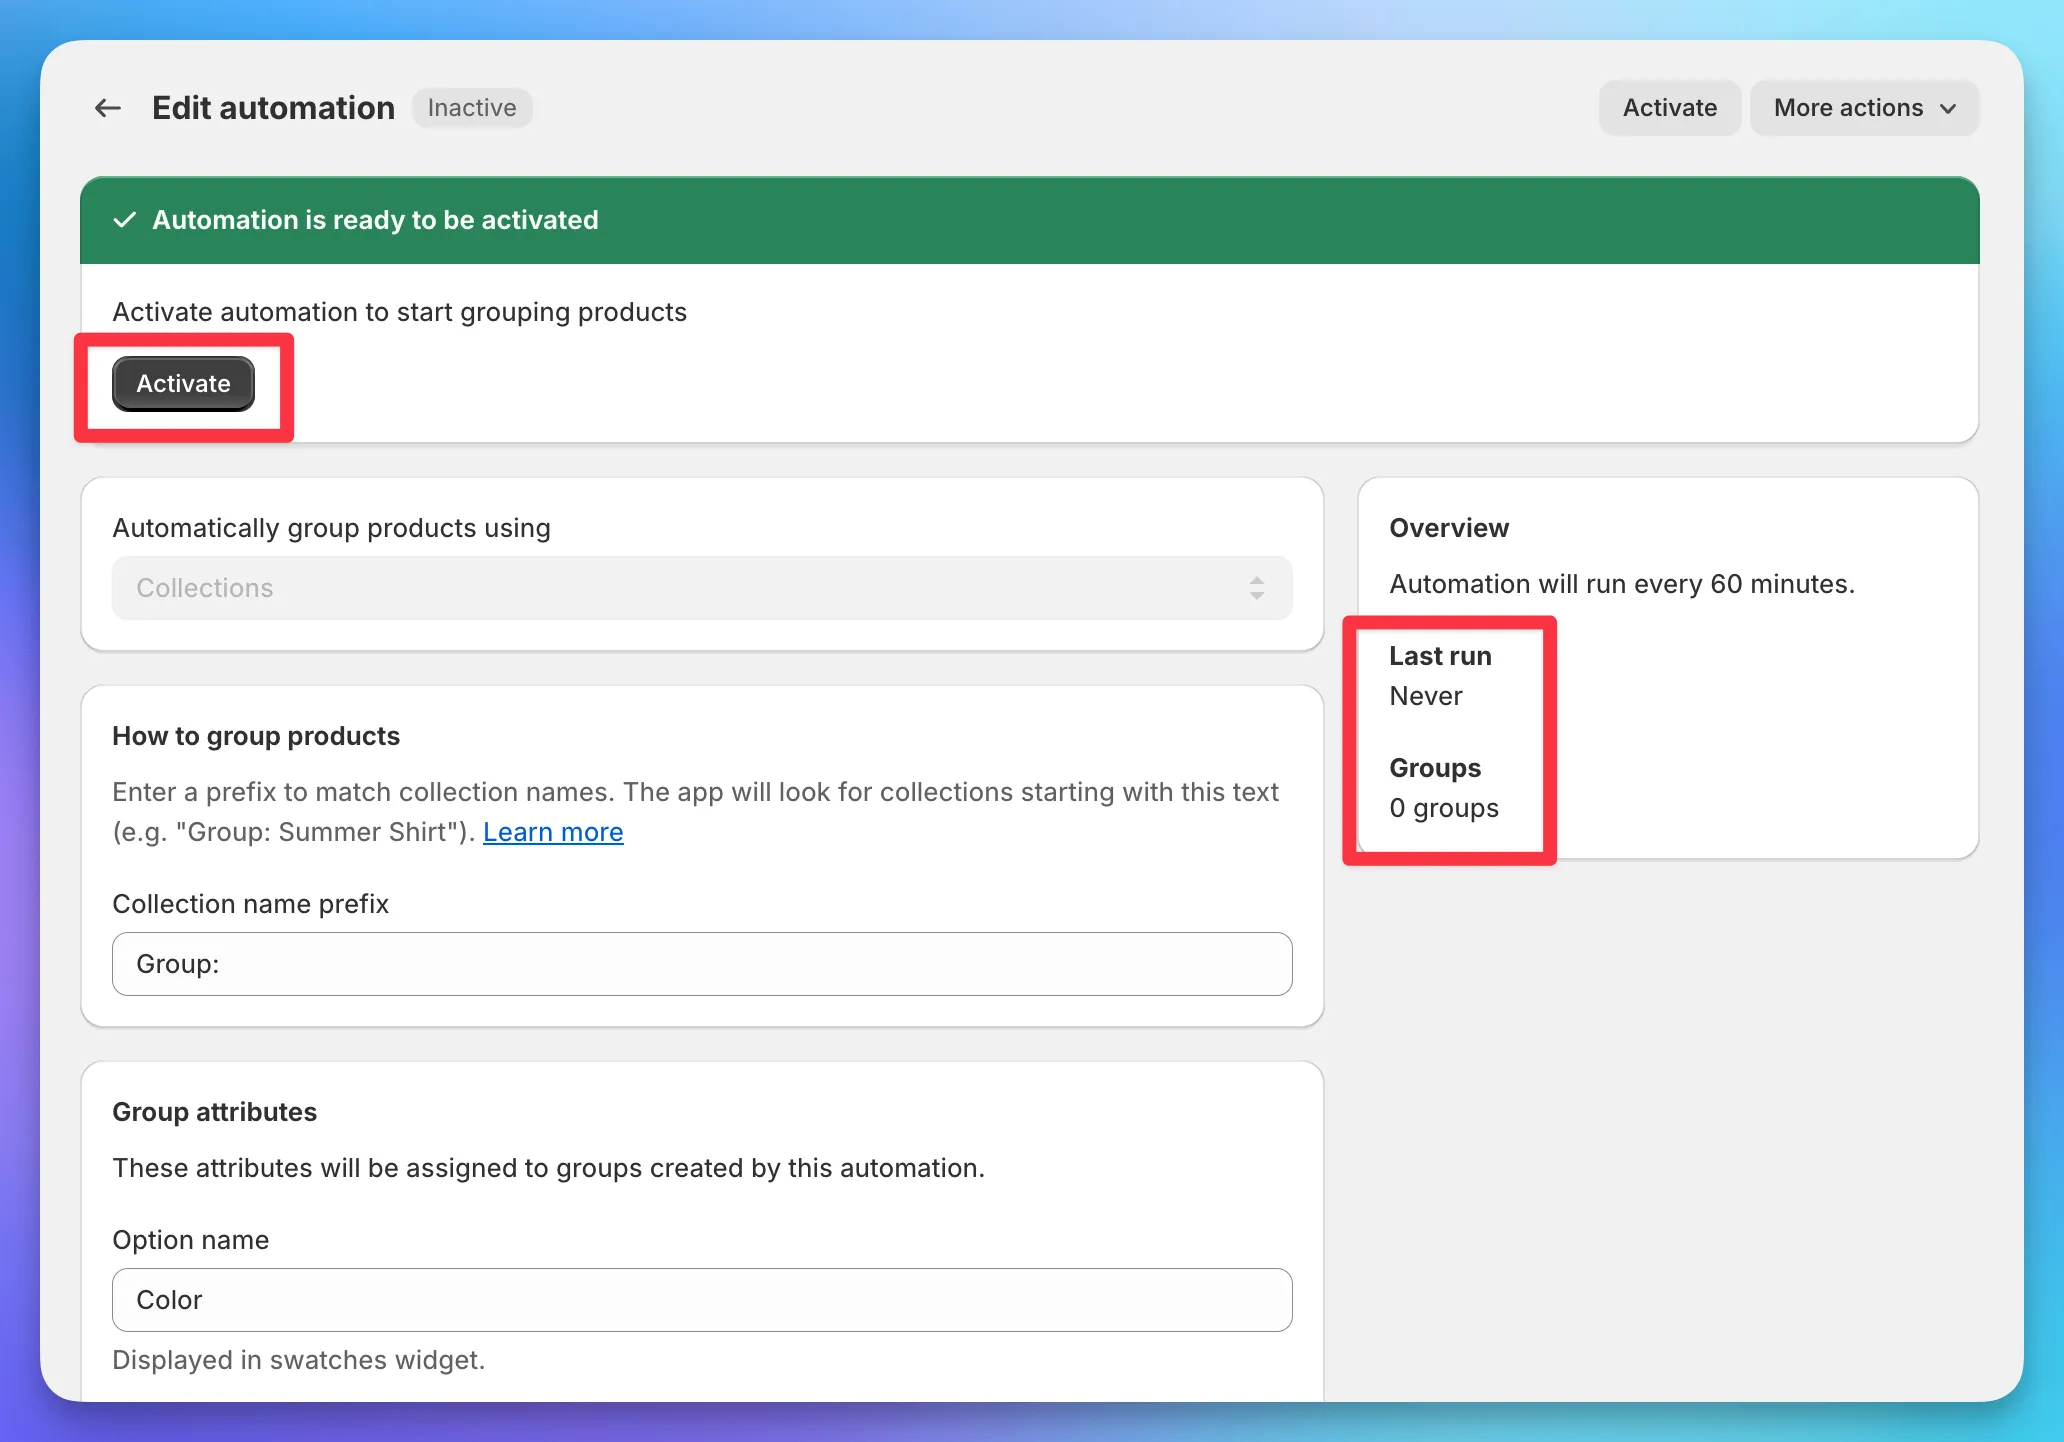
Section titled “Activate and check your groups”A new automation is created Inactive. Open it and click Activate to run it for the first time. The Overview sidebar shows when it last ran and how many groups it manages.
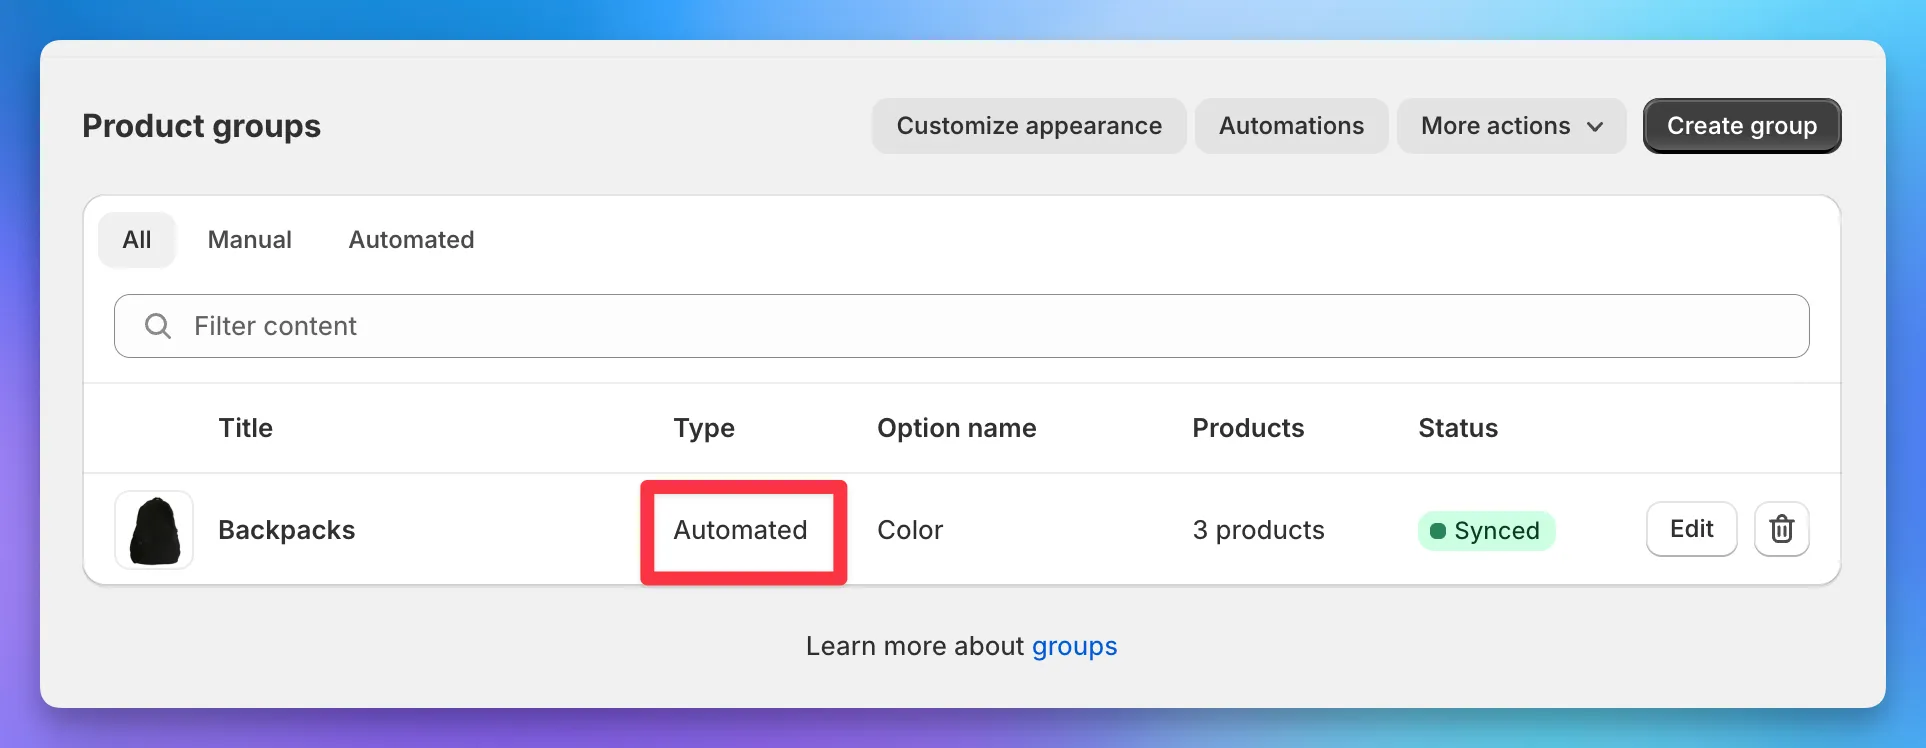
When the run finishes, open Product groups. Groups built by the automation show an Automated type and their sync status.
How automations stay in sync
Section titled “How automations stay in sync”Once active, an automation runs on its own every 60 minutes. Each run:
- Creates groups for new collections or metafield values
- Adds products that now match
- Removes products that no longer match
- Deletes groups whose source is gone - a renamed or deleted collection, or a value no longer used by any product
To sync right away instead of waiting, open the automation and click Run now.
Automated groups are read-only
Section titled “Automated groups are read-only”Groups created by an automation are managed by it, so you can’t change their products, title, or option names by hand. Anything you edit there is overwritten on the next run.
To change a group, change its source:
- Collections automation - add or remove products in the Shopify collection, or rename or delete the collection.
- Metafields automation - edit the metafield values on your products.
The shared settings (option name, position, swatch type, swatch metafields) live on the automation. Edit the automation to change them for every group at once.
Skip single-product groups
Section titled “Skip single-product groups”A collection or metafield value with only one product behind it makes a group with a single swatch, which usually isn’t worth showing. Turn on Skip groups with a single product in the automation and the app won’t create those groups. It also deletes an existing one if it shrinks to a single product.
Multi-option automations
Section titled “Multi-option automations”An automation can build multi-option groups too - two or three swatch rows (like Style and Color) on the same product, filtering each other. Each option slot gets its own swatch type and metafields. See automating multi-option groups for the setup.
Pausing or deleting an automation
Section titled “Pausing or deleting an automation”- Deactivate pauses an automation. The groups it created stay in place but stop updating. Reactivate any time.
- Delete removes the automation and every group it created. This can’t be undone. Your products are untouched in Shopify; only the swatch groups go away.
Troubleshooting
Section titled “Troubleshooting”My automation didn’t create any groups
Section titled “My automation didn’t create any groups”- Collections: check that your collection titles start with the exact prefix, matching capitalization and spacing (
Group:vsGroup:). - Metafields: check that products have a value in the grouping metafield. Empty values are skipped. If the metafield isn’t in the dropdown, click the reload icon to refetch it.
A group has the wrong products
Section titled “A group has the wrong products”Automated groups follow their source. Update the Shopify collection or the product metafield values, then click Run now. Editing the group directly won’t stick.
Swatches show the product image instead of a color
Section titled “Swatches show the product image instead of a color”With Auto-detect, the app falls back to the product image when a swatch name doesn’t match any swatch in the app. Add the colors as swatches (or set a swatch name metafield with names that match), then run the automation again.
The automation is stuck on “Failed”
Section titled “The automation is stuck on “Failed””Open it to read the error, fix the cause, and click Reactivate. Common causes are a metafield that was deleted in Shopify or a permissions issue after reinstalling the app.