
CSV import and export
Export your product groups to a CSV, edit them in a spreadsheet, and import them back. It’s the fastest way to make bulk changes, build groups from scratch, or move groups from one store to another.
This is for Product Groups only. Variant Swatches read their options straight from Shopify, so there’s no CSV step for them.
When to use CSV
Section titled “When to use CSV”- Bulk edits - rename swatches, swap colors, or re-order dozens of groups at once instead of clicking through each one.
- Building from scratch - lay out a large catalog in a spreadsheet and import it in a single pass.
- Moving between stores - export from one store and import into another.
Exporting your groups
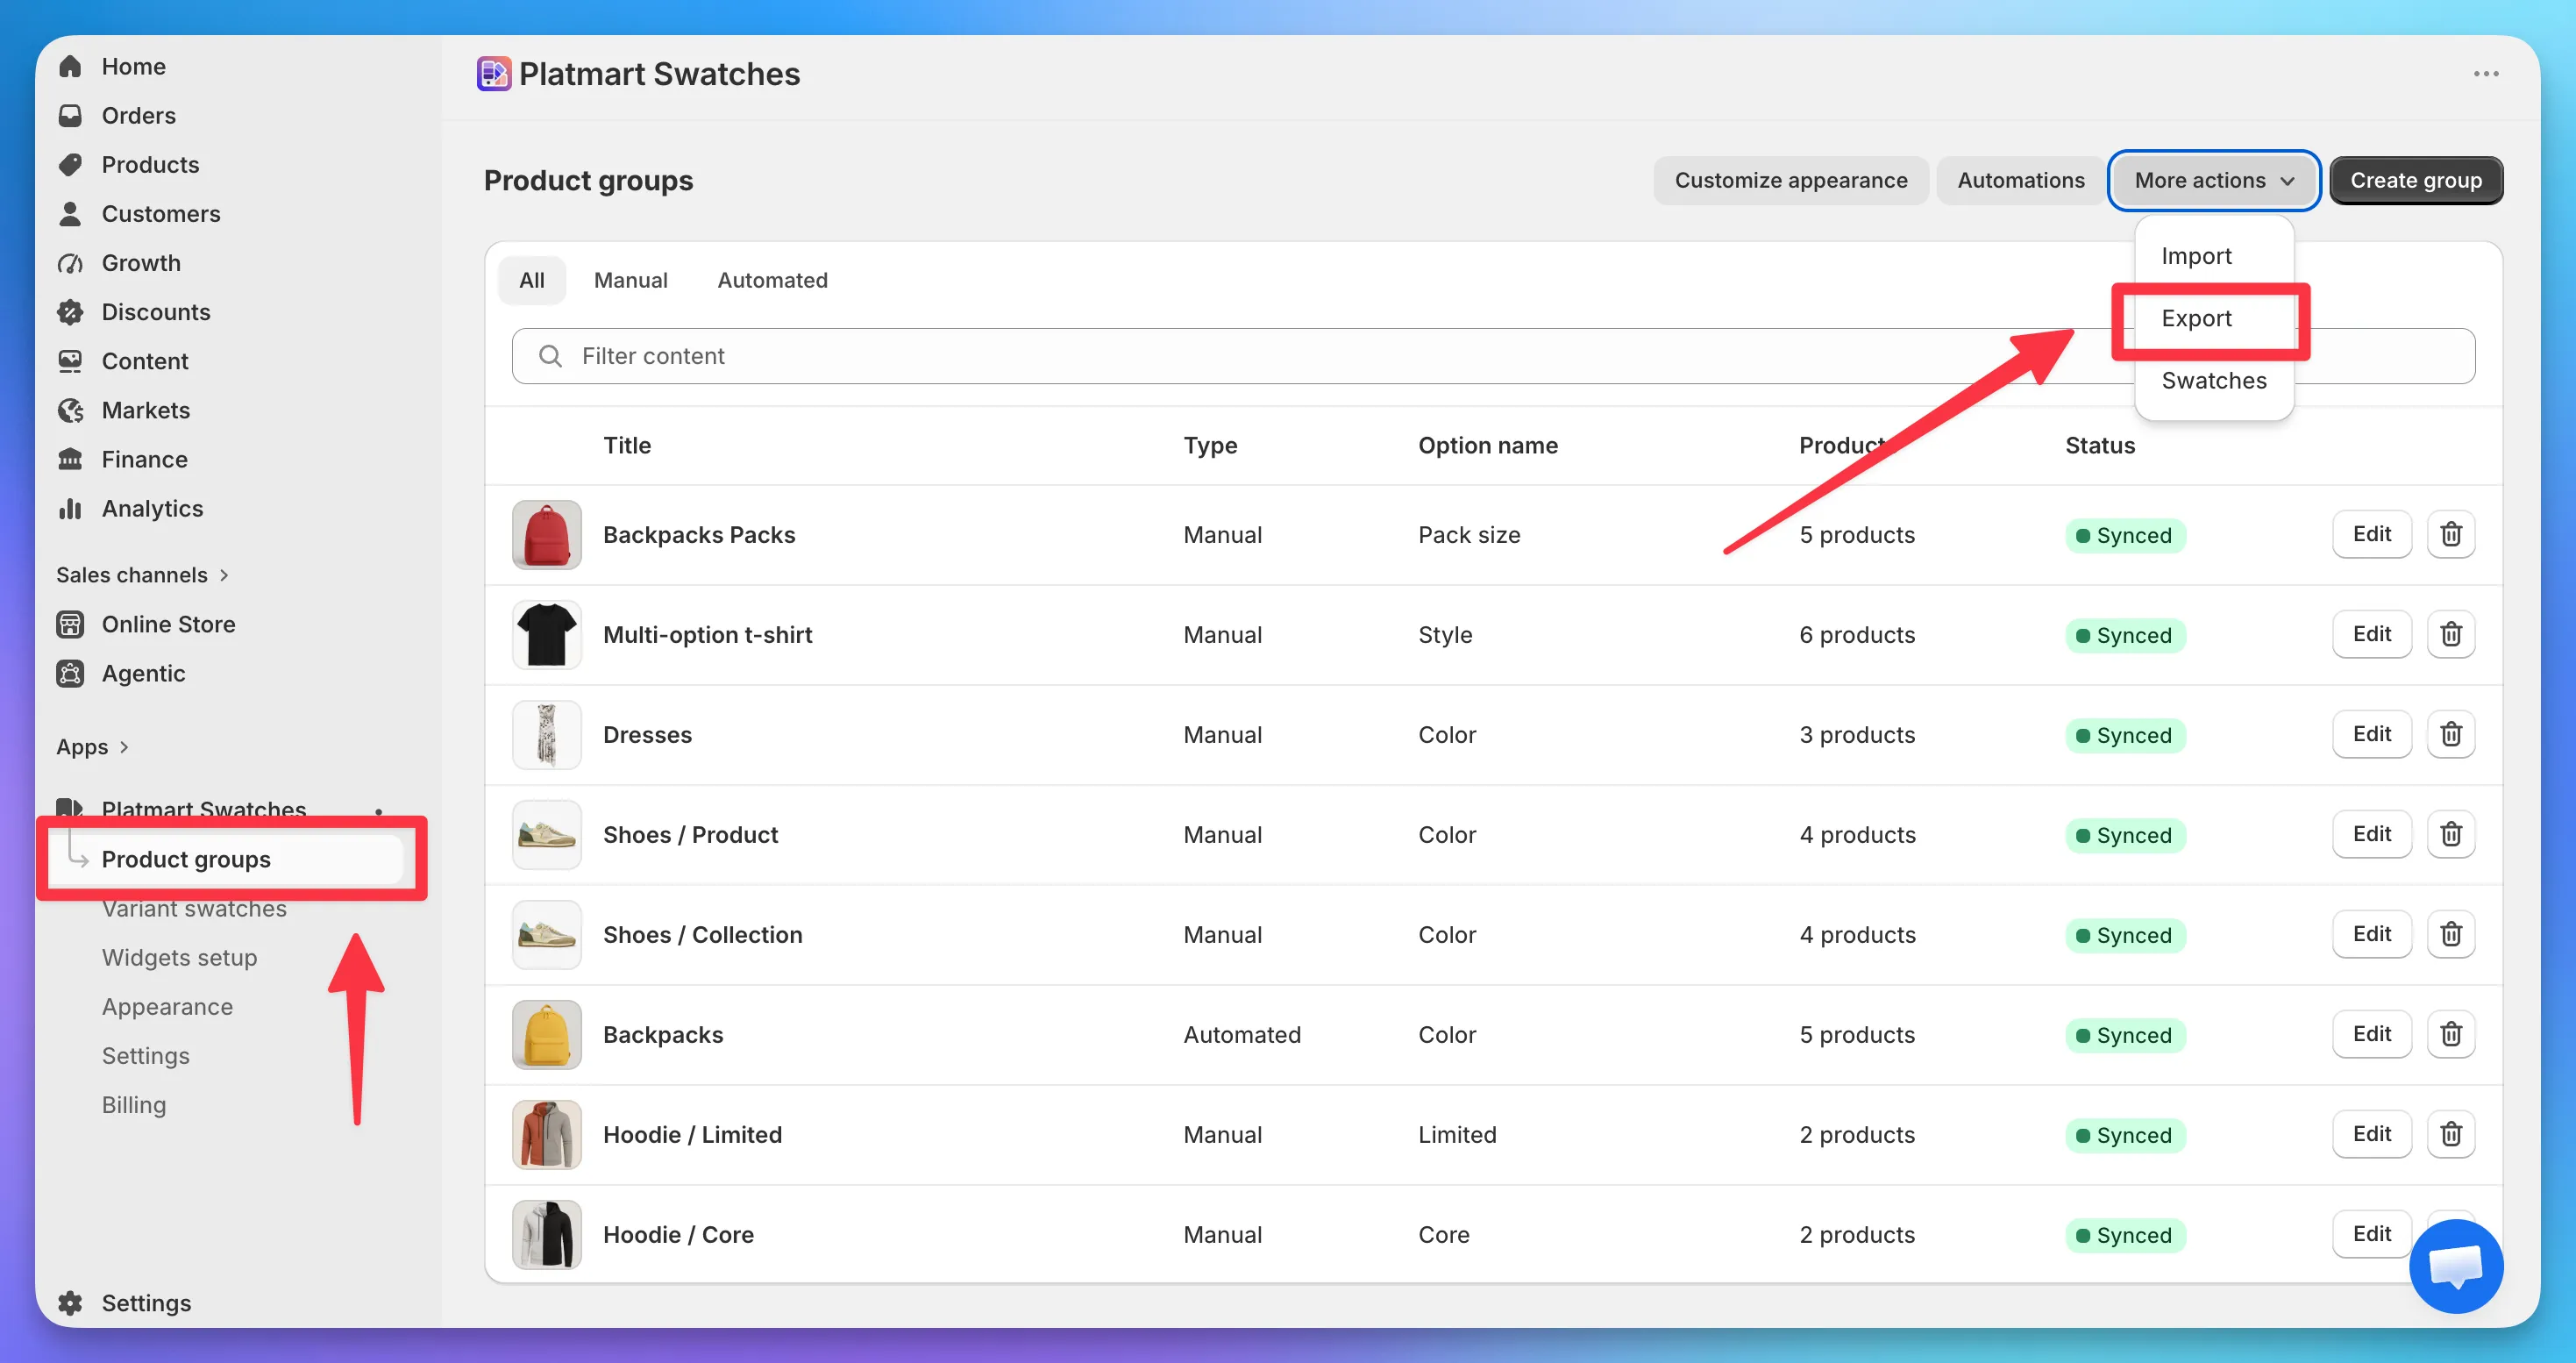
Section titled “Exporting your groups”- Open app and go to Product groups.
- Click More actions > Export.
- Enter the email address where you want the download link.
- Click Start export.
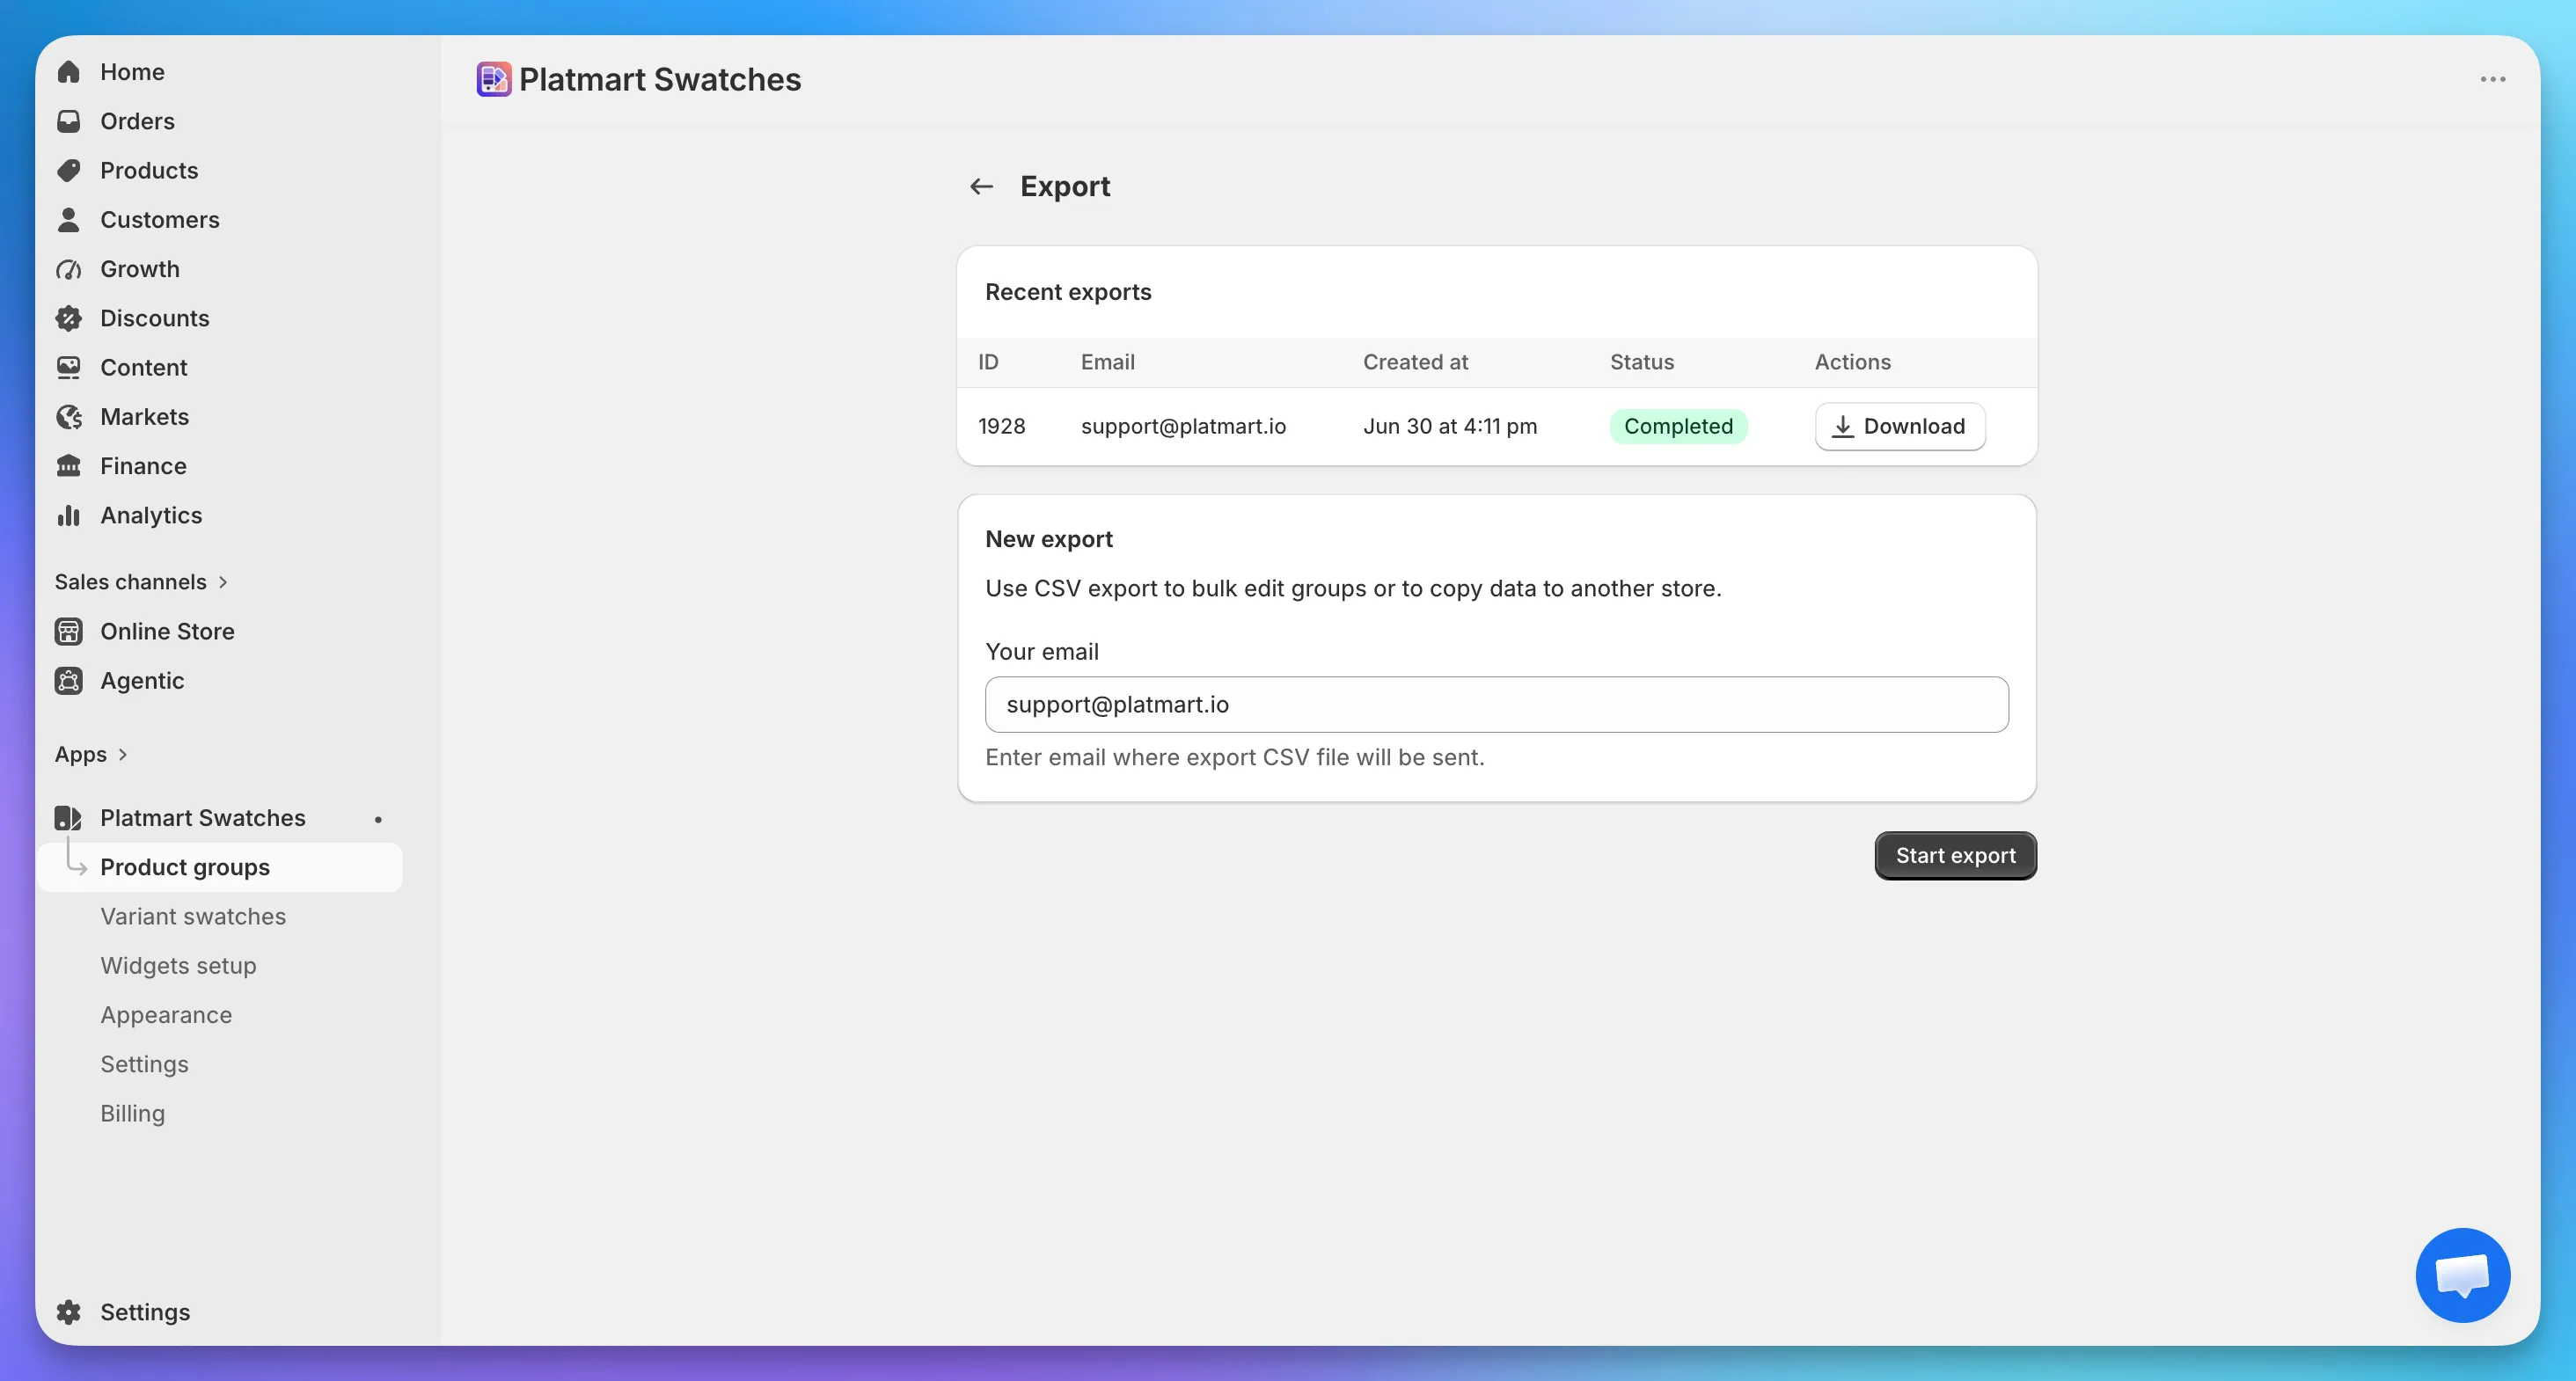
The app builds the file in the background and emails you a download link when it’s ready. Larger catalogs take a little longer.
Your recent exports also stay listed under Recent exports on the same screen, each with a Download button, so you can grab the file again without running a new export.
Editing the CSV
Section titled “Editing the CSV”Open the file in a spreadsheet, make your changes, and save it back as CSV. See CSV format below for what each column does.
Use Google Sheets if you can. Excel and Numbers work too, but they sometimes save CSVs in the wrong encoding, which is the most common cause of import errors (see Fixing import errors).
CSV format
Section titled “CSV format”The same columns are used for export, import, and the sample template. A header row is required, and each row is one product inside one group.
| Column | Required | Notes |
|---|---|---|
shopify_product_handle | Yes | The product’s handle - the part after /products/ in its storefront URL. Must match exactly. |
group_title | Yes | Rows that share a title belong to the same group. |
group_option_name | No | The row label shoppers see (e.g. Color). Defaults to your shop’s default if blank. |
swatch_name | Conditional | The swatch label. Required for image_with_text and pill; recommended for the rest. |
swatch_type | Yes | One of the values below. |
color_one | Conditional | Hex color (e.g. #000000). Required for one_color and two_colors. |
color_two | Conditional | Hex color. Required for two_colors. |
image_url | Conditional | Required for custom_image. The image is downloaded after import, so it appears on the storefront a few minutes later. |
swatch_position | No | Order of the swatch within its group. Integer. |
group_position | No | Order of the group when a product belongs to more than one. |
display_for | No | Where the group shows. Defaults to products_and_collections. |
Hex colors must be the full six-digit form with a leading #, like #000000. Three-digit shorthand (#000) is rejected on import.
swatch_type values
Section titled “swatch_type values”| Value | Needs |
|---|---|
one_color | color_one |
two_colors | color_one and color_two |
custom_image | image_url |
product_image | nothing - pulls the product’s own image |
image_with_text | swatch_name (shown beside the product image) |
pill | swatch_name (text-only swatch) |
display_for values
Section titled “display_for values”products_and_collections- product pages and collection cards (default).products- product pages only.collections- collection cards only.
A header row plus a few products might look like this. The third row is a two-color swatch, with the name split across color_one and color_two:
shopify_product_handle,group_title,group_option_name,swatch_name,swatch_type,color_one,color_two,image_url,swatch_position,group_position,display_forbackpack-black,Backpack,Color,Black,one_color,#000000,,,1,1,products_and_collectionsbackpack-blue,Backpack,Color,Blue,one_color,#000fff,,,2,1,products_and_collectionsbackpack-pink-green,Backpack,Color,Pink/Green,two_colors,#ff69b4,#00a86b,,3,1,products_and_collectionsStarting from a template
Section titled “Starting from a template”No groups to export yet? Open the import screen (Product groups > More actions > Import > Create import) and click the sample CSV template link to download a starter file. It has the correct header row and one example of each swatch type. Fill in one row per product, following the CSV format above, then import it.
To skip the manual data entry, an AI assistant can build the file from your product list instead.
Using an AI assistant
Section titled “Using an AI assistant”An AI assistant can do most of the CSV work for you, whether you’re building new groups or making bulk changes to an export. You attach a file, give it a prompt, and it does the data entry.
Use one that can browse the web and work with files, like ChatGPT or Claude. The prompts below point it to this page for the exact format, so you don’t have to spell out the columns yourself.
Building new groups
Section titled “Building new groups”Best when you don’t have any groups to export yet and want to build them from your Shopify catalog. It’s for products sold as separate listings per color - if some colors are variants of a single product instead, those belong to Variant Swatches, and the prompt below leaves them out.
- Export your products from Shopify (Products > Export in your Shopify admin). Save the file - you’ll attach it next.
- Attach the export to the assistant, paste the prompt below, and fill in your grouping rule.
- Download the
.csvfile it creates and import it.
I'm setting up the Platmart Color Swatches app for my Shopify store, andI want to import my product groups from a CSV.
First, read this page so you know the exact CSV format the app expects:https://platmart.io/docs/color-swatches/groups/csv-import-export/
I've attached my Shopify product export. Create a CSV in the app's format,grouping products that are the same item sold as separate listings per color.Group them by:[DESCRIBE YOUR RULE - for example: the product title with the color removed,wherever the color appears in it]
Follow these rules:- One row per product. Copy each shopify_product_handle exactly from the  attached file - never invent or change a handle.- The swatch name is that product's color, tidied (e.g. "Forest Green"). Use  a one_color swatch with a hex that matches the name. For a two-color name  like "Pink/Green", use two_colors with color_one and color_two.- Skip products whose color is a variant option inside a single product.  Those use Variant Swatches, not groups, so they don't belong in this CSV.- If a product's color is unclear, or two fields disagree (say the title and  a Color column), leave it out instead of guessing.
After the CSV, list every product you skipped or weren't sure about, with thereason, so I can review them.
Give me the result as a downloadable .csv file.
Editing an export
Section titled “Editing an export”Best for bulk changes to groups you already have - recoloring, renaming, reordering, or moving products between groups.
- Export your groups from Color Swatches and save the file.
- Attach the export to the assistant, paste the prompt below, and describe the changes you want.
- Download the edited
.csvand re-import it. Re-importing updates your existing groups instead of duplicating them.
I'm using the Platmart Color Swatches app for my Shopify store, and I wantto bulk-edit my product groups in the attached CSV export.
First, read this page so you keep to the exact CSV format the app expects:https://platmart.io/docs/color-swatches/groups/csv-import-export/
Make these changes:[DESCRIBE YOUR CHANGES - for example: change every Navy swatch to hex#001F3F, and rename the "Lrg" swatches to "Large"]
Keep every shopify_product_handle and the column layout exactly as they are,and change only what I asked for.
Give me the result as a downloadable .csv file.
If your assistant returns the CSV as text instead of a file, copy it into a spreadsheet and save it as a .csv.
Whichever prompt you use, check two things the AI can get wrong before importing:
- Handles have to be exact. The CSV only works when
shopify_product_handlematches your real handles, so start from Shopify’s product export or your groups export rather than a typed-up list. - Hex colors are estimates. A name like “Forest Green” becomes a reasonable guess, not your exact brand color. Review the swatches after importing and adjust any that look off.
Importing your groups
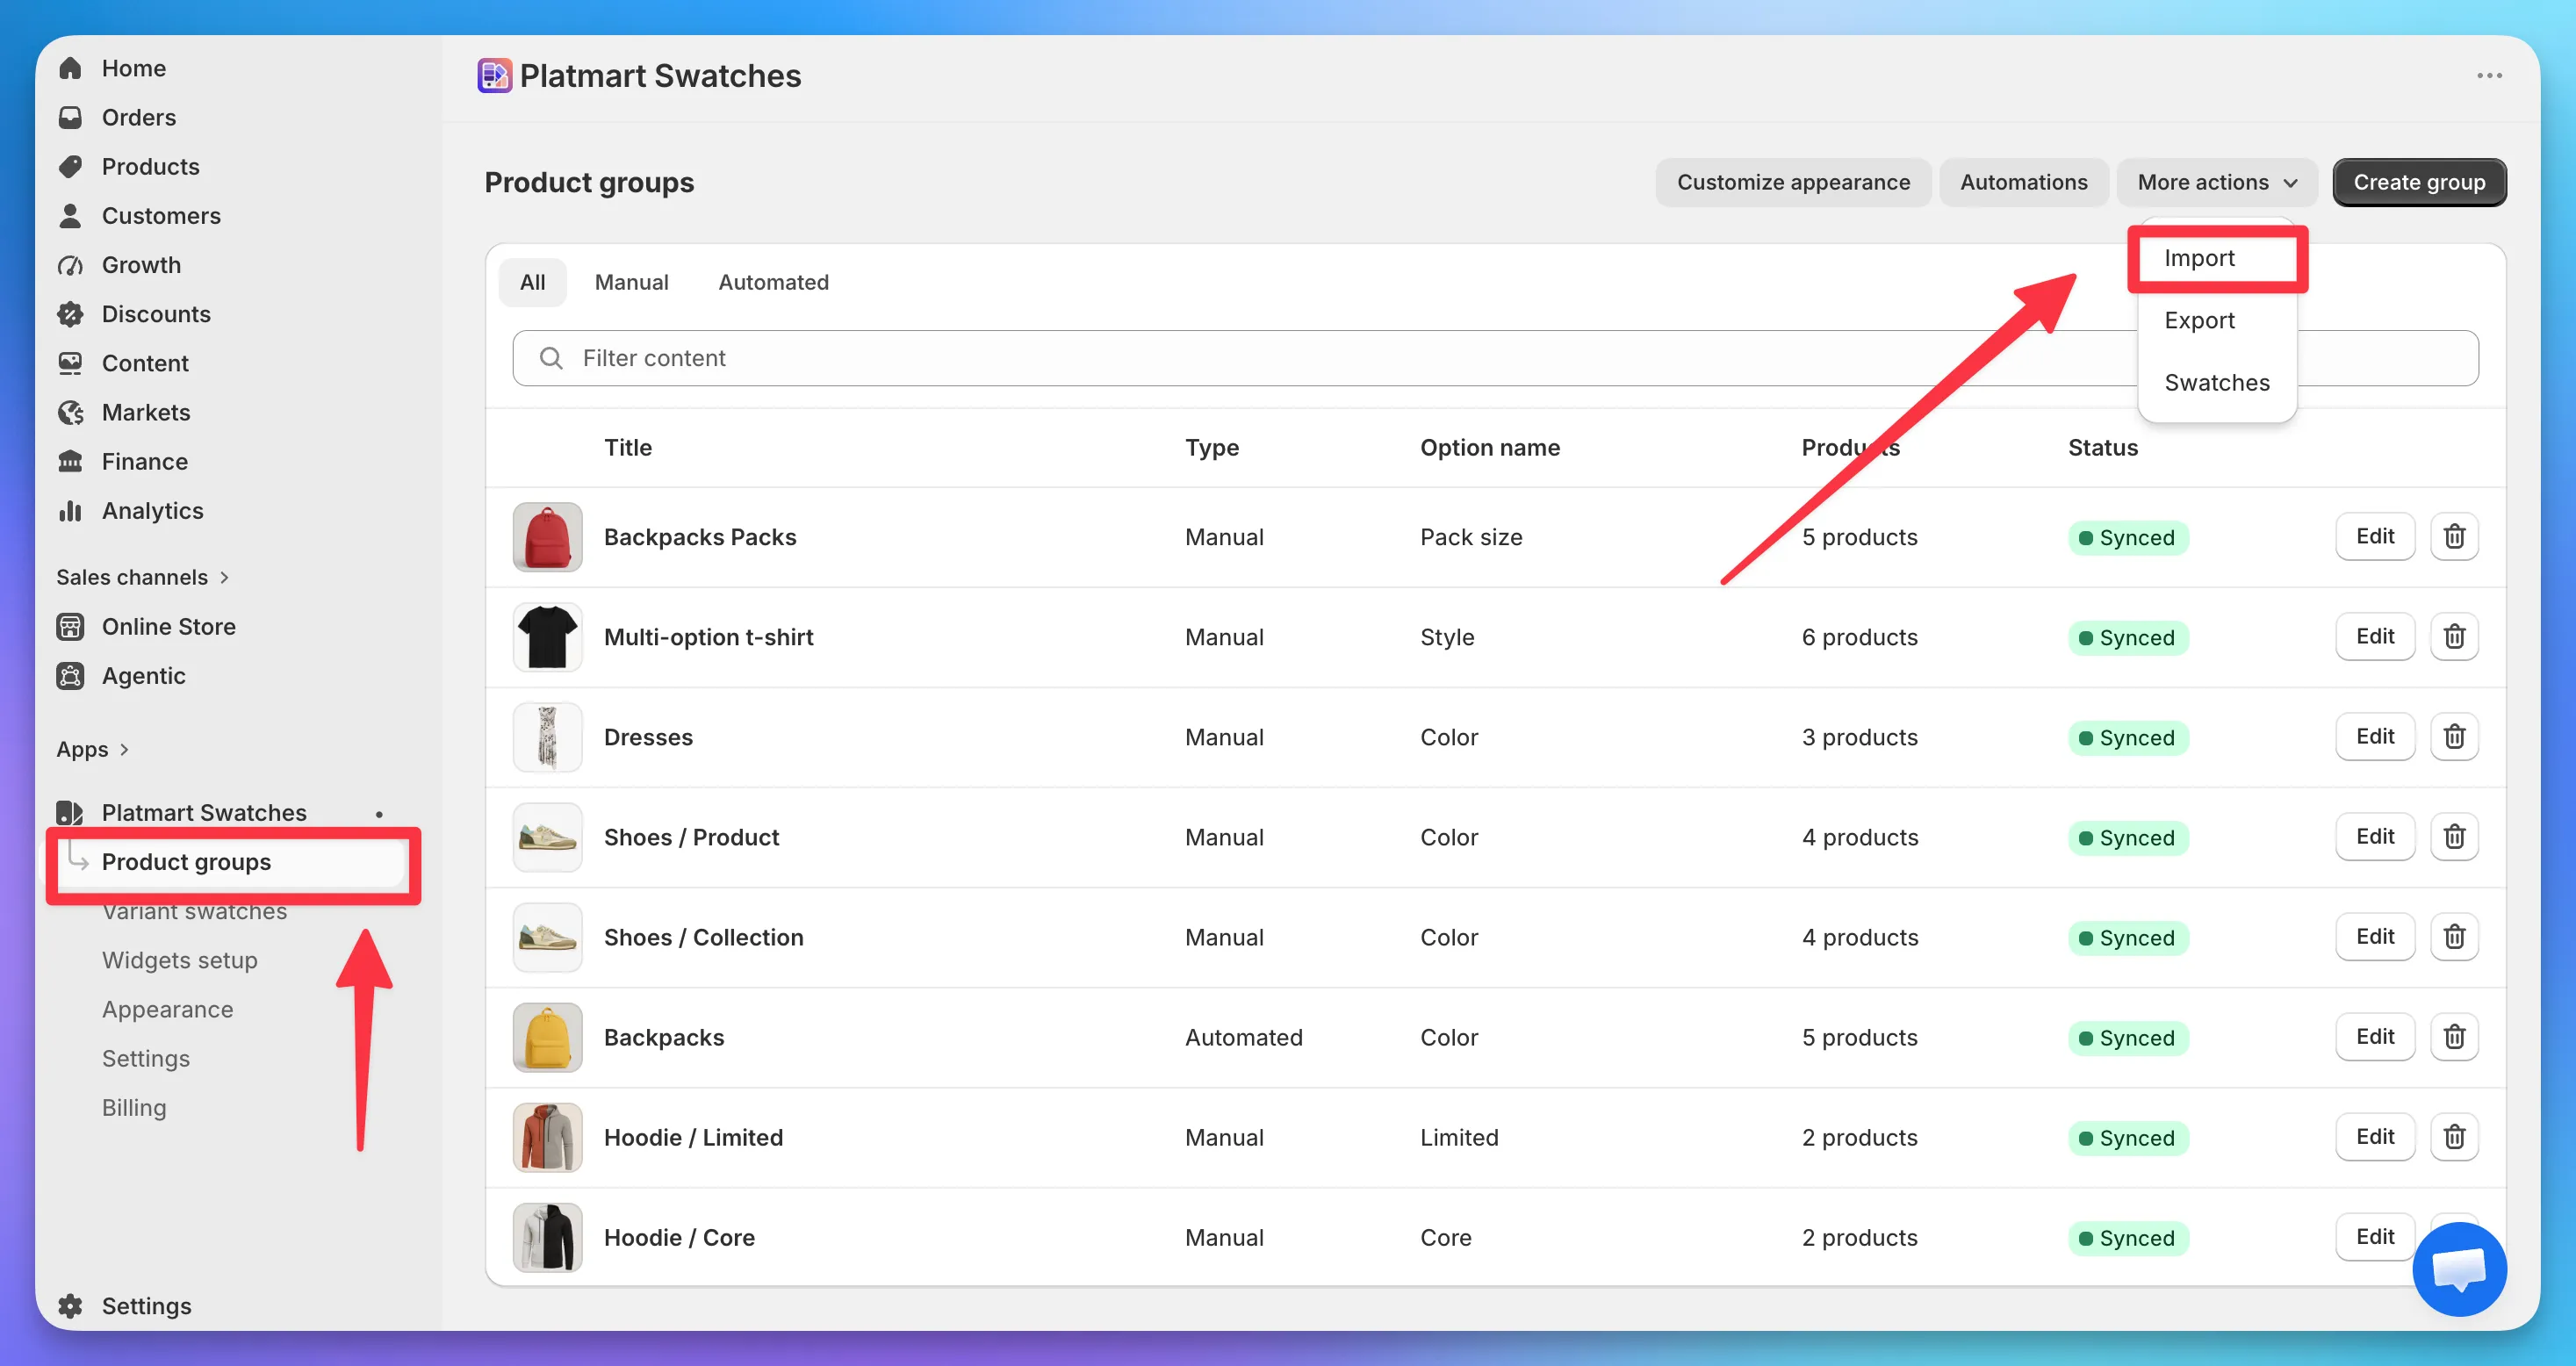
Section titled “Importing your groups”- Open app and go to Product groups.
- Click More actions > Import.
- Click Create import (or Create first import if it’s your first one).
- Drag your CSV onto the upload area, or click to choose the file.
- Click Import groups.
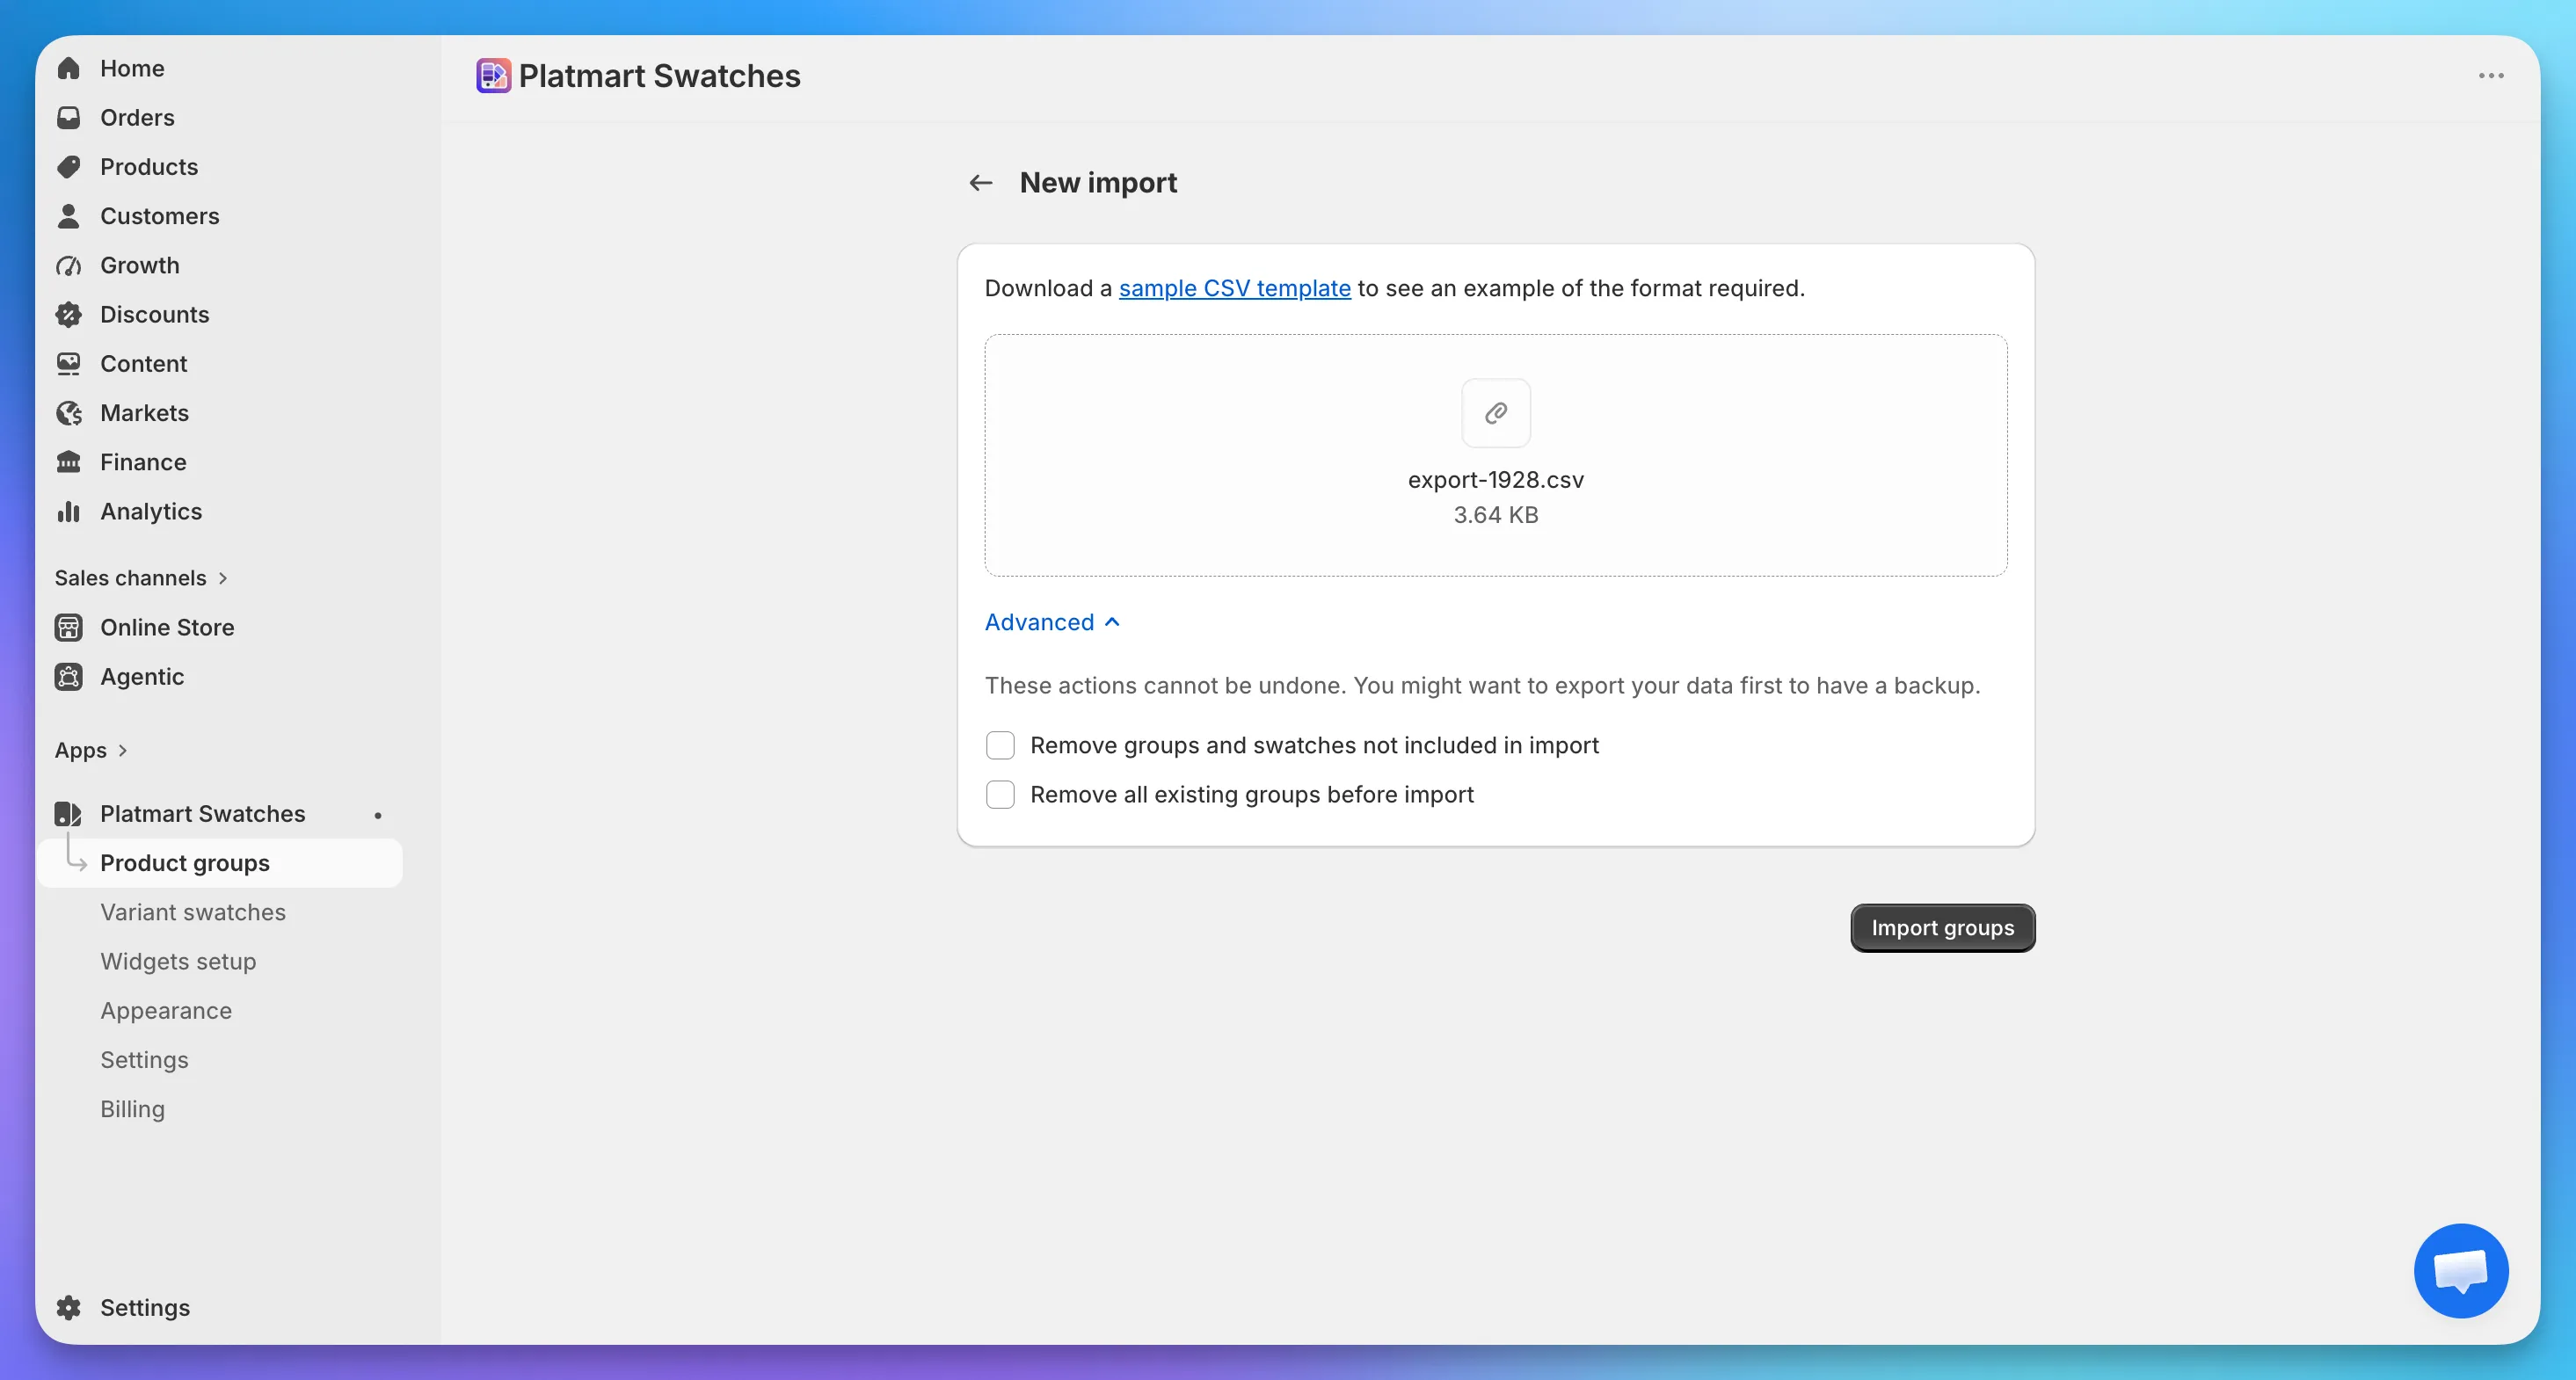
The app processes the file in the background and shows a progress bar. Importing is safe to repeat: a row that matches an existing group (by group_title) and product (by shopify_product_handle) updates it instead of creating a duplicate, so you can re-import an edited export without ending up with copies.
Building an integration instead? The REST API creates and updates groups programmatically, no CSV needed.
Replacing existing groups
Section titled “Replacing existing groups”By default, import only adds and updates - it never deletes. Open Advanced on the import form for two options that also remove data:
- Remove groups and swatches not included in import - deletes any group or swatch that isn’t in the file you’re uploading, so your groups end up matching the CSV exactly.
- Remove all existing groups before import - clears everything first, then imports fresh.
Checking the results
Section titled “Checking the results”The import screen shows live progress and a final status: completed, completed with errors, or failed.
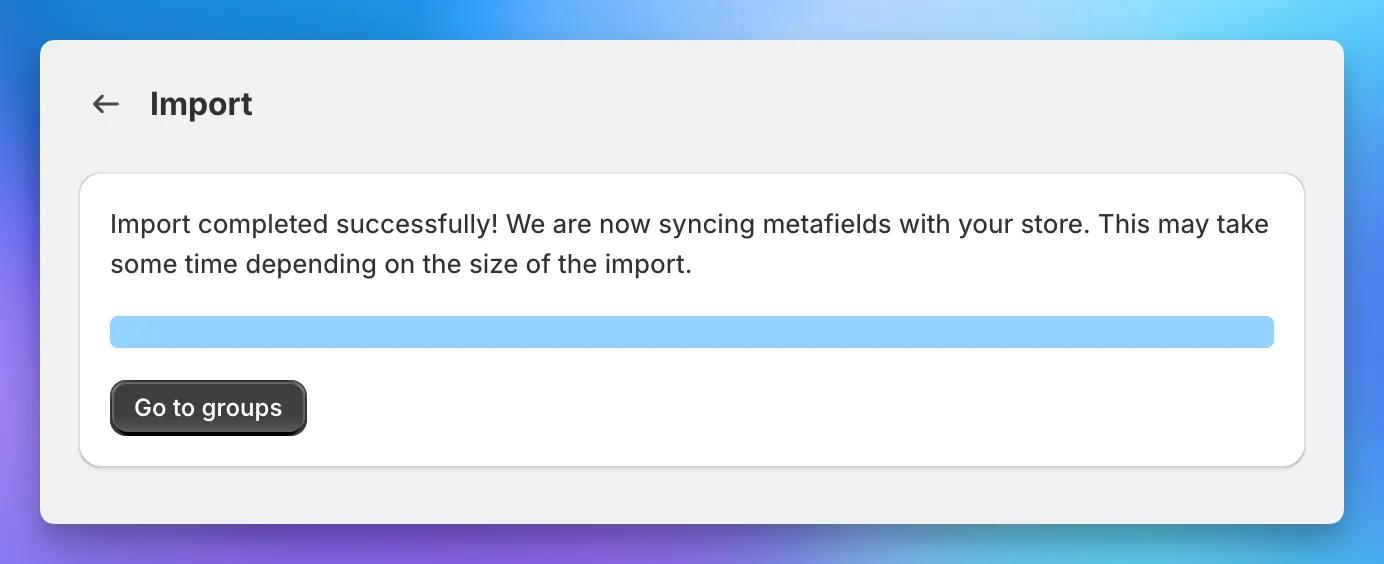
If some rows didn’t import, the app lists up to 10 errors, each tagged with its row number (like [Row #5]). Fix those rows in the CSV and import again.
Fixing import errors
Section titled “Fixing import errors”Most failures fall into a few buckets:
- Wrong encoding - the file must be UTF-8, and this is the most common error. See How do I fix a CSV encoding error? for step-by-step instructions.
- Product handle not found -
shopify_product_handlehas to match the product’s real handle exactly. Check the part after/products/in the storefront URL. - Missing headers - keep the full header row from the template or export. The app reports which columns are missing.
- Group is full - a group can’t hold more products than your plan allows. Split the products across groups or upgrade.
Once your groups import cleanly, they sync to your storefront - usually within a few minutes, though large catalogs take longer.
Frequently asked questions
Section titled “Frequently asked questions”Is CSV import and export available on all plans?
Section titled “Is CSV import and export available on all plans?”Yes. Every plan includes it, and development stores get it free.
What columns does the CSV need?
Section titled “What columns does the CSV need?”group_title, shopify_product_handle, and swatch_type are required. Everything else is optional. See CSV format for the full list.
Why does my CSV import fail?
Section titled “Why does my CSV import fail?”Usually one of a few things: the wrong file encoding (most common), an unknown product handle, missing columns, or a group that’s already full. See Fixing import errors for all of them, or the next question for the encoding fix.
How do I fix a CSV encoding error?
Section titled “How do I fix a CSV encoding error?”An encoding error means the file isn’t UTF-8. It usually happens when Excel, Numbers, or Notepad saves the file in another encoding. Round-trip it through Google Sheets, which always exports UTF-8.
-
In Google Sheets, go to File > Import and upload your CSV.
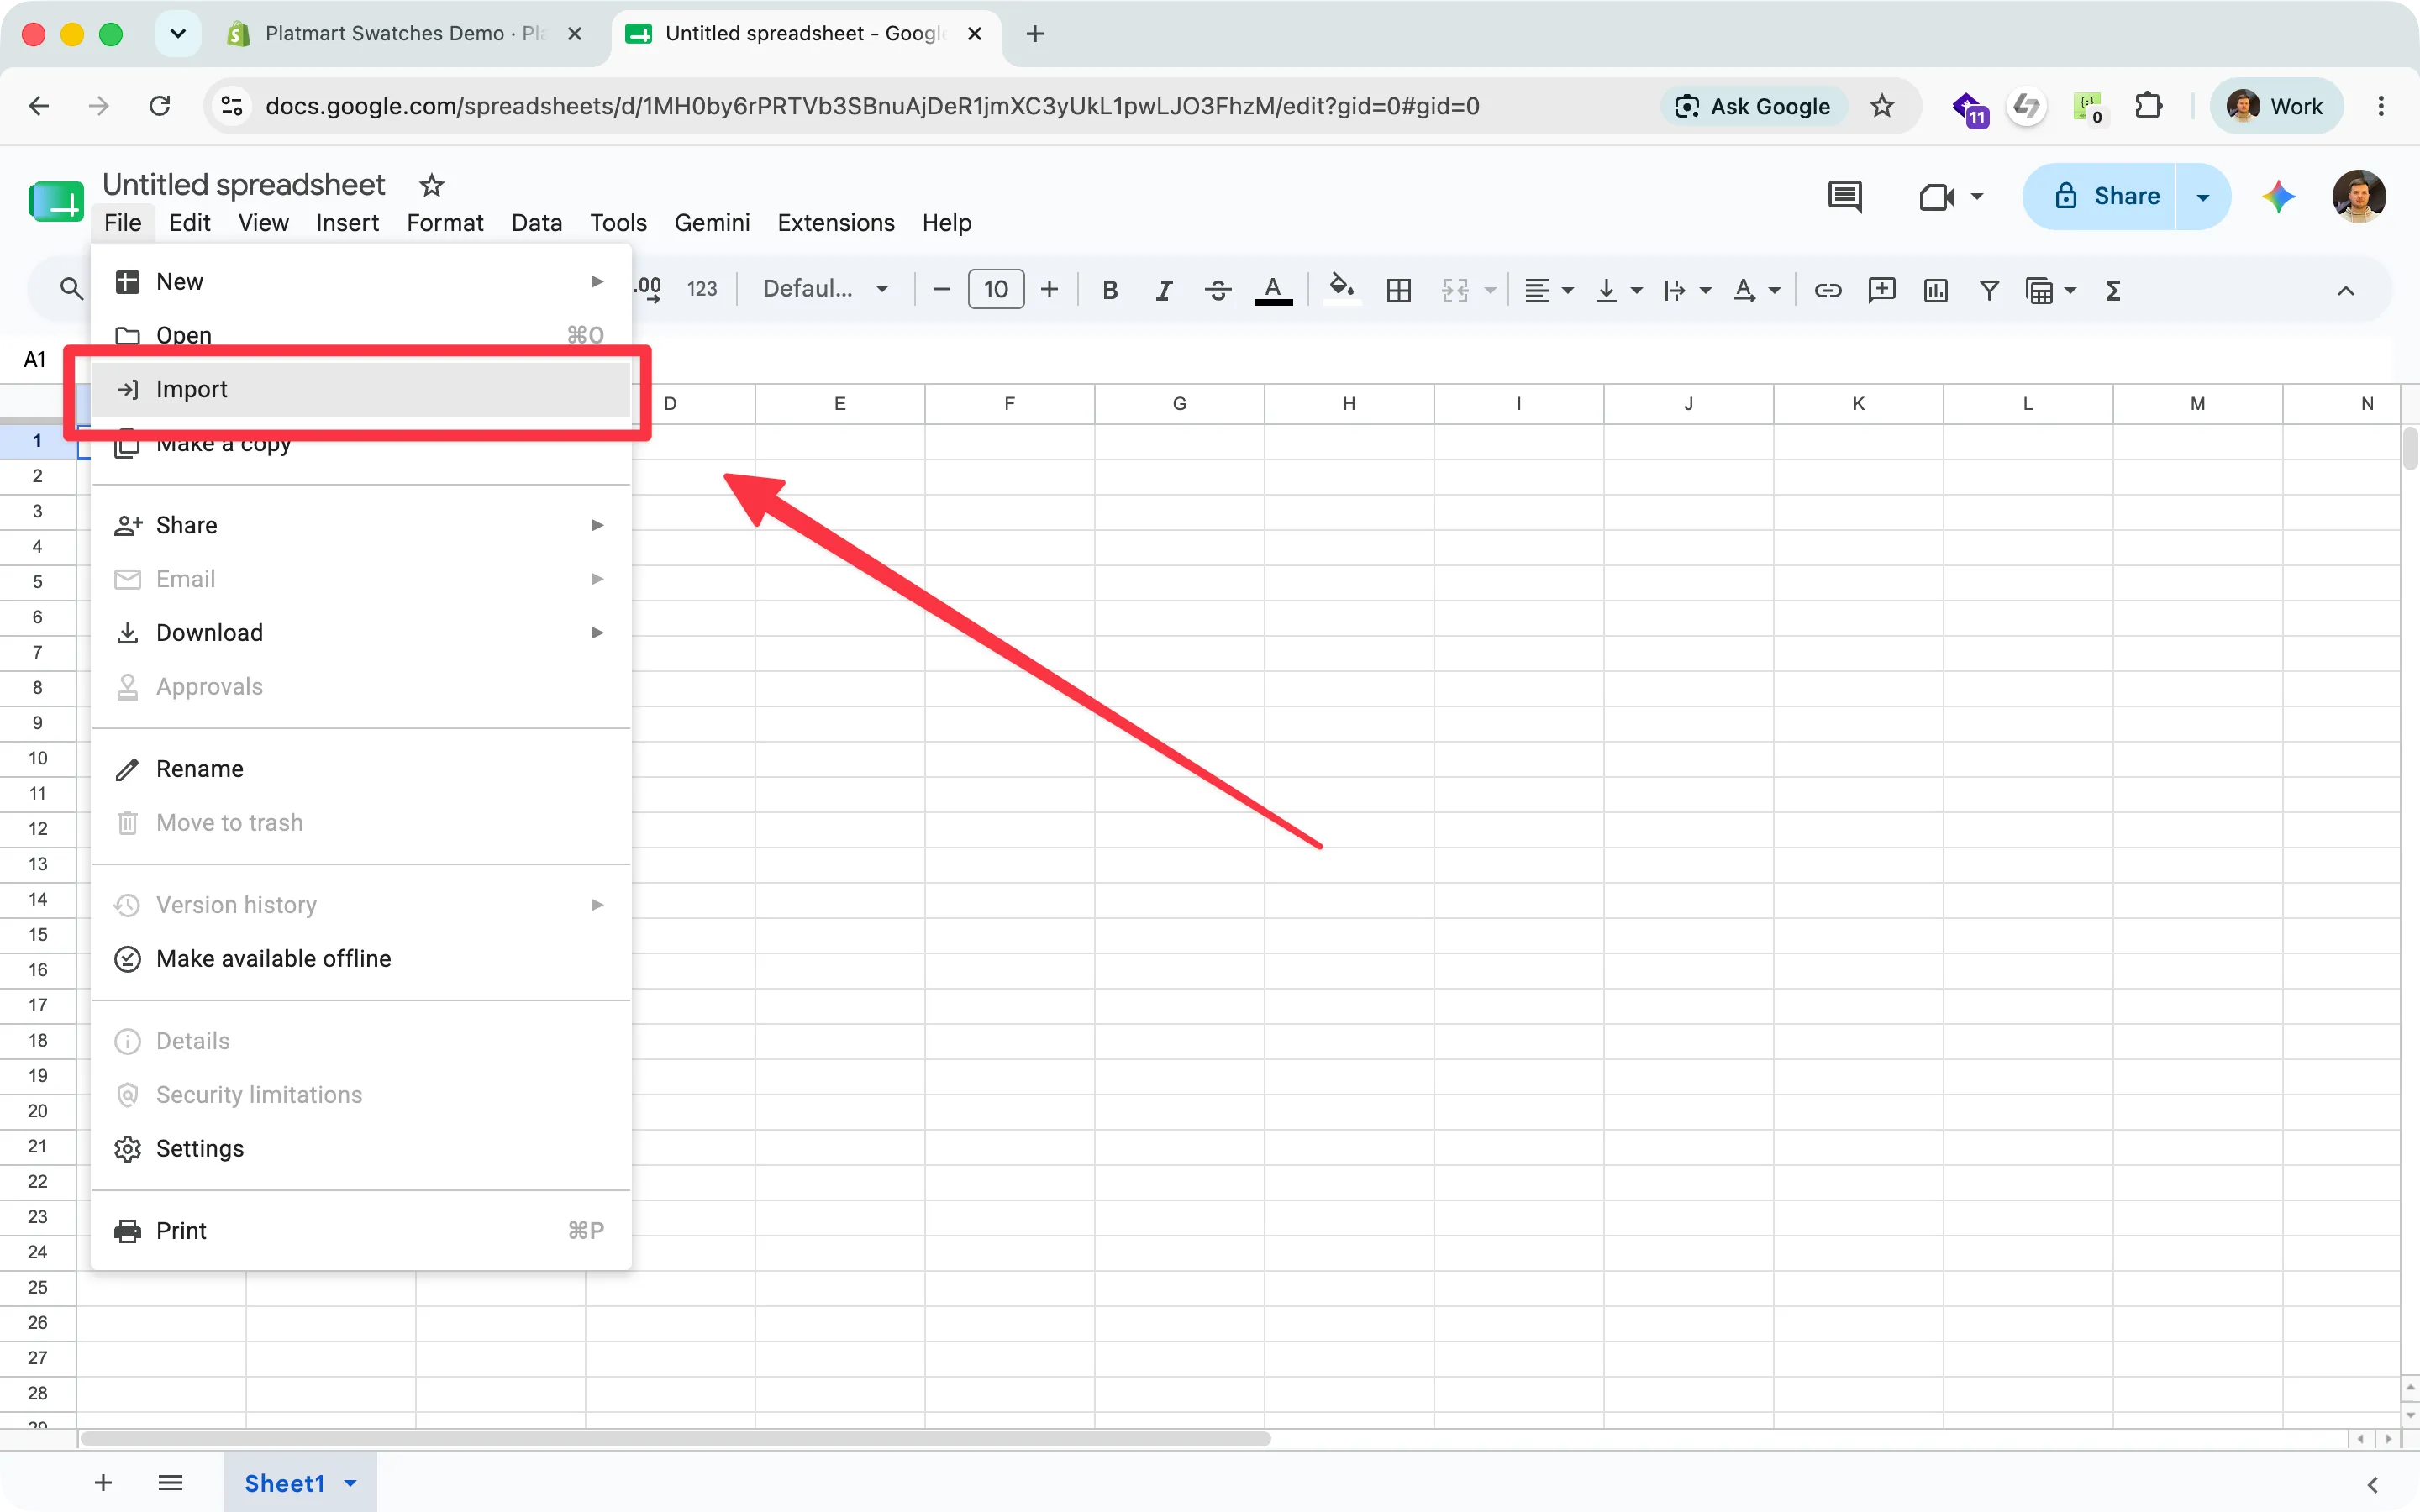
-
Once it opens, go to File > Download > Comma-separated values (.csv).
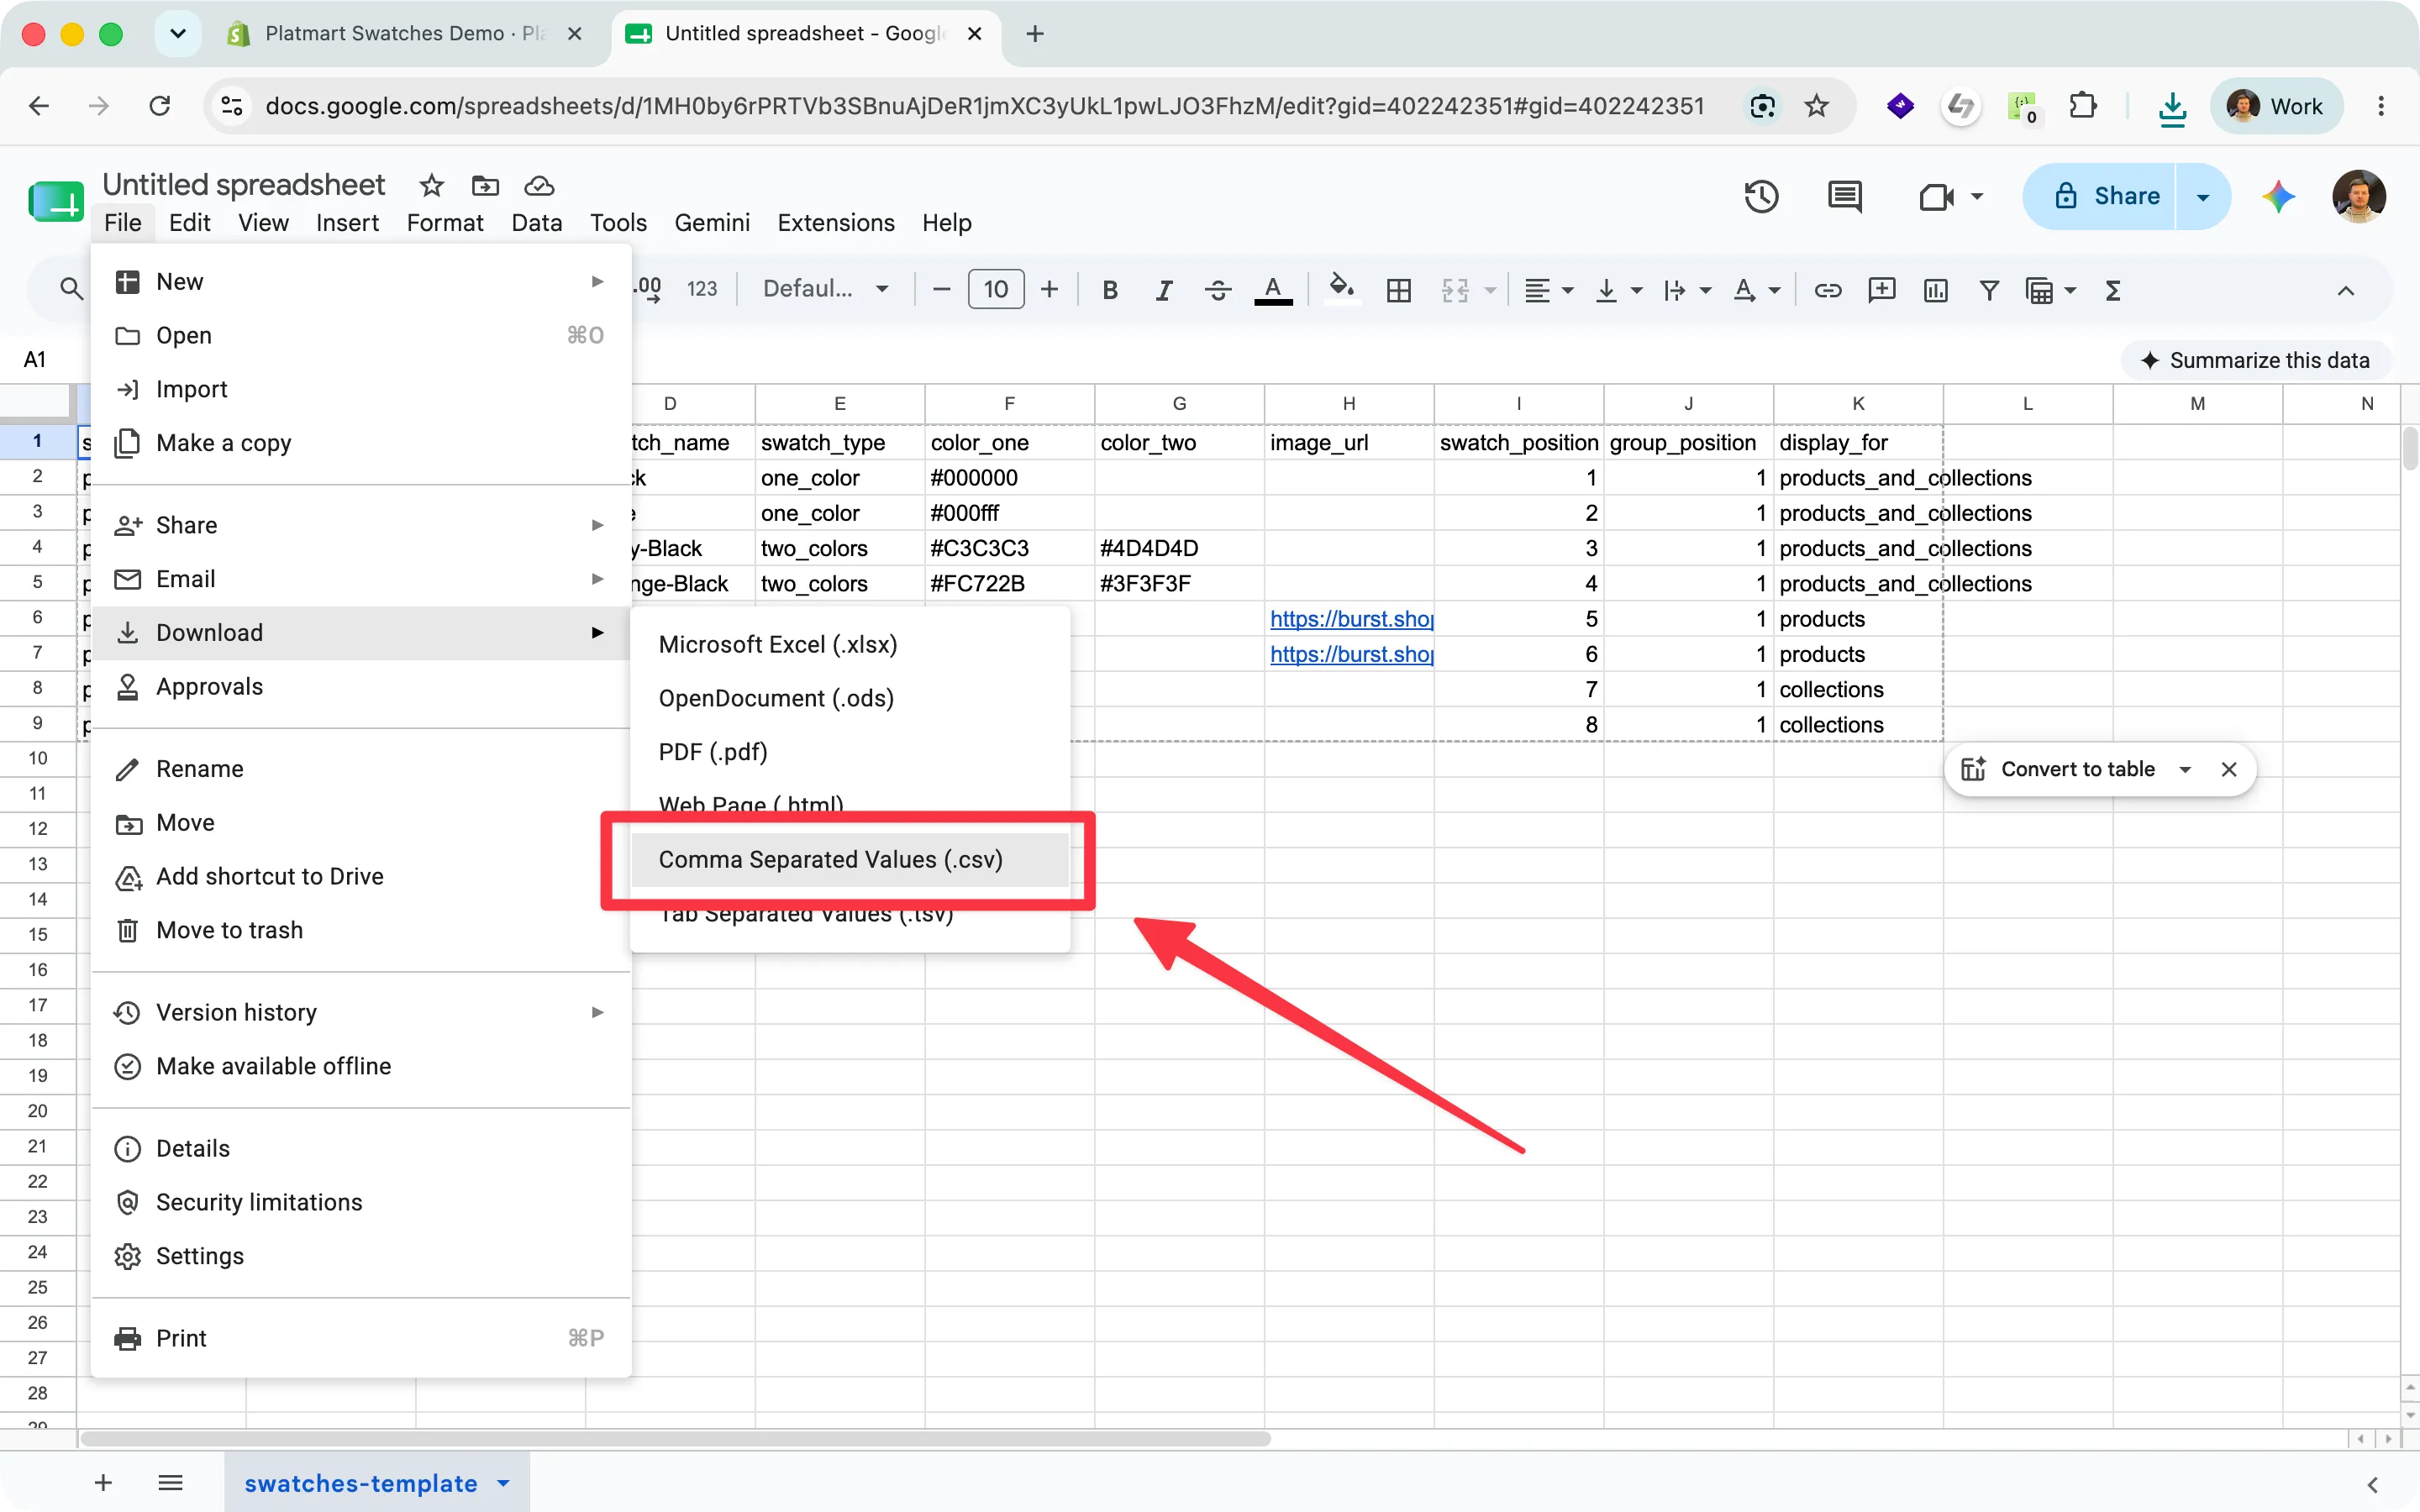
The downloaded file is UTF-8. Import it again following Importing your groups, and the encoding error is gone.
Can I move product groups between stores?
Section titled “Can I move product groups between stores?”Yes. Export from one store and import into the other. The destination store has to contain products with the same handles, because groups link to products by shopify_product_handle.
Can I update existing groups by re-importing?
Section titled “Can I update existing groups by re-importing?”Yes. Importing matches each row to an existing group by group_title and product by shopify_product_handle, so re-importing updates them instead of creating duplicates. To also remove groups that aren’t in the file, use the Advanced remove options.